
Imagick is a native PHP extension to create and modify images using the ImageMagick API. The name causes some confusion as people think that ImageMagick and Imagick are the same thing, however they aren't. You can use ImageMagick without Imagick but you need both Imagick and ImageMagick installed to run it within your PHP code.
You can check with PHP code wheter the Imagick extension is installed or not using:
<?php

if (!extension_loaded('imagick')){
    echo 'imagick not installed';
}
Or just errors in your code that implements Imagick will tell you ... :
Attempted to load class "Imagick" from the global namespace. Did you forget a "use" statement?
Class 'Imagick' not found
In XAMPP for Windows, Imagick isn't built-in, therefore is up to you its installation and implementation. If you have already searched previously how to install Imagick in XAMPP to make it work, and you just can't do it, you're probably out of bounds and you want to kill yourself.
Fortunately, in this article you'll find the definitive installation of Imagick for XAMPP in Windows.
Pre-installation notes
We need to mention that the installation of Imagick is not easy (can be a little confusing) and you may get errors during the installation if you don't follow carefully every step by step. Besides, you need to know the following information about your PHP distribution:
Note: according to the version of XAMPP that you use, these values can vary.
| Name | Default value |
| Architecture | x86 (XAMPP Default) |
| Thread Safety |
Enabled TS: Stands for Thread Safety Enabled NTS: Stands for Thread Safety Disabled |
| Compiler |
MSVC11 (Visual C++ 2012) Some Imagick version are compiled with a different versions e.g VC9, VC11 (in this case), VC14 |
You can get those values with the phpinfo() function of PHP executing this function within an empty script:
<?php

phpinfo();
Once you know the values, these will instruct with files with which architecture you need to download from all the following steps.
Note: don't forget neither to execute every setup with administrator rights.
1. Download and install ImageMagick for Windows
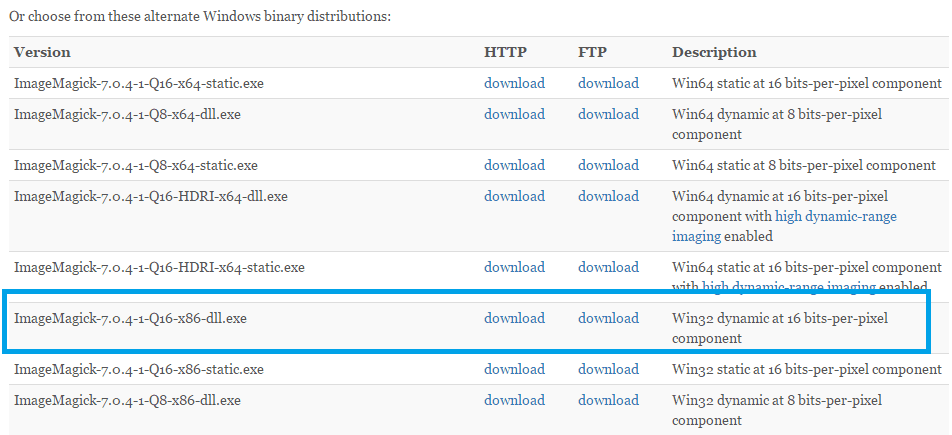
Navigate in your browser to the Downloads area of the website of Imagick and scroll to the Windows zone. ImageMagick runs in almost every version for Windows (from Windows server 2009, XP to Windows 10), now from this list is important to download the latest available version with X86 architecture and DLL version because that's the architecture that XAMPP uses (normally, if not refer to the PHPINFO and download the correct version, e.g ImageMagick-<version>-Q16-x86-dll.exe):
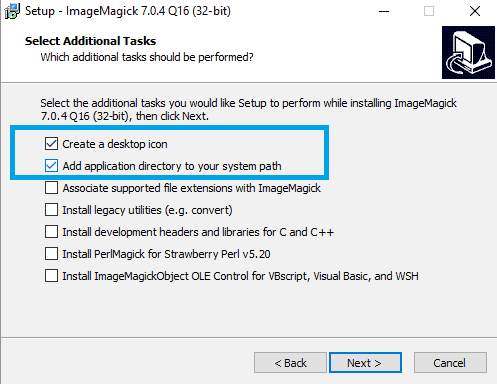
Download the executable and wait. Till the moment, we don't need to configure anything for PHP, just proceed with the installation of Imagick for Windows and don't forget to check the option to add Imagick to the PATH:
Once the setup finishes, you can test Imagick in a new command prompt executing (that should print the version in the console):
magick -version2. Download Imagick for PHP
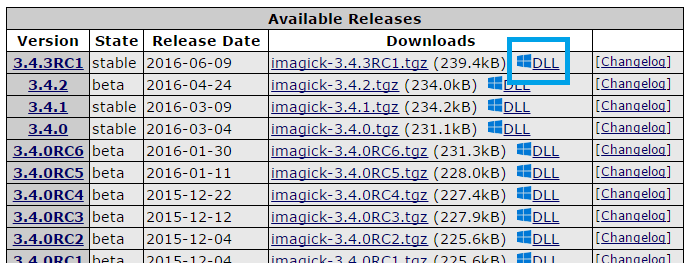
Now navigate to the Imagick package in the PECL website here and select the DLL version from the latest available version (in case you've downloaded an older version of ImageMagick then download a version that accepts your version):
Then a new window will load, in this page scroll to DLL List and click on the right version for your PHP version with correct architecture (of XAMPP not your operative system) and the Thread Safe in case that it's enabled in your distribution (Refer to phpinfo to know wheter your php distribution uses Thread Safe or not):
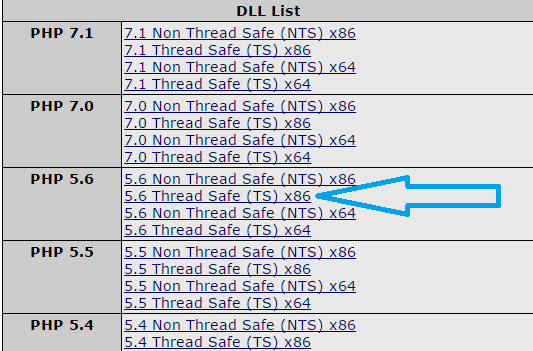
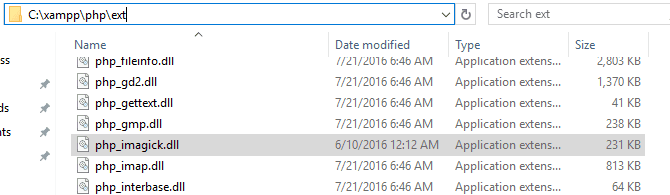
This will start the download of a zip file "php_imagick-<version>-<thread-safe-or-not>-<php-compiled-version>-<architecture>.zip". From this .zip you will need to extract only the php_imagick.dll file. Copy php_imagick.dll file and paste in the php/ext folder inside your xampp installation path (tipically C:\xampp\php\ext):
Then, proceed to enable the extension in your php.ini file by adding the following line:
;;;;;;;;;;;;;;;;;;;;;;
; Dynamic Extensions ;
;;;;;;;;;;;;;;;;;;;;;;
; Add the following line where the other extensions are loaded
extension=php_imagick.dll
Now the extension is loaded, but Imagick still won't work as it won't even be recognized as an extension if you check the phpinfo file because we need to load all the methods and the binaries that you can retrieve from the next step.
3. Download required Imagick binaries
At this point you may be asking to yourself, really dude ? 3 different downloads? The problem with Imagick is that there are a lot of builds from different sources and if you don't download and install the right ones, it wont work or it will be loaded but if you check the Imagick extension (later, not yet) in phpinfo you'll see :
ImageMagick number of supported formats: 0
That's why you need to follow the steps as mentioned, otherwise you won't make Imagick to work. To prevent any implementation error, the binaries needs to come from the same source, in this case windows.php.net. To download the required binaries, navigate to PECL Deps here and search in the list for Imagick:

Download the version that matches with the architecture of xampp and check the compiler version. In this case, we download the third option with a filesize of about 30MB (ImageMagick-6.9.3-7-vc11-x86.zip). Now, extract all the files of this zip in a folder wherever you want, in this case we are going to extract the content of the zip in a folder in the desktop.
Once the content of the file is extracted, open the bin folder and copy all the .dll files (except ImageMagickObject.dll) that would be about 146 files (with prefixes CORE_* and IM_MOD_*) and then paste the copied files into the apache/bin folder of xampp (tipically C:\xampp\apache\bin).
Now start the apache service (or restart it in case it's already running) and go to phpinfo again. Now you should see imagick loaded as an extension:
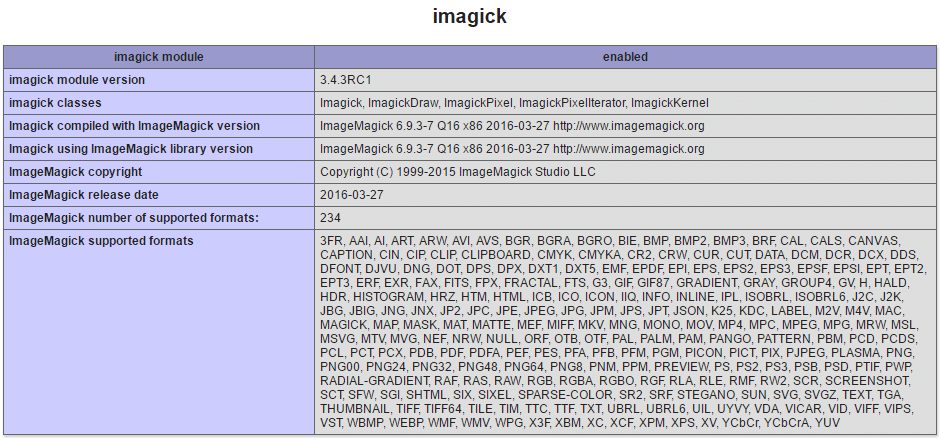
And you can finally after hours of suffering, use Imagick with PHP for XAMPP in Windows.
In case of console error
If after the implementation you still getting the following message error everytime you use PHP (at least in the console):
PHP Warning: PHP Startup: Unable to load dynamic library 'C:\xampp\php\ext\php_imagick.dll' - The specified module could not be found.
You will need to add the bin directory of Apache (C:\xampp\apache\bin) to the PATH environment variable of Windows and the problem will be solved.
Happy coding !

