Obtaining software directly from the source code is a common procedure on Unix computers, and generally involves the following three steps: configuring the makefile, compiling the code, and finally installing the executable to standard locations. In order to work with Node.js in Kali Linux, it's recommendable to follow the mentioned process as it's easier than other solutions.
Although Python is prefered when working with Kali Linux, both of the programming languages (Python and JavaScript) have the same end goals. There is no right or wrong decision for adopting which platform is best suited to you, therefore if you want to work with JavaScript instead of Python don't feel bad about that. Besides, Node can be utilized in the broad range of modules, that means that you can use Python in your Node.JS application and viceversa.
Let's get started with the installation !
Important
"Why should i create my own .deb of Node if i can download it from the website ? ñee, what a stupid post ..." . As you know, Kali Linux is not a normal Linux distribution, therefore the available package publicly in the Node website may not work properly on it. You can try it it if you want, but to guarantee a correct functionality, just follow these steps and you should not have problems later.
1. Verify that you have all the required tools
To create your own .deb package of Node, you will need python and the compiler of c++ "g++". Execute the following command to install the required tools (if they're already installed they should be only updated):
sudo apt-get install python g++ make checkinstall fakerootNote
You may get a warning like "dpkg was interrupted, you must manually run 'sudo dpkg --configure -a' to correct the problem". You just need, as mentioned, execute sudo dpkg --configure -a to solve it and then proceed with the command again.
Besides, if you are unable to install the checkinstall package (happens usually on recent installations of Kali Linux), proceed with the fix mentioned in this article in order to install the package correctly.
2. Create a temporary folder
You should create a temporary folder to generate the .deb package of Node.js. You can create it using mktemp, to make it with a single command execute the following instruction:
src=$(mktemp -d) && cd $srcThe -d argument indicates that mktemp should make a directory instead of a file. In this command we are creating a variable that contains the generated temporary path by mktemp and then switching to that directory in the terminal.
3. Download and extract Node.js
Download the distributable code of Node.js executing the following command in the terminal:
wget -N http://nodejs.org/dist/node-latest.tar.gzOnce the download finishes, extract the content of the tar file with the following command:
tar xzvf node-latest.tar.gz && cd node-v*This should create a folder with the preffix node-v that will vary according to the downloaded version of Node.js.
4. Run configure script
A configure script is an executable script designed to aid in developing a program to be run on a wide number of different computers. It matches the libraries on the user's computer, with those required by the program before compiling it from its source code. Run the configure script with the following command:
./configure5. Create Node .deb package compiling the code
To create our installable package of Node.js we are going to use CheckInstall for it. CheckInstall keeps track of all the files created or modified by your installation script and builds a standard binary package (.deb, .rpm, .tgz). CheckInstall is really useful if you've got a tarball with software that you have to compile (exactly what we're doing in this moment).
To create the package of Node.js execute the following command:
sudo fakeroot checkinstall -y --install=no --pkgversion $(echo $(pwd) | sed -n -re's/.+node-v(.+)$/\1/p') make -j$(($(nproc)+1)) installNote that for most useful actions, checkinstall must be run as root. We'll use fakeroot because as you may know, for security reason, it is a good idea to avoid doing as root everything that could be done as normal user, even if you can run sudo because it is your machine.
The command should start to compile Node.js and it will take a while, so relax, get a cola and wait.
6. Install Node generated package
Once the package is compiled, in the output of the previous step, you should receive a message that specifies the name of the generated .deb package:
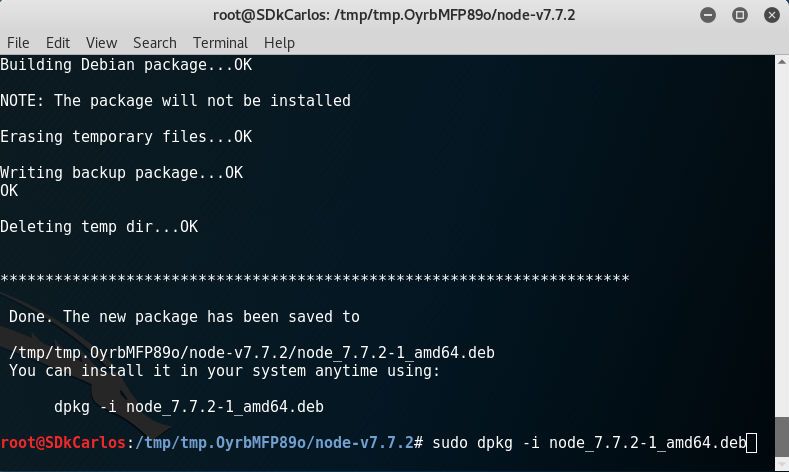
In this case, the name of our package is node_7.7.2-1_amd64.deb, now we just need to install it using dpkg executing the following command:
Note
Remember to replace the value of the i argument with the name of the generated package in the previous step.
sudo dpkg -i [node generated package name.deb]
# Example: sudo dpkg -i node_7.7.2-1_amd64.deb
Wait till the installation finishes and that's it, you can now work with Node.js in Kali Linux without problems. You can verify the version of Node executing the following command in your terminal:
node -vAnd NPM works as well:
npm -vSummary
The next time that you want to install Node.js on your computer, just execute the commands without following the entire tutorial:
# Verify that you have all required tools
sudo apt-get install python g++ make checkinstall fakeroot
# Create tmp dir and switch to it
src=$(mktemp -d) && cd $src
# Download the latest version of Node
wget -N http://nodejs.org/dist/node-latest.tar.gz
# Extract the content of the tar file
tar xzvf node-latest.tar.gz && cd node-v*
# Run configuration
./configure
# Create .deb for Node
sudo fakeroot checkinstall -y --install=no --pkgversion $(echo $(pwd) | sed -n -re's/.+node-v(.+)$/\1/p') make -j$(($(nproc)+1)) install
# Replace [node_*] with the name of the generated .deb package of the previous step
sudo dpkg -i node_*
Happy coding !