
If you were working with PHP frameworks like Symfony or Laravel, you may already know how different (and maybe difficult) is to work with Magento 2. This by itself is not a big problem, the problem is that you are used to tools like the Symfony Profiler or the dev bar of Laravel. If you are kind of nostalgic and would like to implement such a profiler bar in your Magento 2 project we have great news for you, it's possible and it's pretty easy to use thanks to the Shopware Profiler Plugin by Shyim. that implements the Symfony Profiler but configured for Shopware. We are sure that it will become familiar if you have worked with frameworks like Symfony before.
1. Install Magento 2 Dev Toolbar
The toolbar comes with the following tabs that feature:
- Info: Main information about controller, route, action, and store. Search on core config data. Dedicated tab output for local and global phpinfo.
- Design: List handles called and display layout structure of nested blocks and containers
- Profile: View current observers, all events dispatched, collections and models loaded, plugins instantiated
- Queries: Statistics about executed queries and detailed query listing with syntax highlighting of main SQL keywords
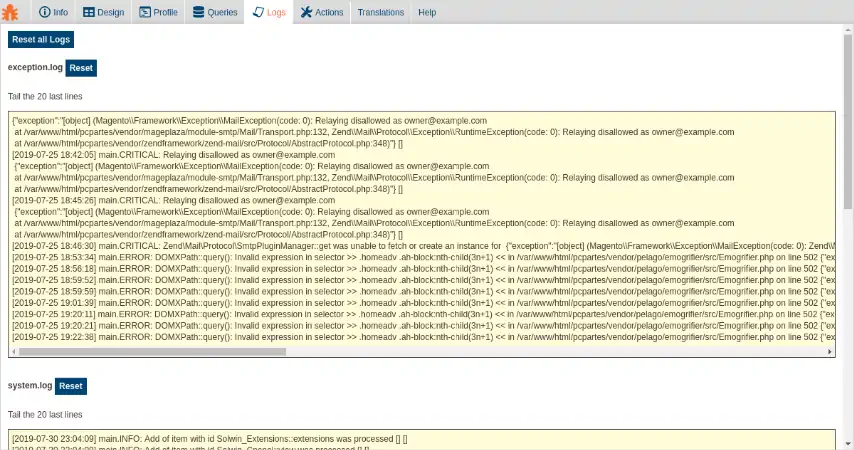
- Logs : Display log files with ability to reset these files
- Translation: Quickly see module, pack, theme, and DB translations
- Actions: Easily toggle template hints and inline translation and flush cache
- Help: Show module version and link to github
The easiest way to install this module is through composer:
composer require vpietri/adm-quickdevbarAfter the download of the module with composer, you will need to enable the module with the following command:
php bin/magento module:enable ADM_QuickDevBarAnd proceed to upgrade the project with the following command:
php bin/magento setup:upgradeIf you enabled one or more modules, then you will need to run magento setup:upgrade to update the database schema. By default, magento setup:upgrade clears compiled code and the cache. For more information about this project, please don't forget to visit the official repository at Github here.
2. Enable Developer Toolbar
Now that the toolbar has been installed, you need to enable it, so you can see it. To enable it, you just need to go to Stores > Configuration > Advanced > Developer > Quick dev bar configuration, here you will find a simple form to configure the bar:
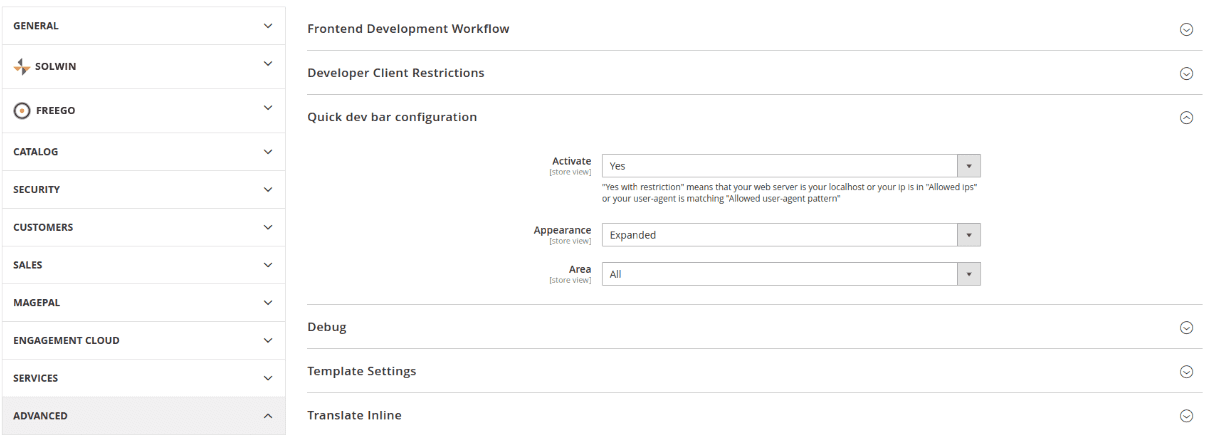
Notice that when you work with this toolbar on your local environment, it will be ok to enable it everywhere and allow the access from anywhere. However, when you work with it in the production environment, be sure to add restrictions of access to the tool. We don't want sensible data to show up on the clients interface isn't? Through the Same route going to Stores > Configuration > Advanced > Developer > Quick dev bar configuration, be sure to set the Activate option to "Yes with restriction":

You will be able to filter the access to the bar either with a regular expression, for example to filter the user agent, or you can filter by IP address as well with a comma separated list.
3. Enable SQL Profiler
In order to enable the SQL Queries tab of the profiler, so you can see and log every single SQL query in the current page, you will need to enable the database profiler. Otherwise in the tab you will only see the following message:

To do this, search for the /app/etc/env.php file and search for the database connection settings. In this key of the returned array on the file, set the profiler property to 1:
<?php
// application/app/etc/env.php

// Note: search for every mentioned key as they should already exist
return [
    'db' => [
        'connection' => [
            'default' => [
                // The profiler property won't exist probably, so be sure to declare it
                // and set it's value to 1
                'profiler' => '1'
            ]
        ]
    ],
];
Save the changes to the file and clear the cache of the project:
php bin/magento cache:clean

php bin/magento cache:flush
This will allow you to see the queries:

Doing this will enable everything you need to work with this toolbar in your Magento project.
Happy coding !

