
On the last days, we needed to implement a WebRTC based videoconference application using PeerJS with Node.js. As mentioned on the official notes of getting started with this technology, most of the times to make applications like this work, you will need a special kind of server that is on charge of relaying the traffic between peers, because sometimes a direct socket is often not possible between the clients (unless they reside on the same local network). This is known as a TURN server, that stands for Traversal Using Relay NAT and is a protocol for relaying network traffic.
As it's quite difficult to find a free TURN server, because there isn't any, we ended up implementing our own STUN/TURN server and we want to share with you how we implemented it. In this tutorial, we'll explain you how to install and configure coturn from scratch to create your own STUN/TURN server in Ubuntu 18.04.
Requirements
In order to succeed with the implementation of this tutorial, you will need obligatorily the following things:
- An Ubuntu server (18.04 in our case).
- Know the public IP of your server, in our case we will use our server public IP 209.126.124.122.
- Own a domain and have access to the DNS manager as you will need to create 2 subdomains (the domain will be
ourcodeworld.comin our case and we have it hosted on goDaddy). - SSL Certificates for the subdomains (preferably a certificate with wildcard e.g
*.ourcodeworld.com). Without the secure protocol, your server implementation won't be completed and after using it on your WebRTC projects with HTTPS it won't work, so be smart and avoid headaches, buy a SSL certificate or get a free one with LetsEncrypt.
Having said that, let's get started with the tutorial!
1. Install coturn
To implement your own STUN/TURN server, we will rely on the Coturn project. Coturn is a free and open-source implementation of a TURN and STUN server for VoIP and WebRTC. This project evolved from rfc5766-turn-server project (https://code.google.com/p/rfc5766-turn-server/). There are many new advanced TURN specs which are going far beyond the original RFC 5766 document. This project takes the code of rfc5766-turn-server as the starter, and adds new advanced features to it.
Before proceeding with the installation of coturn, be sure to update the apt-get repository to its latest version with the following command:
sudo apt-get -y updateThen, install the coturn package with the following command:
sudo apt-get install coturnThis will install the coturn TURN project in your server, a free open source implementation of TURN and STUN server. Be sure to stop the service after installing the package with the following command, as it will be automatically started once the installation finishes:
systemctl stop coturnYou will be able now to follow up the rest of the tutorial. For more information about the coturn project, be sure to visit the official repository at Github to check the documentation.
2. Enable coturn
After the installation, you will need to enable the TURN server in the configuration file of coturn. To do this, uncomment the TURNSERVER_ENABLED property in the /etc/default/coturn file. You can use nano to edit the file from the terminal:
nano /etc/default/coturnBe sure that the content of the file has the property uncommented, just like this:
TURNSERVER_ENABLED=1Save the changes and proceed with the next step.
3. Backup and create configuration file
Now that the turn server is enabled, you need to modify the configuration file according to your needs. Be sure to backup the original configuration file that lists all the possible options of coturn, in case you need to restore in other ocassion. You can use the following command to do that:
# Move the original turnserver configuration file to a backup in the same directory
mv /etc/turnserver.conf /etc/turnserver.conf.original
This will basically rename the file. Then, proceed to create the configuration file in the same directory:
nano /etc/turnserver.confAnd paste the following content on it:
# /etc/turnserver.conf

# STUN server port is 3478 for UDP and TCP, and 5349 for TLS.
# Allow connection on the UDP port 3478
listening-port=3478
# and 5349 for TLS (secure)
tls-listening-port=5349

# Require authentication
fingerprint
lt-cred-mech

# We will use the longterm authentication mechanism, but if
# you want to use the auth-secret mechanism, comment lt-cred-mech and
# uncomment use-auth-secret
# Check: https://github.com/coturn/coturn/issues/180#issuecomment-364363272
#The static auth secret needs to be changed, in this tutorial
# we'll generate a token using OpenSSL
# use-auth-secret
# static-auth-secret=replace-this-secret
# ----
# If you decide to use use-auth-secret, After saving the changes, change the auth-secret using the following command:
# sed -i "s/replace-this-secret/$(openssl rand -hex 32)/" /etc/turnserver.conf
# This will replace the replace-this-secret text on the file with the generated token using openssl.

# Specify the server name and the realm that will be used
# if is your first time configuring, just use the domain as name
server-name=ourcodeworld.com
realm=ourcodeworld.com

# Important:
# Create a test user if you want
# You can remove this user after testing
user=guest:somepassword

total-quota=100
stale-nonce=600

# Path to the SSL certificate and private key. In this example we will use
# the letsencrypt generated certificate files.
cert=/usr/local/psa/var/modules/letsencrypt/etc/live/ourcodeworld.com/cert.pem
pkey=/usr/local/psa/var/modules/letsencrypt/etc/live/ourcodeworld.com/privkey.pem

# Specify the allowed OpenSSL cipher list for TLS/DTLS connections
cipher-list="ECDHE-RSA-AES256-GCM-SHA512:DHE-RSA-AES256-GCM-SHA512:ECDHE-RSA-AES256-GCM-SHA384:DHE-RSA-AES256-GCM-SHA384:ECDHE-RSA-AES256-SHA384"

# Specify the process user and group
proc-user=turnserver
proc-group=turnserver
This basic configuration usually works for most of the needs, however in case that you need to configure something else, be sure to visit the official docs of the configuration properties here. Don't forget that in this case, we included a test user in the file to test the TURN server later, however you are free to remove it and create it later with turnadmin.
Till this point, everything that we need to configure on our server should be done.
4. Create stun/turn DNS records on your DNS manager
As we mentioned at the beginning of the article, you need to own some domain where the STUN/TURN server will be hosted. You will need to create 2 new A records using turn and stun as host respectively pointing to the public IP of your server:

Our registrar is GoDaddy and they offer the DNS management system, so we created them easily with a form. After registering the subdomains and waiting the proper time so they can be found with a DNS lookup, you can proceed with the next step.
5. Create a long term user using turnadmin
Turnadmin comes included in the default package of coturn, this application is a TURN relay administration tool that allows you to manage the users of your turn/stun server. Clients will need credentials in order to connect to your turn server, so you can register them like this:
sudo turnadmin -a -u USERNAME -r REALM -p PASSWORDFor example, to create a test user i would run the following command (username brucewayne, realm ourcodeworld.com and password 12345):
sudo turnadmin -a -u brucewayne -r ourcodeworld.com -p 12345Note that we created previously a single user on the /etc/turnserver.conf file with plain text setting the username as guest and password somepassword.
6. Turn coturn server on
After creating the users and configuring coturn properly, you will be able to start the service so clients can connect to it. Proceed with the initialization of the service with the following command:
systemctl start coturnThis will start the service of coturn in the server. You can check the status of the service with the following command:
systemctl status coturnWhich should output something similar to:

7. Testing TURN/STUN server
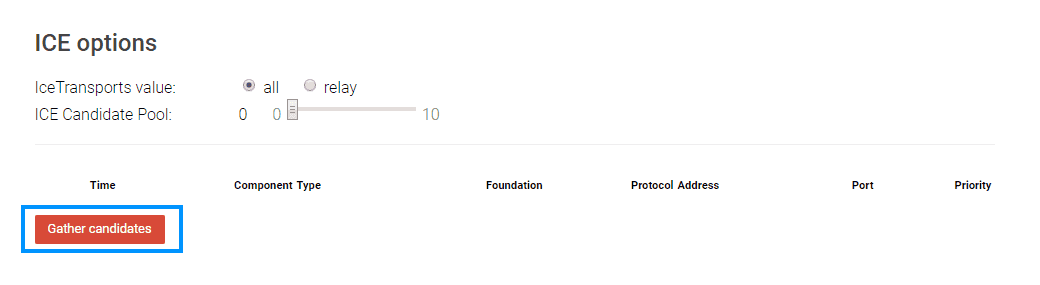
Fortunately, there's an awesome online tool that allows you to check the functionality of STUN/TURN servers. This tool is Trickle ICE, a WebRTC page project that tests the trickle ICE functionality in a regular WebRTC implementation. It creates a PeerConnection with the specified ICEServers (which will contain the information of our recently implemented server), and then starts candidate gathering for a session with a single audio stream. As candidates are gathered, they are displayed in the text box below, along with an indication when candidate gathering is complete.
To get started open the tool website in a new browser tab and start filling the ICE servers form. In the form you will need to provide the STUN or TURN URI respectively with the credentials (only for the TURN server) like this:
stun:stun.ourcodeworld.com:5349

turn:turn.ourcodeworld.com:5349
As you can see the URI's follow the pattern of the protocol:domain:port. The form would be filled like this:

Then on the bottom of the page in the ICE options, run the test pressing the Gather candidates button:
The test should generate something similar to:
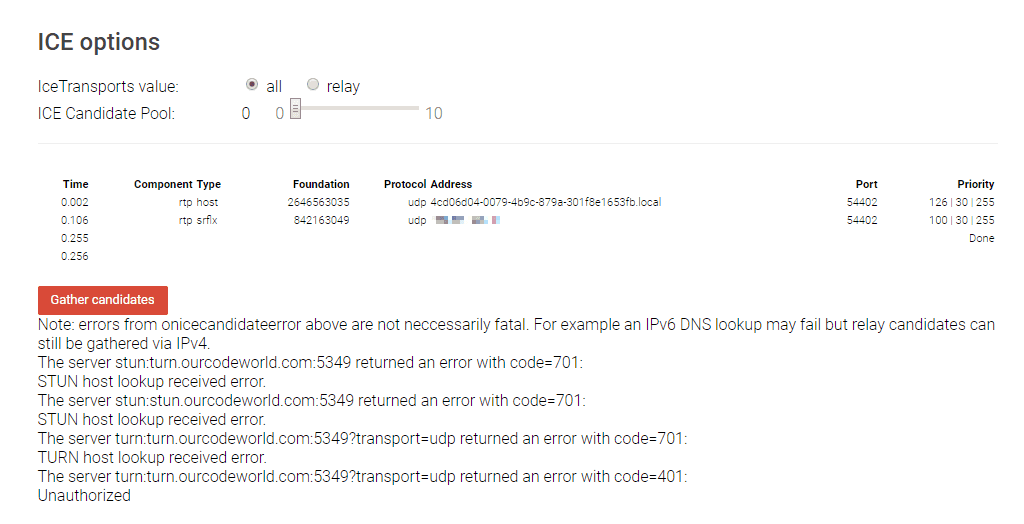
Note that this happens because the tool has a bug on most recent browsers, however as long as you are able to re-run the test pressing Gather candidates again and again (so the gather candidates button doesn't block) everything should be ok with the STUN/TURN server.
Notes
- Be sure that your server has the ports 5349 and 3478 open.
- If you are behind a NAT, for example with an Amazon EC2 instance, be sure to configure the external IP in the configuration file, like mentioned on this question in Stack Overflow.
Happy coding ❤️!

