
A Scheduler is a component that you can't miss on a Software Product for a company. With the scheduler, an enterprise (or a normal person) would be able to schedule and track appointments, events, task and another things. As shown in our Top 5 : Best , dhtmlx scheduler is one of the best scheduler JavaScript libraries that allows you to implement such a feature in your application. dhtmlxScheduler is a Google-like JS event calendar with a wide range of views and features. It has a clean UI and customizable appearance.
In this article you will learn how to create your own custom Event Calendar (scheduler) in the frontend and backend with Symfony and dhtmlxscheduler.
Requirements
To create your own Scheduler, you will need to prepare the following libraries in your project. We'll describe what we need from them and if you aren't able to include them (excluding dhtmlx scheduler as it's obviously necessary) you can write your own fallback:
A. dhtmlx Scheduler
You will need a copy of the dhtmlx scheduler library (.zip file). This library offers 2 versions, the Open Source version (Standard Edition) where you are at your own by reading the documentation of the library on the official website or the Paid version (Pro Edition) where you receive support and a commercial license.
From the source zip file, you will need only the JavaScript code as the backend will be implemented totally with Symfony. This scheduler is very flexible and you can customize many things in the way you want, we recommend you to read the documentation too. You can download any of the mentioned versions here.
The first you need to do, once you have the zip file, is to create a directory where to save the library. In this article, we'll create the libraries folder at the /web directory of the Symfony application. So the source JavaScript will be accesible at yourapplication/web/libraries/dhtmlx. We won't mess up the original structure of the downloaded zip file, so you will have in this case the folders codebase and samples inside dhtmlx that you can use to checkout the examples to make your scheduler besser later.
B. Moment.js
The JavaScript main file of Moment.js will need to be accesible at yourapplication/web/libraries/momentjs. If you don't want to use the MomentJS library to format our date where we need it (step 4), you can create a fallback by replacing the getFormatedEvent with the following code:
// Retrieve the format date method (that follows the given pattern) from the scheduler library
var formatDate = scheduler.date.date_to_str("%d-%m-%Y %H:%i:%s");

/**
 * Returns an Object with the desired structure of the server.
 *
 * @param {*} id
 * @param {*} useJavascriptDate
 */
function getFormatedEvent(id, useJavascriptDate){
    var event;

    // If id is already an event object, use it and don't search for it
    if(typeof(id) == "object"){
        event = id;
    }else{
        event = scheduler.getEvent(parseInt(id));
    }

    if(!event){
        console.error("The ID of the event doesn't exist: " + id);
        return false;
    }

    var start , end;

    if(useJavascriptDate){
        start = event.start_date;
        end = event.end_date;
    }else{
        start = formatDate(event.start_date);
        end = formatDate(event.end_date);
    }

    return {
        id: event.id,
        start_date : start,
        end_date : end,
        description : event.description,
        title : event.text
    };
}
C. jQuery or any other custom related AJAX Library
We'll use jQuery AJAX to submit our appointments in the view. Alternatively, you can write your own plain XMLHttpRequest code to submit the data to your server asynchronously with JavaScript or in case you don't want jQuery but other library, minAjax is pretty useful and works in the same way that jQuery does.
1. Implement Appointment Entity
Note
If you already have some custom table design for your "appointments", then skip this step and follow the structure of the controller on step 2.
With the scheduler you will be able to schedule events graphically in the client side, however they need to be stored in some database for your user too. This can be achieved with the communication with AJAX between the client and the server.
The goal of this example will be to persist some Appointment class to a database (MySql, MongoDB, CouchDB, etc). Your first job, then, is to create the Appointment class for your application. This class can look and act as you want, so add any properties or methods you find useful. In this example our Entity will be generated from the following table namely appointments. The appointments table on your database will have 5 fields namely id (autoincrement not null), title (text column), description (text column), start_date (datetime column) and end_date (datetime column):
CREATE TABLE `YourExistentTable`.`appointments`
  (
     `id`          BIGINT NOT NULL auto_increment,
     `title`       VARCHAR(255) NOT NULL,
     `description` TEXT NULL,
     `start_date`  DATETIME NOT NULL,
     `end_date`    DATETIME NOT NULL,
     PRIMARY KEY (`id`)
  )
engine = innodb;
According to the way you work, you may follow the process to generate the orm files and the entity manually or from your database. If you are generating the entity from an existing database, you may now run the following command to generate the ORM files:
php bin/console doctrine:mapping:import --force AppBundle ymlThat will generate our ORM file for the Appointment table with the following result at AppBundle/Resources/config/doctrine/Appointments.orm.yml:
AppBundle\Entity\Appointments:
    type: entity
    table: appointments
    id:
        id:
            type: bigint
            nullable: false
            options:
                unsigned: false
            id: true
            generator:
                strategy: IDENTITY
    fields:
        title:
            type: string
            nullable: false
            length: 255
            options:
                fixed: false
        description:
            type: text
            nullable: true
            length: 65535
            options:
                fixed: false
        startDate:
            type: datetime
            nullable: false
            column: start_date
        endDate:
            type: datetime
            nullable: false
            column: end_date
    lifecycleCallbacks: {  }
Then once the orm file exists, you can generate automatically the Appointments Entity using:
php bin/console doctrine:generate:entities AppBundleThe generated entity at AppBundle/Entity/Appointments will look like:
<?php

namespace AppBundle\Entity;

/**
 * Appointments
 */
class Appointments
{
    /**
     * @var integer
     */
    private $id;

    /**
     * @var string
     */
    private $title;

    /**
     * @var string
     */
    private $description;

    /**
     * @var \DateTime
     */
    private $startDate;

    /**
     * @var \DateTime
     */
    private $endDate;


    /**
     * Get id
     *
     * @return integer
     */
    public function getId()
    {
        return $this->id;
    }

    /**
     * Set title
     *
     * @param string $title
     *
     * @return Appointments
     */
    public function setTitle($title)
    {
        $this->title = $title;

        return $this;
    }

    /**
     * Get title
     *
     * @return string
     */
    public function getTitle()
    {
        return $this->title;
    }

    /**
     * Set description
     *
     * @param string $description
     *
     * @return Appointments
     */
    public function setDescription($description)
    {
        $this->description = $description;

        return $this;
    }

    /**
     * Get description
     *
     * @return string
     */
    public function getDescription()
    {
        return $this->description;
    }

    /**
     * Set startDate
     *
     * @param \DateTime $startDate
     *
     * @return Appointments
     */
    public function setStartDate($startDate)
    {
        $this->startDate = $startDate;

        return $this;
    }

    /**
     * Get startDate
     *
     * @return \DateTime
     */
    public function getStartDate()
    {
        return $this->startDate;
    }

    /**
     * Set endDate
     *
     * @param \DateTime $endDate
     *
     * @return Appointments
     */
    public function setEndDate($endDate)
    {
        $this->endDate = $endDate;

        return $this;
    }

    /**
     * Get endDate
     *
     * @return \DateTime
     */
    public function getEndDate()
    {
        return $this->endDate;
    }
}
Now the Appointments Entity can be persisted on the database. If you don't have an existent design to store the register on the database, you are free to modify the fields as you need.
2. Implement Scheduler Controller and Routes
The controller for the scheduler will have only 4 routes. The routes that we'll define should be accesible at the /scheduler route of your project, so modify the main routing.yml file of your Symfony project and register another routing file that handles the routes for the scheduler:
# Create route for scheduler in your app
app_scheduler:
    resource: "@AppBundle/Resources/config/routing/scheduler.yml"
    prefix:   /scheduler
Note that we'll store the new routing file in the config/routing folder of the main bundle. The scheduler.yml routing file is the following:
# app/config/routing.yml
scheduler_index:
    path:      /
    defaults:  { _controller: AppBundle:Scheduler:index }
    methods:  [GET]

scheduler_create:
    path:      /appointment-create
    defaults:  { _controller: AppBundle:Scheduler:create }
    methods:  [POST]

scheduler_update:
    path:      /appointment-update
    defaults:  { _controller: AppBundle:Scheduler:update }
    methods:  [POST]

scheduler_delete:
    path:      /appointment-delete
    defaults:  { _controller: AppBundle:Scheduler:delete }
    methods:  [DELETE]
Every route is handled by a function in the Scheduler Controller located in the AppBundle (that we'll create now). 3 of them only will be used to create, delete and modify the appointments via AJAX. The index route (yourwebsite/scheduler) will render the Scheduler in the browser.
Now that the routes are registered, you will need to create the controller that handle the routes and the logic on every one of them. As the logic may vary according to the way you handle the entities, the following controller shows how to handle every event by working with the Appointment entity. All the responses are given in JSON format (except the index) to provide information about the status of the action:
<?php

namespace AppBundle\Controller;

use Symfony\Bundle\FrameworkBundle\Controller\Controller;

// Include the used classes as JsonResponse and the Request object
use Symfony\Component\HttpFoundation\JsonResponse;
use Symfony\Component\HttpFoundation\Request;

// The entity of your Appointment
use AppBundle\Entity\Appointments as Appointment;

class SchedulerController extends Controller
{
    /**
     * View that renders the scheduler.
     *
     */
    public function indexAction()
    {
        // Retrieve entity manager
        $em = $this->getDoctrine()->getManager();

        // Get repository of appointments
        $repositoryAppointments = $em->getRepository("AppBundle:Appointments");

        // Note that you may want to filter the appointments that you want to send
        // by dates or something, otherwise you will send all the appointments to render
        $appointments = $repositoryAppointments->findAll();

        // Generate JSON structure from the appointments to render in the start scheduler.
        $formatedAppointments = $this->formatAppointmentsToJson($appointments);

        // Render scheduler
        return $this->render("default/scheduler.html.twig", [
            'appointments' => $formatedAppointments
        ]);
    }

    /**
     * Handle the creation of an appointment.
     *
     */
    public function createAction(Request $request){
        $em = $this->getDoctrine()->getManager();
        $repositoryAppointments = $em->getRepository("AppBundle:Appointments");

        // Use the same format used by Moment.js in the view
        $format = "d-m-Y H:i:s";

        // Create appointment entity and set fields values
        $appointment = new Appointment();
        $appointment->setTitle($request->request->get("title"));
        $appointment->setDescription($request->request->get("description"));
        $appointment->setStartDate(
            \DateTime::createFromFormat($format, $request->request->get("start_date"))
        );
        $appointment->setEndDate(
            \DateTime::createFromFormat($format, $request->request->get("end_date"))
        );

        // Create appointment
        $em->persist($appointment);
        $em->flush();

        return new JsonResponse(array(
            "status" => "success"
        ));
    }

    /**
     * Handle the update of the appointments.
     *
     */
    public function updateAction(Request $request){
        $em = $this->getDoctrine()->getManager();
        $repositoryAppointments = $em->getRepository("AppBundle:Appointments");

        $appointmentId = $request->request->get("id");

        $appointment = $repositoryAppointments->find($appointmentId);

        if(!$appointment){
            return new JsonResponse(array(
                "status" => "error",
                "message" => "The appointment to update $appointmentId doesn't exist."
            ));
        }

        // Use the same format used by Moment.js in the view
        $format = "d-m-Y H:i:s";

        // Update fields of the appointment
        $appointment->setTitle($request->request->get("title"));
        $appointment->setDescription($request->request->get("description"));
        $appointment->setStartDate(
            \DateTime::createFromFormat($format, $request->request->get("start_date"))
        );
        $appointment->setEndDate(
            \DateTime::createFromFormat($format, $request->request->get("end_date"))
        );

        // Update appointment
        $em->persist($appointment);
        $em->flush();

        return new JsonResponse(array(
            "status" => "success"
        ));
    }

    /**
     * Deletes an appointment from the database
     *
     */
    public function deleteAction(Request $request){
        $em = $this->getDoctrine()->getManager();
        $repositoryAppointments = $em->getRepository("AppBundle:Appointments");

        $appointmentId = $request->request->get("id");

        $appointment = $repositoryAppointments->find($appointmentId);

        if(!$appointment){
            return new JsonResponse(array(
                "status" => "error",
                "message" => "The given appointment $appointmentId doesn't exist."
            ));
        }

        // Remove appointment from database !
        $em->remove($appointment);
        $em->flush();

        return new JsonResponse(array(
            "status" => "success"
        ));
    }


    /**
     * Returns a JSON string from a group of appointments that will be rendered on the calendar.
     * You can use a serializer library if you want.
     *
     * The dates need to follow the format d-m-Y H:i e.g : "13-07-2017 09:00"
     *
     *
     * @param $appointments
     */
    private function formatAppointmentsToJson($appointments){
        $formatedAppointments = array();

        foreach($appointments as $appointment){
            array_push($formatedAppointments, array(
                "id" => $appointment->getId(),
                "description" => $appointment->getDescription(),
                // Is important to keep the start_date, end_date and text with the same key
                // for the JavaScript area
                // altough the getter could be different e.g:
                // "start_date" => $appointment->getBeginDate();
                "text" => $appointment->getTitle(),
                "start_date" => $appointment->getStartDate()->format("Y-m-d H:i"),
                "end_date" => $appointment->getEndDate()->format("Y-m-d H:i")
            ));
        }

        return json_encode($formatedAppointments);
    }
}
As the dhtmlx scheduler requires the start_date, end_date and text keys in an event, you will need to provide them on every event, this means that you can't change their name.
3. Implement Layout and Scripts Structure
Now that the server side logic is ready, you can proceed to create the layout of your application. In this case we'll render a fullscreen Scheduler.
We'll use the following base file for our layout in Twig (base.html.twig):
{# application/resources/views/base.html.twig #}
<!DOCTYPE html>
<html>
    <head>
        <meta charset="UTF-8" />
        <title>{% block title %}Welcome!{% endblock %}</title>
        {% block stylesheets %}{% endblock %}
    </head>
    <body>
        {% block body %}{% endblock %}
        {% block javascripts %}{% endblock %}
    </body>
</html>
As your project may follow another schema, be sure to include the content that we'll add in the respective block of yours.
Then, as defined in our controller, our scheduler.html.twig file will be located in the directory app/resources/views/default, so be sure to create it in the mentioned path (or change it in the controller). The layout of the scheduler will look like this:
{# default/scheduler.html.twig #}
{% extends "base.html.twig" %}
{% block stylesheets %}
<!-- Include the flat style of the scheduler -->
<link rel='stylesheet' type='text/css' href='{{ asset("libraries/dhtmlx/codebase/dhtmlxscheduler_flat.css") }}' charset="utf-8"/>
<!-- If you won't use full screen mode, ignore the following style -->
<style type="text/css" media="screen">
html, body{
margin:0px;
padding:0px;
height:100%;
overflow:hidden;
}
</style>
{% endblock %}
{% block body -%}
<div id="scheduler_element" class="dhx_cal_container" style='width:100%; height:100%;'>
<div class="dhx_cal_navline">
<div class="dhx_cal_prev_button"> </div>
<div class="dhx_cal_next_button"> </div>
<div class="dhx_cal_today_button"></div>
<div class="dhx_cal_date"></div>
<div class="dhx_cal_tab" name="day_tab" style="right:204px;"></div>
<div class="dhx_cal_tab" name="week_tab" style="right:140px;"></div>
<div class="dhx_cal_tab" name="month_tab" style="right:76px;"></div>
</div>
<div class="dhx_cal_header"></div>
<div class="dhx_cal_data"></div>
</div>
{% endblock %}
{% block javascripts %}
<!-- Include the scheduler library -->
<script src='{{ asset("libraries/dhtmlx/codebase/dhtmlxscheduler.js") }}' type='text/javascript' charset="utf-8"></script>
<!-- Include jQuery to handle AJAX Requests -->
<script src="https://cdnjs.cloudflare.com/ajax/libs/jquery/3.2.1/jquery.min.js"></script>
<!-- Include Momentjs to play with the dates -->
<script src="{{ asset("libraries/momentjs/moment.js") }}"></script>
<script>
// Expose the appointments globally by printing the JSON string with twig and the raw filter
// so they can be accesible by the schedulerScripts.js the controller
window.GLOBAL_APPOINTMENTS = {{ appointments|raw }};
// As the scheduler scripts will be in other files, the routes generated by twig
// should be exposed in the window too
window.GLOBAL_SCHEDULER_ROUTES = {
create: '{{ path("scheduler_create") }}',
update: '{{ path("scheduler_update") }}',
delete: '{{ path("scheduler_delete") }}'
};
</script>
<!-- Include the schedulerScripts that you will need to write in the next step -->
<script src='{{ asset("libraries/schedulerScripts.js") }}' type='text/javascript' charset="utf-8"></script>
{% endblock %}It includes in the stylesheets block the flat style of the Scheduler and some rules to make it look good on fullscreen mode. Then in the block body, the required markup for the Scheduler and in the JavaScripts block, we'll include in the following order the libraries: dhtmlxscheduler, jQuery for AJAX, MomentJS to manipulate dates easily.
The raw script tag, declares 2 variables in the window (global) namely GLOBAL_APPOINTMENTS and GLOBAL_SCHEDULER_ROUTES. The appointments object stores the Appointments from the index view (see index controller for more info) as JSON format (but interpreted as object in JS), therefore we need to use the raw filter of Twig. The routes object stores the routes generated by Twig that will be used to update,create and delete the appointments. As the logic to handle the scheduler will be written in another JavaScript file, we can't use twig inside, so it's recommendable to generate them where twig is available and then access them on the files with the window.
Now we are going to write the content of schedulerScripts.js file which will contain the code to handle the scheduler logic in the view.
4. Write Client Side Logic
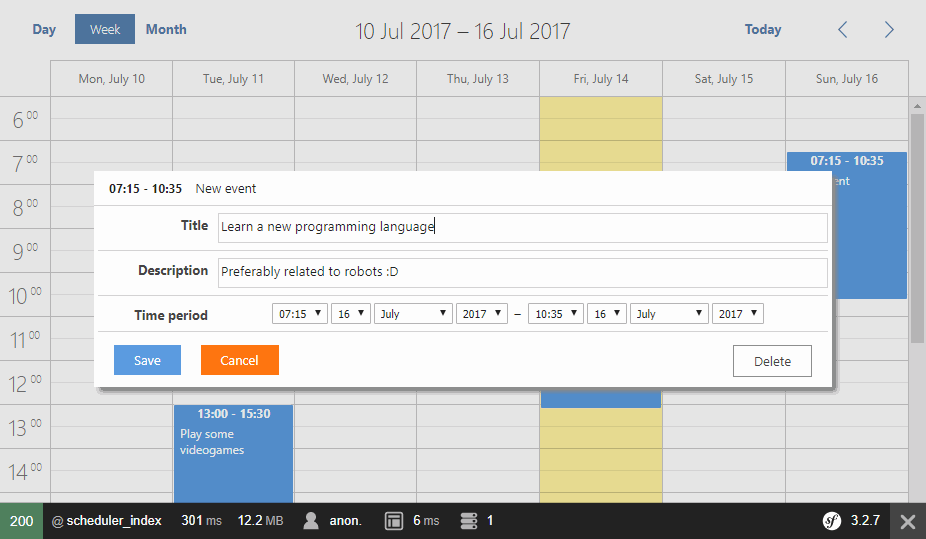
For our Scheduler, we'll allow the user to create appointments on the calendar with the help of a dialog, namely the default Lightbox of dhtmlx scheduler. The first you need to do is to configure the default behaviour of your scheduler by modifying the config object of scheduler. At least you need to provide the xml_date format, the rest are purely optional.
Then configure the sections of the form to insert and edit the appointments. In this case as we only have 2 fields, namely Title and Description, the title will map to the default text field of Scheduler. The default fields of time and text need to exist on the lightbox, the time specifies automatically the start and end fields. Then proceed to initialize the scheduler in some mode (day, week or month) in a DIV element and optionally specify the date where the scheduler should start. Then parse the events returned from the index controller (all the appointments stored on the window.GLOBAL_APPOINTMENTS array. As last you can attach the events to handle what the user does with the Scheduler.
The code of schedulerScripts.js will be the following:
// 1. Configure Scheduler Basic Settings
scheduler.config.xml_date="%Y-%m-%d %H:%i";
scheduler.config.first_hour = 6;
scheduler.config.last_hour = 24;
scheduler.config.limit_time_select = true;
scheduler.config.details_on_create = true;
// Disable event edition with single click
scheduler.config.select = false;
scheduler.config.details_on_dblclick = true;
scheduler.config.max_month_events = 5;
scheduler.config.resize_month_events = true;

// 2. Configure Lightbox (form) sections
scheduler.config.lightbox.sections = [
    // If you have another field on your Appointment entity (e.g example_field column), you would add it like
    // {name:"Example Field", height:30, map_to:"example_field", type:"textarea"},
    {name:"Title", height:30, map_to:"text", type:"textarea"},
    {name:"Description", height:30, map_to:"description", type:"textarea"},
    {name:"time", height:72, type:"time", map_to:"auto"}
];

// 3. Start calendar with custom settings
var initSettings = {
    // Element where the scheduler will be started
    elementId: "scheduler_element",
    // Date object where the scheduler should be started
    startDate: new Date(),
    // Start mode
    mode: "week"
};

scheduler.init(initSettings.elementId, initSettings.startDate , initSettings.mode);

// 4. Parse the initial (From index controller) appointments
scheduler.parse(window.GLOBAL_APPOINTMENTS, "json");

// 5. Function that formats the events to the expected format in the server side

/**
 * Returns an Object with the desired structure of the server.
 *
 * @param {*} id
 * @param {*} useJavascriptDate
 */
function getFormatedEvent(id, useJavascriptDate){
    var event;

    // If id is already an event object, use it and don't search for it
    if(typeof(id) == "object"){
        event = id;
    }else{
        event = scheduler.getEvent(parseInt(id));
    }

    if(!event){
        console.error("The ID of the event doesn't exist: " + id);
        return false;
    }

    var start , end;

    if(useJavascriptDate){
        start = event.start_date;
        end = event.end_date;
    }else{
        start = moment(event.start_date).format('DD-MM-YYYY HH:mm:ss');
        end = moment(event.end_date).format('DD-MM-YYYY HH:mm:ss');
    }

    return {
        id: event.id,
        start_date : start,
        end_date : end,
        description : event.description,
        title : event.text
    };
}

// 6. Attach Event Handlers !

/**
 * Handle the CREATE scheduler event
 */
scheduler.attachEvent("onEventAdded", function(id,ev){
    var schedulerState = scheduler.getState();

    $.ajax({
        url:  window.GLOBAL_SCHEDULER_ROUTES.create,
        data: getFormatedEvent(ev),
        dataType: "json",
        type: "POST",
        success: function(response){
            // Very important:
            // Update the ID of the scheduler appointment with the ID of the database
            // so we can edit the same appointment now !

            scheduler.changeEventId(ev.id , response.id);

            alert('The appointment '+ev.text+ " has been succesfully created");
        },
        error:function(error){
            alert('Error: The appointment '+ev.text+' couldnt be created');
            console.log(error);
        }
    });
});

/**
 * Handle the UPDATE event of the scheduler on all possible cases (drag and drop, resize etc..)
 *
 */
scheduler.attachEvent("onEventChanged", function(id,ev){
    $.ajax({
        url:  window.GLOBAL_SCHEDULER_ROUTES.update,
        data: getFormatedEvent(ev),
        dataType: "json",
        type: "POST",
        success: function(response){
            if(response.status == "success"){
                alert("Event succesfully updated !");
            }
        },
        error: function(err){
            alert("Error: Cannot save changes");
            console.error(err);
        }
    });

    return true;
});

/**
 * Handle the DELETE appointment event
 */
scheduler.attachEvent("onConfirmedBeforeEventDelete",function(id,ev){
    $.ajax({
        url: window.GLOBAL_SCHEDULER_ROUTES.delete,
        data:{
            id: id
        },
        dataType: "json",
        type: "DELETE",
        success: function(response){
            if(response.status == "success"){
                if(!ev.willDeleted){
                    alert("Appointment succesfully deleted");
                }
            }else if(response.status == "error"){
                alert("Error: Cannot delete appointment");
            }
        },
        error:function(error){
            alert("Error: Cannot delete appointment: " + ev.text);
            console.log(error);
        }
    });

    return true;
});


/**
 * Edit event with the right click too
 *
 * @param {type} id
 * @param {type} ev
 * @returns {Boolean}
 */
scheduler.attachEvent("onContextMenu", function (id, e){
    scheduler.showLightbox(id);
    e.preventDefault();
});
Finally save changes, access to the URL of your project http://yourproject/scheduler and you can now test the scheduler. As final recommendation, check the documentation of the dhtmlx scheduler to discover more awesome utilities that will allow you to create the greatest scheduler app for your clients.
Show data from a repository in the appointment form
According to the structure of your project, your appointments won't be simply title, description and time, but they may have a type on it that depends from the values of another table (foreign keys). In the following example, our appointments table will have a ManyToOne relation in the column category with a table namely categories, whose structure looks like:
AppBundle\Entity\Categories:
    type: entity
    table: categories
    id:
        id:
            type: bigint
            nullable: false
            options:
                unsigned: false
            id: true
            generator:
                strategy: IDENTITY
    fields:
        name:
            type: string
            nullable: false
            length: 255
            options:
                fixed: false
    lifecycleCallbacks: {  }
Once the orm file of the Categories table exists, you can generate automatically the Categories Entity using:
php bin/console doctrine:generate:entities AppBundleThe generated entity at AppBundle/Entity/Categories will look like:
<?php
// AppBundle\Entity\Categories.php

namespace AppBundle\Entity;

/**
 * Categories
 */
class Categories
{
    /**
     * @var integer
     */
    private $id;

    /**
     * @var string
     */
    private $name;


    /**
     * Get id
     *
     * @return integer
     */
    public function getId()
    {
        return $this->id;
    }

    /**
     * Set name
     *
     * @param string $name
     *
     * @return Categories
     */
    public function setName($name)
    {
        $this->name = $name;

        return $this;
    }

    /**
     * Get name
     *
     * @return string
     */
    public function getName()
    {
        return $this->name;
    }
}
Now you have a new repository that could be accessed with the identified AppBundle:Categories. By configuring the new field in the appointments table category to have a ManyToOne relation with another table, our original ORM file of the Appointment table will obviously change too:
AppBundle\Entity\Appointments:
    type: entity
    table: appointments
    indexes:
        category:
            columns:
                - category
    id:
        id:
            type: bigint
            nullable: false
            options:
                unsigned: false
            id: true
            generator:
                strategy: IDENTITY
    fields:
        title:
            type: string
            nullable: false
            length: 255
            options:
                fixed: false
        description:
            type: text
            nullable: true
            length: 65535
            options:
                fixed: false
        startDate:
            type: datetime
            nullable: false
            column: start_date
        endDate:
            type: datetime
            nullable: false
            column: end_date
    manyToOne:
        category:
            targetEntity: Categories
            cascade: {  }
            fetch: LAZY
            mappedBy: null
            inversedBy: null
            joinColumns:
                category:
                    referencedColumnName: id
            orphanRemoval: false
    lifecycleCallbacks: {  }
And if you generate the entity again, it will add 2 new methods:
// project/AppBundle/Entity/Appointments.php

/**
    * @var \AppBundle\Entity\Categories
    */
private $category;


/**
    * Set category
    *
    * @param \AppBundle\Entity\Categories $category
    *
    * @return Appointments
    */
public function setCategory(\AppBundle\Entity\Categories $category = null)
{
    $this->category = $category;

    return $this;
}

/**
    * Get category
    *
    * @return \AppBundle\Entity\Categories
    */
public function getCategory()
{
    return $this->category;
}
So now you can insert a new field on the appointments entity in the backend.
As our form isn't a pure symfony form but a "form" created with JavaScript by the scheduler library, if you want to add a select input that lists all the categories rows from the database so your user can select the category for the appointment, you will need in the same way you did with the appointments, convert the rows of the Categories repository to JSON so they can be processed by the scheduler.
In your Scheduler Controller, create a new method that will format your Categories into JSON:
/**
    * Returns a JSON string from data of a repository. The structure may vary according to the
    * complexity of your forms.
    *
    * @param $categories
    */
private function formatCategoriesToJson($categories){
    $formatedCategories = array();

    foreach($categories as $categorie){
        array_push($formatedCategories, array(
            // Important to set an object with the 2 following properties !
            "key" => $categorie->getId(),
            "label" => $categorie->getName()
        ));
    }

    return json_encode($formatedCategories);
}
Is important to send an object with the structure key and label and nothing else. Then you need to modify your indexAction that renders the scheduler, here send the JSON structure from the data of your Categories repository as a variable to twig namely categories:
/**
 * View that renders the scheduler.
 *
 */
public function indexAction()
{
    // Retrieve entity manager
    $em = $this->getDoctrine()->getManager();

    // Get repository of appointments
    $repositoryAppointments = $em->getRepository("AppBundle:Appointments");

    // Get repository of categories
    $repositoryCategories = $em->getRepository("AppBundle:Categories");

    // Note that you may want to filter the appointments that you want to send
    // by dates or something, otherwise you will send all the appointments to render
    $appointments = $repositoryAppointments->findAll();

    // Generate JSON structure from the appointments to render in the start scheduler.
    $formatedAppointments = $this->formatAppointmentsToJson($appointments);

    // Retrieve the data from the repository categories
    $categories = $repositoryCategories->findAll();

    // Generate JSON structure from the data of the repository (in this case the categories)
    // so they can be rendered inside a select on the lightbox
    $formatedCategories = $this->formatCategoriesToJson($categories);

    // Render scheduler
    return $this->render("default/scheduler.html.twig", [
        'appointments' => $formatedAppointments,
        'categories' => $formatedCategories
    ]);
}
The categories will now be accesible by Twig as a string, however not yet for JavaScript so you will need to expose it globally in the Twig view so it can be accesible to the schedulerScripts file, in this case we'll do it through window.GLOBAL_CATEGORIES:
{% block javascripts %}
    <!-- Include the scheduler library -->
    <script src='{{ asset("libraries/dhtmlx/codebase/dhtmlxscheduler.js") }}' type='text/javascript' charset="utf-8"></script>

    <!-- Include jQuery to handle AJAX Requests -->
    <script src="https://cdnjs.cloudflare.com/ajax/libs/jquery/3.2.1/jquery.min.js"></script>

    <!-- Include Momentjs to play with the dates -->
    <script src="{{ asset("libraries/momentjs/moment.js") }}"></script>

    <script>
        // Expose the appointments globally by printing the JSON string with twig and the raw filter
        // so they can be accesible by the schedulerScripts.js the controller
        window.GLOBAL_APPOINTMENTS = {{ appointments|raw }};

        // As the scheduler scripts will be in other files, the routes generated by twig
        // should be exposed in the window too
        window.GLOBAL_SCHEDULER_ROUTES = {
            create: '{{ path("scheduler_create") }}',
            update: '{{ path("scheduler_update") }}',
            delete: '{{ path("scheduler_delete") }}'
        };

        // Important:
        // Expose the categories of the Appointments so they can be shown in the select
        window.GLOBAL_CATEGORIES = {{ categories|raw }};
    </script>

    <!-- Include the schedulerScripts that you will need to write in the next step -->
    <script src='{{ asset("libraries/schedulerScripts.js") }}' type='text/javascript' charset="utf-8"></script>
{% endblock %}
Now, the categories object needs to be rendered in our form for the appointment in the calendar, that means that you need to modify the schedulerScripts.js file and modify the step 2 that defines the lightbox sections:
// 2. Configure Lightbox (form) sections
scheduler.config.lightbox.sections = [
    // If you have another field on your Appointment entity (e.g example_field column), you would add it like
    // {name:"Example Field", height:30, map_to:"example_field", type:"textarea"},
    {name:"Title", height:30, map_to:"text", type:"textarea"},
    {name:"Description", height:30, map_to:"description", type:"textarea"},

    // Add a select that allow you to select the category of the appointment according to a table
    // "categories" from the database :)
    {name:"Category", options: window.GLOBAL_CATEGORIES , map_to: "category", type: "select", height:30 },

    // Add the time field
    {name:"time", height:72, type:"time", map_to:"auto"},
];
Note that the map_to property maps the events with this value as the category property that stores a simple number that indicates which category is being used. You need to modify the getFormatedEvent function as well to send the category as a property, otherwise this field won't be send when you modify or update an appointment:
/**
 * Returns an Object with the desired structure of the server.
 *
 * @param {*} id
 * @param {*} useJavascriptDate
 */
function getFormatedEvent(id, useJavascriptDate){
    var event;

    // If id is already an event object, use it and don't search for it
    if(typeof(id) == "object"){
        event = id;
    }else{
        event = scheduler.getEvent(parseInt(id));
    }

    if(!event){
        console.error("The ID of the event doesn't exist: " + id);
        return false;
    }

    var start , end;

    if(useJavascriptDate){
        start = event.start_date;
        end = event.end_date;
    }else{
        start = formatDate(event.start_date);
        end = formatDate(event.end_date);
    }

    return {
        id: event.id,
        start_date : start,
        end_date : end,
        description : event.description,
        title : event.text,

        // Important add the category ID
        category: event.category
    };
}
Finally, you need to handle the events on the backend (create and update) so they can become an object of type category and the Appointment entity can be persisted:
Note
This modification needs to be made in the updateAction too.
/**
 * Handle the creation of an appointment.
 *
 */
public function createAction(Request $request){
    $em = $this->getDoctrine()->getManager();
    $repositoryAppointments = $em->getRepository("AppBundle:Appointments");


    // Use the same format used by Moment.js in the view
    $format = "d-m-Y H:i:s";

    // Create appointment entity and set fields values
    $appointment = new Appointment();
    $appointment->setTitle($request->request->get("title"));
    $appointment->setDescription($request->request->get("description"));
    $appointment->setStartDate(
        \DateTime::createFromFormat($format, $request->request->get("start_date"))
    );
    $appointment->setEndDate(
        \DateTime::createFromFormat($format, $request->request->get("end_date"))
    );

    // Don't forget to update the create or update controller with the new field
    $repositoryCategories = $em->getRepository("AppBundle:Categories");

    // Search in the repository for a category object with the given ID and
    // set it as value !
    $appointment->setCategory(
        $repositoryCategories->find(
            $request->request->get("category")
        )
    );

    // Create appointment
    $em->persist($appointment);
    $em->flush();

    return new JsonResponse(array(
        "status" => "success"
    ));
}
You can to check wheter the category exists or not to prevent any error. Now your scheduler would have a select component that allows the user to select the category of the appointment:
Note
In our database, the categories table only contains 2 rows namely Medical Appointment and Freetime Appointment.

Happy coding !

