
A couple of years ago, it was really tricky to record the audio that was currently being played in your speakers thanks to the sound card of your computer using C#. Fortunately with the matter of time, an useful API was introduced to Windows Vista. The Windows Audio Session API (WASAPI) is Microsoft's most modern method for talking with audio devices. It is available in Windows Vista, Windows 7, and later versions of Windows. It allows delivering an unmodified bitstream to a sound device, and provides benefits similar to those provided by ASIO drivers. NAudio offers a really useful wrapper around this API that allows you to record the audio from your soundcard easily with C#.
In this article, we'll show you how to record the audio that's coming from your sound card using NAudio with C# in WinForms.
1. Install NAudio with NuGet
You will need to install the NAudio library in your project using the NuGet package manager. Open your Winforms C# project and open the NuGet package manager in the solution explorer:

Go to the Browse tab and search for NAudio:
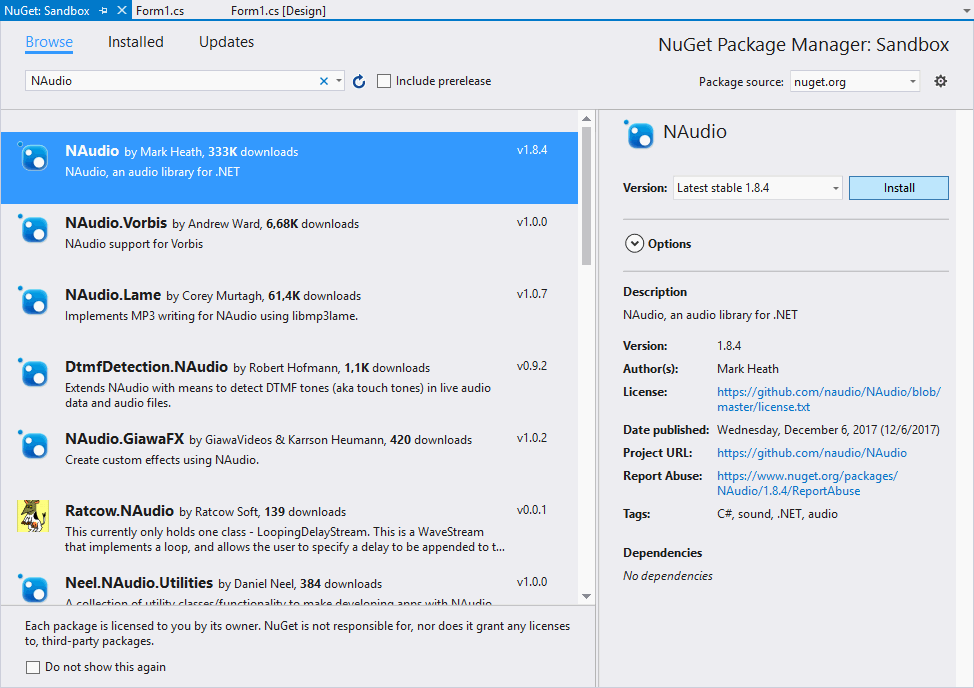
From the list, select the NAudio package by Mark Heath and install it simply clicking on the Install button. Once the installation finishes you will be able to import the Wave namespace of NAudio in the class where you want to use it like this:
using NAudio.Wave;If you already have NAudio installed, then you can proceed with the next step.
2. Understand recording audio logic
Thanks to NAudio, most of the hard logic behind the complex process of recording the audio coming out from your speakers (sound card) has been fortunately abstracted and written in a way that almost every developer can understand and use. The WasapiLoopbackCapture is the class from NAudio that you will use to record it, this class is a very well writen wrapper of the WASAPI (Windows Audio Session API) that can be used together with some file writer classes of NAudio to record easily the audio from the default sound source of your system.
The logic that you will need to handle to record the audio is minimal, initially, you need to create an instance of the WaveFileWriter and the WasapiLoopBackCapture classes.l The WaveFileWriter expects as first argument the path where the wav file should be written (the one with the recorded audio from the speakers/sound card) and as second argument the WaveFormat property of the capturer instance. Doing this, you're ready to write the sound coming from the sound card, however it isn't done automatically as you need to attach a listener to the capturer instance, namely the DataAvailable. This event is triggered when the some audio is received, in this callback you need to use the audio writer, providing as first argument of the write method, the buffer and the offest of the recorded bytes and the recorded bytes itself. You need as well dispose the audio writer once the capturer stops so the file can be accessible. Finally, you can simply start the recorder using the StartRecording method.
It's worth to say that the code is asynchronous, so you don't need to care basically about threading or other complex stuff (maybe initially):
// Define the output wav file of the recorded audio
string outputFilePath = @"C:\Users\sdkca\Desktop\system_recorded_audio.wav";

// Redefine the capturer instance with a new instance of the LoopbackCapture class
WasapiLoopbackCapture CaptureInstance = new WasapiLoopbackCapture();

// Redefine the audio writer instance with the given configuration
WaveFileWriter RecordedAudioWriter = new WaveFileWriter(outputFilePath, CaptureInstance.WaveFormat);

// When the capturer receives audio, start writing the buffer into the mentioned file
CaptureInstance.DataAvailable += (s, a) =>
{
    // Write buffer into the file of the writer instance
    RecordedAudioWriter.Write(a.Buffer, 0, a.BytesRecorded);
};

// When the Capturer Stops, dispose instances of the capturer and writer
CaptureInstance.RecordingStopped += (s, a) =>
{
    RecordedAudioWriter.Dispose();
    RecordedAudioWriter = null;
    CaptureInstance.Dispose();
};

// Start audio recording !
CaptureInstance.StartRecording();
To stop the audio recording, you would simply run the StopRecording method of the capturer:
CaptureInstance.StopRecording();The buffer writing in the desired file will stop, producing a wav file with the audio produced from your system during the execution of the process. Obviously, don't forget to play some audio while you test or you will hear nothing !
Full example
In this example, we are going to simply create a form with 2 buttons, one to start the recorder (button1) and other to stop it (button2). The Stop button is initially disabled and it will enabled once the recorder starts and viceversa with the start button. Graphically the form looks like:

The logic that we'll implement is very simple, yet functional. When the user clicks on start, the audio of the system will be recorded and when the user clicks on stop, the recorder stops and finishes the writing buffer of our desired output Audio file. The instances of WaveFileWriter and the WasapiLoopbackCapture are meant to be accesible at class level, so our start and stop button have access to them, they're because of this behaviour originally set to null.
As next, attach a click listener to both buttons and assign the logic respectively. For the start button, define a variable that contains the path to the output audio file and redefine the WaveFileWriter and the WasapiLoopbackCapture instances with a new one. Then, attach the onDataAvailable and onRecordingStopped callbacks to the capturer instance and write the logic respectively, in this case when the data is available, write the output buffer into the declared file used by the wave writer. When the recording stops it should obviously dispose the capture instance. Finally when the user clicks on the stop button, the recorder instance should simply stop the recorder, disabling as well the stop button and enabling the start button again so a new file can be recorded again:
using System;
using System.Windows.Forms;

// Import Wave of NAudio
using NAudio.Wave;

namespace Sandbox
{
    public partial class Form1 : Form
    {
        // Create class-level accessible variables to store the audio recorder and capturer instance
        private WaveFileWriter RecordedAudioWriter = null;
        private WasapiLoopbackCapture CaptureInstance = null;

        public Form1()
        {
            InitializeComponent();
        }

        private void button1_Click(object sender, EventArgs e)
        {
            // Define the output wav file of the recorded audio
            string outputFilePath = @"C:\Users\sdkca\Desktop\system_recorded_audio.wav";

            // Redefine the capturer instance with a new instance of the LoopbackCapture class
            this.CaptureInstance = new WasapiLoopbackCapture();

            // Redefine the audio writer instance with the given configuration
            this.RecordedAudioWriter = new WaveFileWriter(outputFilePath, CaptureInstance.WaveFormat);

            // When the capturer receives audio, start writing the buffer into the mentioned file
            this.CaptureInstance.DataAvailable += (s, a) =>
            {
                this.RecordedAudioWriter.Write(a.Buffer, 0, a.BytesRecorded);
            };

            // When the Capturer Stops
            this.CaptureInstance.RecordingStopped += (s, a) =>
            {
                this.RecordedAudioWriter.Dispose();
                this.RecordedAudioWriter = null;
                CaptureInstance.Dispose();
            };

            // Enable "Stop button" and disable "Start Button"
            this.button1.Enabled = false;
            this.button2.Enabled = true;

            // Start recording !
            this.CaptureInstance.StartRecording();
        }

        private void button2_Click(object sender, EventArgs e)
        {
            // Stop recording !
            this.CaptureInstance.StopRecording();

            // Enable "Start button" and disable "Stop Button"
            this.button1.Enabled = true;
            this.button2.Enabled = false;
        }
    }
}
Happy coding !

