
As you may know, there are plenty types of RAID´s. The RAID 1 array type is implemented by mirroring data across all available disks. Each disk in a RAID 1 array will obtain a full copy of the data, providing redundancy in the event of a device failure, so in a production environment such feature is a must. In this article we'll show you how to configure a RAID 1 with 3 disks in your Ubuntu server.
Requirements
- A minimum of 3 disks (the first is the one that has the OS and the 2 that will contain the copy of the first disk). Is important to notice that the three disks must have the same number of IOPS and the same capacity.
Since it's necessary to have at least two copies of the data, only half of the disk space will be usable. Having said that, let's get started with the implementation of our software RAID 1 !
1. List available disks and remember them
You will need to know the name of the disks that are available in your system, this can be done in Ubuntu using the lsblk command in the terminal:
lsblkThis will list in the terminal all the disks available in your system. In this example we have 3 disks namely xvda (the main disk), xvdf and xvdg (the disks that will synchronize the data of the main disk):

Keep in mind the name of the disks as you will need them to run the commands to implement the RAID.
2. Verify that the 2 extra disks have a filesystem
As next you will need to check that the 2 disks, where the copy of the main disk will be synchronized, have a filesystem. To know wheter a disk have a filesystem or not in Ubuntu with the sudo file -s [/dev/disk_name] command, where you have to change the disk_name argument with the name of the disk that you want to check (you need to do the same for both of the extra disks, in our case xvdf and xvdg):
# sudo file -s [/dev/disk_name]

# e.g with our first copy disk
sudo file -s /dev/xvdf
A disk with a filesystem would output something like:
/dev/xvdf: Linux rev 1.0 ext4 filesystem data, UUID=1701d228-e1bd-4094-a14c-8c64d6819362 (needs journal recovery) (extents) (large files) (huge files)But a disk without a filesystem would output something like:
/dev/xvdf: dataIf you got the second output with the verification of both of the disks, you need to provide a filesystem to the disks using the following command (assuming that you will use the common format in linux ext4):
# Warning:
# This step assumes that you're mounting an empty volume. If you're mounting a volume that
# already has data on it, don't use this command.
# Otherwise, you'll format the volume and delete the existing data on it

# sudo mkfs -t ext4 [/dev/disk_name]

# Format second disk
sudo mkfs -t ext4 /dev/xvdf


# Then format second disk
sudo mkfs -t ext4 /dev/xvdg
After the verification, you will be able to proceed with the creation of the RAID 1.
3. Create RAID 1
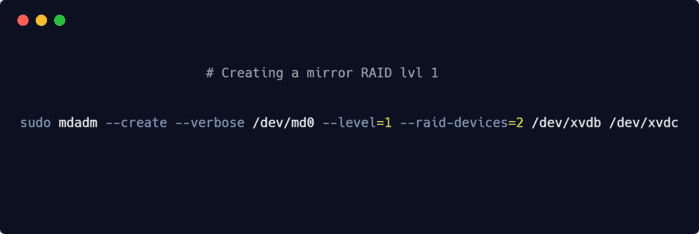
To create the software based RAID, we'll use the mdadm tool that is already available in Ubuntu. mdadm is a GNU/Linux utility used to manage and monitor software RAID devices, mainly used in modern GNU/Linux distributions in place of older software RAID utilities such as raidtools2 or raidtools. The command to create the RAID has the following structure
--create: provide the instruction to create the raid.--verbose: to show all the generate output./dev/md0: name of the raid to create--level: specifies the level of the raid that you want to create, in this article we'll use the mode 1 that will work as a mirror of the main disk.--raid-devices: specifies the number of disks that will have a copy of the raid, in our case we'll use 2, but you can use more if you want. As last, provide the array of disks that you will use e.g/dev/xvdfand/dev/xvdg:
# Where /dev/md0 will be the name of the RAID 1
# sudo mdadm --create --verbose /dev/md0 --level=1 --raid-devices=2 [/dev/second_disk_name] [/dev/third_disk_name]
# e.g :

sudo mdadm --create --verbose /dev/md0 --level=1 --raid-devices=2 /dev/xvdf /dev/xvdg
Once you run the command, the process will start and will prompt if you really want to continue with the creation of the RAID:
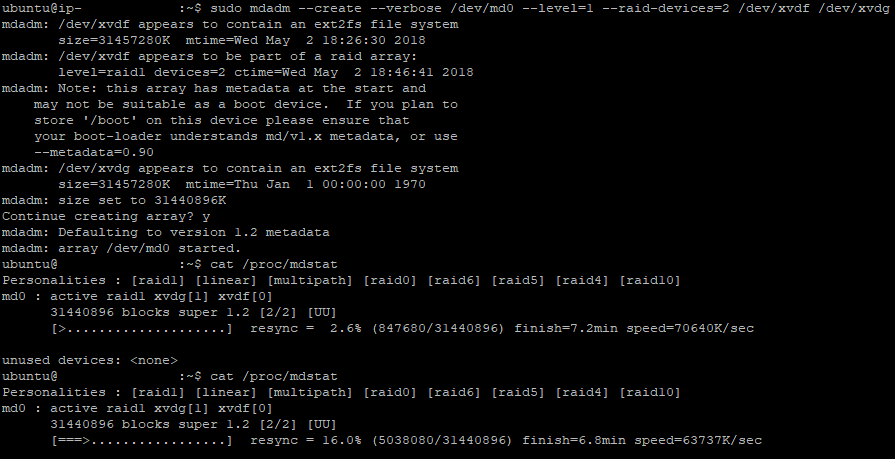
Normally the process is executed on the background, so you will be able to see the progress of the synchronization of data in the disks running the following command:
cat /proc/mdstatThis will output the current process of the creation of the RAID, so you will need to execute it multiple times:

Once the process finishes, you will confirm that the RAID was succesfully created by running the same command and you will see your md0 RAID active:

Only when the previous step is finished, you will be able to continue with the next step.
4. Create and mount the Filesystem
Now that the RAID exists, you will need to create a filesystem on the array of disks using the following command:
sudo mkfs.ext4 -F /dev/md0After giving the format to the disk, create a directory to mount the array with the following command:
sudo mkdir -p /mnt/md0And mount it with the next one:
sudo mount /dev/md0 /mnt/md0After mounting, you will be able to check if the new space is available with the next command:
df -h -x devtmpfs -x tmpfsThis will generate an output like:
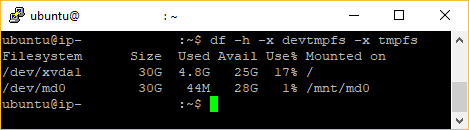
Now the new filesystem is mounted and accessible.
5. Save the array layout
As last important step, is necessary to be sure that the array is reassembled automatically at the boot of the system, so you will need to adjust the /etc/mdadm/mdadm.conf file. You can automatically scan the active array and append the file by typing the following command:
sudo mdadm --detail --scan | sudo tee -a /etc/mdadm/mdadm.confThen, you can update the initial RAM file system (initramfs). In this way the array will be available during the boot process:
sudo update-initramfs -uAnd lastly add the new filesystem mount options to the /etc/fstab file for automatic mounting at boot with the next command:
echo '/dev/md0 /mnt/md0 ext4 defaults,nofail,discard 0 0' | sudo tee -a /etc/fstabYour RAID 1 array should now automatically be assembled and mounted on each boot.
6. Check your RAID 1 information
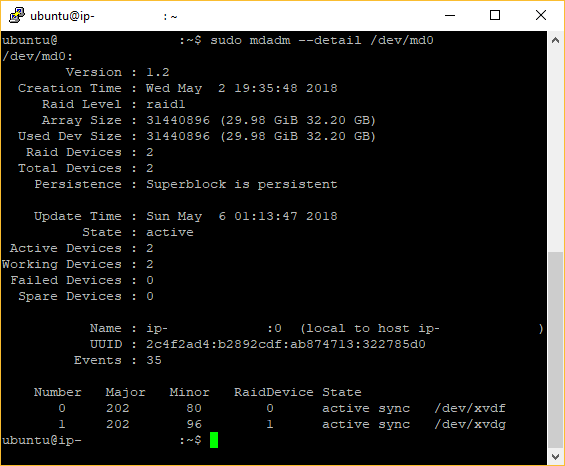
Now that your RAID 1 implementation is done, you can check the status of it with the following command:
sudo mdadm --detail /dev/md0This will generate an output with detailed information about the implemented raid like the following:
Happy server management !

