
The 7-segment display (seven segment display), consists of seven LEDs arranged in a rectangular shape. Each of the seven LEDs is called a segment because when illuminated the segment forms part of a numerical digit (both Decimal and Hex) to be displayed. An additional 8th LED is sometimes used within the same package thus allowing the indication of a decimal point, (DP) when two or more 7-segment displays are connected together to display numbers greater than ten. In some application, you will need to use OCR to recognize automatically this number, however as you may know the recognition of such characters as the shown on this article, with regular OCR algorithms or with tools like tesseract, you won't be able to recognize the numbers correctly:

Pitifully, as you can see, the recognized characters were wrong recognized. All regular algorithms will fail during the identification of the numbers, however, there's an easy way to identify such numbers with another tool. We are talking about SSOCR, a tiny program that allows you to recognize digits of a seven segment display. In this article, we'll teach you how to install this application properly in your Ubuntu 16.04 server easily and how to use it.
1. Install required build tools
In order to build ssocr from its source code, you will need some of the functionalities of the xlib (libx11) library in your system and the libimlib2 as well (library for image loading, rendering, saving images). You can install them easily with the following commands:
sudo apt-get update
sudo apt-get install libx11-dev
sudo apt-get install libimlib2-dev
After installing, you can proceed with the build of the ssocr library without any issue.
2. Clone ssocr source code and build
Proceed to download the source code of the library in some directory of your system with git:
git clone https://github.com/auerswal/ssocr.gitThis will create the ssocr directory with the source code inside, then switch to the directory in the cli:
cd ssocrAnd finally start the build of the library with the make command:
makeAfter starting the build of ssocr with the make command, you will get a short output in the cli:

And the binary ssocr will be inside the same directory where you ran the command. Now the tool is available from the directory, however you need to expose it globally on your system copying the binary to the local bin path with the following command:
sudo mv ./ssocr /usr/local/bin/ssocrThis will allow you to execute the ssocr command from anywhere in the cli, for example to print the version:
ssocr --versionThe Seven Segment Optical Character Recognition library current version is 2.19.0 and it has been developer by Erik Auerswald. This program comes with ABSOLUTELY NO WARRANTY and you are welcome to redistribute it under the terms of the GNU GPL (version 3 or later). For more information about this tool, please visit the official repository at Github here or the official website.
3. Using ssocr
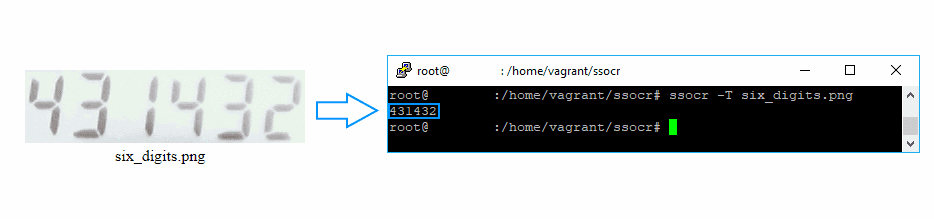
Now comes the fun part ! ssocr will allow you to identify the numbers of a seven segment display from any image, providing the path of it as argument when running the tool:
ssocr -t image.pngssocr will print the recognized numbers in the output as response, like any other CLI tool would do, so you can use this tool in combination with other applications using any programming language. The tool is pretty flexible as there are a lot options that you can set on the command:
-h,--help: Prints the usage message, shows default values, describes program operation and shows possible exit codes.-v,--verbose: Some messages regarding program execution are printed.-V,--version: Prints version and copyright information.-t,--threshold=THRESHOLD: Set the luminance threshold used to distinguish black from white. THRESHOLD is interpreted as a percentage.-a,--absolute-threshold: Use the THRESHOLD value without adjustment. Otherwise the THRESHOLD is adjusted to the luminance interval used in the image.-T,--iter-threshold: Use an iterative method (one-dimensional k-means clustering) to determine the threshold used to distinguish black from white. A THRESHOLD value given via-t THRESHOLD: sets the starting value.-n,--number-pixels=NUMBER: Set the number of foreground pixels that have to be found in a scanline to recognize a segment. Can be used to ignore some noise in the picture.-i,--ignore-pixels=NUMBER: Set the number of foreground pixels that are ignored when deciding if a column consists only of background or foreground pixels. Can be used to ignore some noise in the picture.-d,--number-digits=NUMBER: Specifies the number of digits shown in the image. If NUMBER is -1, the number of digits is detected automatically.-r,--one-ratio=RATIO: Set the height/width ratio threshold to recognize a digit as a one. RATIO takes integers only.-m,--minus-ratio=RATIO: Set the width/height ratio to recognize a minus sign. RATIO takes integers only.-o,--output-image=FILE: Write the processed image to FILE. Normally no image is written to disk. If a standard extension is used it is interpreted as the image format to use.-O,--output-format=FORMAT: Specify the image format. This format must be recognized by Imlib2, standard filename extensions are used.-p,--process-only: Process the given commands only, no segmentation or character recognition. Should be used together with --output-image=FILE.-D,--debug-image[=FILE]: Write a debug image showing the results of thresholding, segmentation and character recognition. The image is written to testbild.png unless a filename FILE is given.-P,--debug-output: Print information helpful for debugging.-f,--foreground=COLOR: Specify the foreground color (either black or white). This automatically sets the background color as well.-b,--background=COLOR: Specify the background color (either black or white). This automatically sets the foreground color as well.-I,--print-info: Prints image dimensions and range of used luminance values to stderr.-g,--adjust-gray: Use values T1 and T2 given to command gray_stretch as percentages instead of absolut luminance values.-l,--luminance=KEYWORD: Controls the kind of luminace computation. Using help as KEYWORD prints the list of keywords with a short description of the used formula. The default should work well.-S,--ascii-art-segments: Print recognized segments a ASCII art to stderr.-X,--print-as-hex: Changes the output format to use a string of hexadecimal numbers separated by colons. The hexadecimal numbers represent the set segments of the display. This can be used in combination with an external program to use a different interpretation of set segments (e.g. different display font or error correction if just some specific digits/characters or even words are displayed). See the manual page for infos on the values.-C,--omit-decimal-point: Omit decimal points from output. Decimal points are still recognized and counted against the number of digits.-c,--charset=KEYWORD: Select the set of characters that ssocr shall recognize. Using help as KEYWORD prints the list of keywords with a short description of the included characters.
The exit code of the CLI tool can refer to:
- 0: if correct number of digits have been recognized
- 1: if a different number of digits have been found
- 2: if one of the digits could not be recognized
- 3: if successful image processing only
- 42: if -h, -V, or -l help
- 99: otherwise
Happy coding !

