

Surely there are a lot of Java libraries that allow you to scan QR Codes, however not all of them are compatible with Android or at least they aren't so easy to implement. QReader is one of those libraries that allows you to implement easily a QRCode scanner in your android application without headaches.
In this article, we will show you how to install and use the QReader library to read QR Codes in your Android application.
1. Add and install QReader as a dependency on gradle
As first step, to get started with the QReader library, you will need to install it. This can be done easily through the gradle management. If you are using Gradle > 4.0 then add the dependency with:
dependencies {
    implementation 'com.github.nisrulz:qreader:2.1.1'
}
If you are using Gradle < 4.0 then add it like this:
dependencies {
    compile 'com.github.nisrulz:qreader:2.1.1'
}
Till the date of this article, the latest available version might be higher, so be sure to check the latest version available on the releases page of the repository. After adding the dependency synchronize the project so the library will be installed. For more information about this library, please visit the official repository at Github here.
2. Register helper permission class
Create a new java class, namely RuntimePermissionUtil.java in your project. This file will contain the following code:
// \app\src\main\java\com\yourcompany\yourapp\RuntimePermissionUtil.java
package com.yourcompany.yourapp;

/*
 * Copyright (C) 2016 Nishant Srivastava
 *
 * Licensed under the Apache License, Version 2.0 (the "License");
 * you may not use this file except in compliance with the License.
 * You may obtain a copy of the License at
 *
 *    http://www.apache.org/licenses/LICENSE-2.0
 *
 * Unless required by applicable law or agreed to in writing, software
 * distributed under the License is distributed on an "AS IS" BASIS,
 * WITHOUT WARRANTIES OR CONDITIONS OF ANY KIND, either express or implied.
 * See the License for the specific language governing permissions and
 * limitations under the License.
 */

import android.app.Activity;
import android.content.Context;
import android.content.pm.PackageManager;
import android.support.v4.app.ActivityCompat;

public class RuntimePermissionUtil {

    private RuntimePermissionUtil() {

    }

    public static void onRequestPermissionsResult(int[] grantResults,
                                                  RPResultListener rpResultListener) {
        if (grantResults.length > 0) {
            for (int grantResult : grantResults) {
                if (grantResult == PackageManager.PERMISSION_GRANTED) {
                    rpResultListener.onPermissionGranted();
                } else {
                    rpResultListener.onPermissionDenied();
                }
            }
        }
    }

    public static void requestPermission(final Activity activity, final String[] permissions,
                                         final int REQUEST_CODE) {
        // No explanation needed, we can request the permission.
        ActivityCompat.requestPermissions(activity, permissions, REQUEST_CODE);
    }

    public static void requestPermission(final Activity activity, final String permission,
                                         final int REQUEST_CODE) {
        // No explanation needed, we can request the permission.
        ActivityCompat.requestPermissions(activity, new String[] { permission }, REQUEST_CODE);
    }

    public static boolean checkPermissonGranted(Context context, String permission) {
        return (
            ActivityCompat.checkSelfPermission(context, permission)
            ==
            PackageManager.PERMISSION_GRANTED
        );
    }
}
This class will be used later in our implementation code to handle the camera permissions dynamically just as the new Android platforms need. You will need to create an interface file as well with the following content:
// \app\src\main\java\com\yourcompany\yourapp\RPResultListener.java
package com.yourcompany.yourapp;

interface RPResultListener {
    void onPermissionGranted();

    void onPermissionDenied();
}
Following this step, you will have 2 extra java files that we'll use in the implementation of the next steps.
3. Create layout
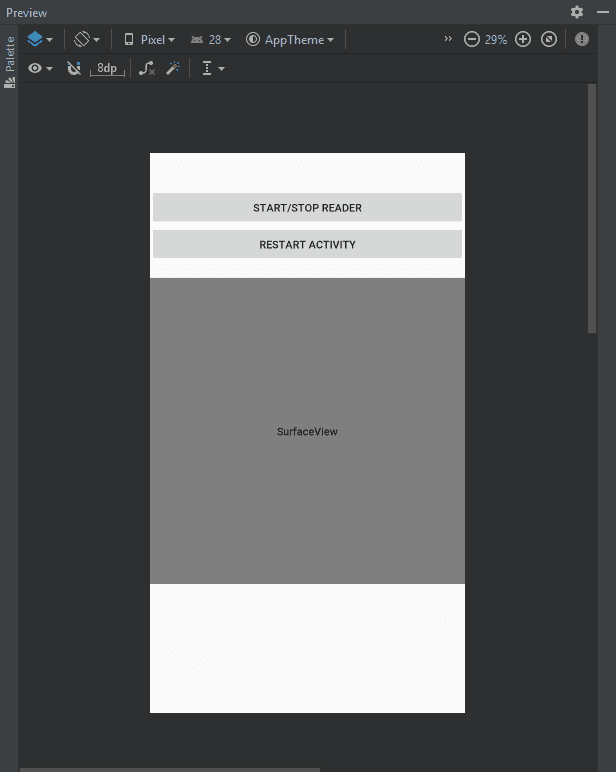
The layout needs to be pretty independent according to your needs, however we will use a very basic approach that will contain 2 buttons, the one that handles the status of the reader (enabled/disabled) and the button that restarts the current activity. We will use a linear layout with the mentioned elements and we'll place them in the main activity. As our app only contains this, you may create another layout for your activity in case that you want to create it in another one:
<?xml version="1.0" encoding="utf-8"?>
<android.support.constraint.ConstraintLayout xmlns:android="http://schemas.android.com/apk/res/android"
    xmlns:app="http://schemas.android.com/apk/res-auto"
    xmlns:tools="http://schemas.android.com/tools"
    android:id="@+id/container"
    android:layout_width="match_parent"
    android:layout_height="match_parent"
    tools:context=".MainActivity">

    <LinearLayout
        android:id="@+id/info"
        android:layout_width="match_parent"
        android:layout_height="wrap_content"
        android:layout_alignParentBottom="true"
        android:orientation="vertical"
        >
        <TextView
            android:id="@+id/code_info"
            android:layout_width="match_parent"
            android:layout_height="wrap_content"
            android:gravity="center"
            android:padding="10dp"
            android:textColor="@android:color/black"
            android:textSize="20sp"
        />
        <Button
            android:id="@+id/btn_start_stop"
            android:layout_width="match_parent"
            android:layout_height="wrap_content"
            android:text="Start/Stop reader"
        />

        <Button
            android:id="@+id/btn_restart_activity"
            android:layout_width="match_parent"
            android:layout_height="wrap_content"
            android:layout_gravity="center_horizontal"
            android:text="Restart activity"
        />

        <SurfaceView
            android:id="@+id/camera_view"
            android:layout_width="match_parent"
            android:layout_height="400dp"
            android:layout_marginTop="20dp"
            android:layout_above="@+id/info"
        />
    </LinearLayout>

</android.support.constraint.ConstraintLayout>
This layout will have the following preview:
4. Implementation on activity
Finally, we need to write the code that will handle the logic in your activity. As we mentioned previously, we are working on a empty project that will have a single activity, so we will handle the code on the main activity of our application, but you can implement the code on another activity if you wish. As first we will need to include the namespaces of the classes that we will use. Create as well the class-level variables that will contain for example the reader instance, the surface view where the camera image will be displayed.
The logic is simply based on requesting the camera permission as first, if its granted, you should start the reader with the method setupQREader that initializes a basic instance of the QReader. When the reader detects and interprets a QRCode, the content will be displayed in the information label of our layout:
// \app\src\main\java\com\yourcompany\yourapp\MainActivity.java
package com.yourcompany.yourapp;

import android.Manifest;
import android.content.Intent;
import android.os.Bundle;
import android.support.annotation.NonNull;
import android.support.v7.app.AppCompatActivity;
import android.util.Log;
import android.widget.TextView;
import android.widget.Button;
import android.view.View;
import android.view.SurfaceView;
import github.nisrulz.qreader.QRDataListener;
import github.nisrulz.qreader.QREader;

public class MainActivity extends AppCompatActivity {

    // User Interface
    private TextView text;

    // QREader
    private SurfaceView mySurfaceView;
    private QREader qrEader;
    private boolean hasCameraPermission = false;
    private static final String cameraPerm = Manifest.permission.CAMERA;

    @Override
    protected void onCreate(final Bundle savedInstanceState) {
        super.onCreate(savedInstanceState);
        setContentView(R.layout.activity_main);

        // 1. When the app starts, request Camera permission
        hasCameraPermission = RuntimePermissionUtil.checkPermissonGranted(this, cameraPerm);

        text = findViewById(R.id.code_info);


        // 2. Handle action button text. With this button you will start/stop the reader
        final Button stateBtn = findViewById(R.id.btn_start_stop);
        // change of reader state in dynamic
        stateBtn.setOnClickListener(new View.OnClickListener() {
            @Override
            public void onClick(View v) {
                if (qrEader.isCameraRunning()) {
                    stateBtn.setText("Start QREader");
                    qrEader.stop();
                } else {
                    stateBtn.setText("Stop QREader");
                    qrEader.start();
                }
            }
        });

        stateBtn.setVisibility(View.VISIBLE);

        Button restartButton = findViewById(R.id.btn_restart_activity);
        restartButton.setOnClickListener(new View.OnClickListener() {
            @Override
            public void onClick(View view) {
                restartActivity();
            }
        });

        // Setup SurfaceView
        // -----------------
        mySurfaceView = findViewById(R.id.camera_view);

        if (hasCameraPermission) {
            // Setup QREader
            setupQREader();
        } else {
            RuntimePermissionUtil.requestPermission(
                MainActivity.this,
                cameraPerm,
                100
            );
        }
    }

    void restartActivity() {
        startActivity(new Intent(MainActivity.this, MainActivity.class));
        finish();
    }

    void setupQREader() {
        // Init QREader
        // ------------
        qrEader = new QREader.Builder(this, mySurfaceView, new QRDataListener() {
            @Override
            public void onDetected(final String data) {
                Log.d("QREader", "Value : " + data);
                text.post(new Runnable() {
                    @Override
                    public void run() {
                        text.setText(data);
                    }
                });
            }
        }).facing(QREader.BACK_CAM)
            .enableAutofocus(true)
            .height(mySurfaceView.getHeight())
            .width(mySurfaceView.getWidth())
            .build();
    }

    @Override
    protected void onPause() {
        super.onPause();

        if (hasCameraPermission) {

            // Cleanup in onPause()
            // --------------------
            qrEader.releaseAndCleanup();
        }
    }

    @Override
    protected void onResume() {
        super.onResume();

        if (hasCameraPermission) {

            // Init and Start with SurfaceView
            // -------------------------------
            qrEader.initAndStart(mySurfaceView);
        }
    }

    // Method that handles the result of the permission request made at the beginning of the application
    @Override
    public void onRequestPermissionsResult(
        int requestCode,
        @NonNull final String[] permissions,
        @NonNull final int[] grantResults
    ) {
        if (requestCode == 100) {
            RuntimePermissionUtil.onRequestPermissionsResult(grantResults, new RPResultListener() {
                @Override
                public void onPermissionGranted() {
                    if ( RuntimePermissionUtil.checkPermissonGranted(MainActivity.this, cameraPerm)) {
                        restartActivity();
                    }
                }

                @Override
                public void onPermissionDenied() {
                    // Do nothing
                }
            });
        }
    }
}
Happy coding !

