The feature of detecting when the users upload files that contain adult material is something that has been needed since the beginning of social networks where everyone can upload whatever they want without having in count that there might be children's watch that. There are many companies that have built products based on this premise offering an API to detect NSFW content as we wrote in this top. As someone that likes to build stuff so sustainable as possible, which means every penny you save counts, finding a way to solve this problem by something self-hosted lead me to find this awesome project namely NudeNet.
In this article, I will explain to you how to use NudeNet to identify NSFW content using Python.
Requirements
The NudeNet utility requires obligatorily Python 3.7 to work correctly as of now because it requires TensorFlow <= 1.15.4, so TensorFlow 2 won't work with NudeNet. You can check the python version in your system using:
# Outputs: Python 3.7.7
python --version
If you know already that your machine uses Python 3.7, you may proceed with this tutorial.
1. Install TensorFlow
Otherwise, if you try to use the library without TensorFlow, it's most likely to receive the following error in the terminal:
Traceback (most recent call last):
  File ".\index.py", line 2, in <module>
    from nudenet import NudeClassifier
  File "C:\Python38\lib\site-packages\nudenet\__init__.py", line 1, in <module>
    from .classifier import Classifier as NudeClassifier
  File "C:\Python38\lib\site-packages\nudenet\classifier.py", line 11, in <module>
    import tensorflow as tf
ModuleNotFoundError: No module named 'tensorflow'
If you have a GPU available, install the GPU based version of TensorFlow with the following command:
python -m pip install tensorflow-gpu==1.15When using TensorFlow with support for GPU, be sure to have CUDA v10.0 installed on your system. Otherwise, use the CPU based package:
python -m pip install tensorflow==1.15In our case, as we have a GPU available, the installation of the package would generate an output similar to the following one:
Collecting tensorflow-gpu==1.15
  Downloading tensorflow_gpu-1.15.0-cp37-cp37m-win_amd64.whl (294.5 MB)
     |████████████████████████████████| 294.5 MB 544 kB/s
Collecting gast==0.2.2
  Downloading gast-0.2.2.tar.gz (10 kB)
Collecting tensorflow-estimator==1.15.1
  Downloading tensorflow_estimator-1.15.1-py2.py3-none-any.whl (503 kB)
     |████████████████████████████████| 503 kB 1.1 MB/s
Collecting absl-py>=0.7.0
  Using cached absl_py-0.11.0-py3-none-any.whl (127 kB)
Collecting astor>=0.6.0
  Downloading astor-0.8.1-py2.py3-none-any.whl (27 kB)
Collecting google-pasta>=0.1.6
  Using cached google_pasta-0.2.0-py3-none-any.whl (57 kB)
Collecting grpcio>=1.8.6
  Downloading grpcio-1.34.0-cp37-cp37m-win_amd64.whl (2.9 MB)
     |████████████████████████████████| 2.9 MB 656 kB/s
Collecting keras-applications>=1.0.8
  Downloading Keras_Applications-1.0.8-py3-none-any.whl (50 kB)
     |████████████████████████████████| 50 kB 3.2 MB/s
Collecting keras-preprocessing>=1.0.5
  Using cached Keras_Preprocessing-1.1.2-py2.py3-none-any.whl (42 kB)
Collecting numpy<2.0,>=1.16.0
  Downloading numpy-1.19.5-cp37-cp37m-win_amd64.whl (13.2 MB)
     |████████████████████████████████| 13.2 MB 544 kB/s
Collecting opt-einsum>=2.3.2
  Using cached opt_einsum-3.3.0-py3-none-any.whl (65 kB)
Collecting protobuf>=3.6.1
  Downloading protobuf-3.14.0-cp37-cp37m-win_amd64.whl (798 kB)
     |████████████████████████████████| 798 kB 939 kB/s
Collecting six>=1.10.0
  Using cached six-1.15.0-py2.py3-none-any.whl (10 kB)
Collecting tensorboard<1.16.0,>=1.15.0
  Downloading tensorboard-1.15.0-py3-none-any.whl (3.8 MB)
     |████████████████████████████████| 3.8 MB 726 kB/s
Requirement already satisfied: setuptools>=41.0.0 in c:\users\sdkca\appdata\local\programs\python\python37\lib\site-packages (from tensorboard<1.16.0,>=1.15.0->tensorflow-gpu==1.15) (41.2.0)
Collecting markdown>=2.6.8
  Using cached Markdown-3.3.3-py3-none-any.whl (96 kB)
Collecting termcolor>=1.1.0
  Using cached termcolor-1.1.0.tar.gz (3.9 kB)
Collecting werkzeug>=0.11.15
  Using cached Werkzeug-1.0.1-py2.py3-none-any.whl (298 kB)
Collecting wheel>=0.26
  Using cached wheel-0.36.2-py2.py3-none-any.whl (35 kB)
Collecting wrapt>=1.11.1
  Using cached wrapt-1.12.1.tar.gz (27 kB)
Collecting h5py
  Downloading h5py-3.1.0-cp37-cp37m-win_amd64.whl (2.7 MB)
     |████████████████████████████████| 2.7 MB 595 kB/s
Collecting cached-property
  Downloading cached_property-1.5.2-py2.py3-none-any.whl (7.6 kB)
Collecting importlib-metadata
  Downloading importlib_metadata-3.3.0-py3-none-any.whl (10 kB)
Collecting typing-extensions>=3.6.4
  Using cached typing_extensions-3.7.4.3-py3-none-any.whl (22 kB)
Collecting zipp>=0.5
  Downloading zipp-3.4.0-py3-none-any.whl (5.2 kB)
Using legacy 'setup.py install' for gast, since package 'wheel' is not installed.
Using legacy 'setup.py install' for termcolor, since package 'wheel' is not installed.
Using legacy 'setup.py install' for wrapt, since package 'wheel' is not installed.
Installing collected packages: zipp, typing-extensions, six, numpy, importlib-metadata, cached-property, wheel, werkzeug, protobuf, markdown, h5py, grpcio, absl-py, wrapt, termcolor, tensorflow-estimator, tensorboard, opt-einsum, keras-preprocessing, keras-applications, google-pasta, gast, astor, tensorflow-gpu
    Running setup.py install for wrapt ... done
    Running setup.py install for termcolor ... done
    Running setup.py install for gast ... done
Successfully installed absl-py-0.11.0 astor-0.8.1 cached-property-1.5.2 gast-0.2.2 google-pasta-0.2.0 grpcio-1.34.0 h5py-3.1.0 importlib-metadata-3.3.0 keras-applications-1.0.8 keras-preprocessing-1.1.2 markdown-3.3.3 numpy-1.19.5 opt-einsum-3.3.0 protobuf-3.14.0 six-1.15.0 tensorboard-1.15.0 tensorflow-estimator-1.15.1 tensorflow-gpu-1.15.0 termcolor-1.1.0 typing-extensions-3.7.4.3 werkzeug-1.0.1 wheel-0.36.2 wrapt-1.12.1 zipp-3.4.0
After installing TensorFlow, continue with the installation of the NudeNet module.
2. Install NudeNet
NudeNet is a collection of Pre-trainer classification and detection models for nudity detection and censoring. This tool will allow you to do 3 different things:
- classify: identify with a percentage if the processed image is safe for anyone. The higher the unsafe property value, the higher the probability for the image to contain adult content.
- detection: after the classification, you may want to provide a description of what's exposed in the image (parts of the body).
- censoring: provide the censored version of the provided image.
You can install this module with the following command:
python -m pip install nudenet --upgradeThe installation of this package will generate an output similar to:
Collecting nudenet
  Using cached NudeNet-2.0.6-py2.py3-none-any.whl (24 kB)
Collecting opencv-python-headless
  Downloading opencv_python_headless-4.5.1.48-cp37-cp37m-win_amd64.whl (34.8 MB)
     |████████████████████████████████| 34.8 MB 595 kB/s
Requirement already satisfied: numpy>=1.14.5 in c:\users\sdkca\appdata\local\programs\python\python37\lib\site-packages (from opencv-python-headless->nudenet) (1.19.5)
Collecting pillow
  Downloading Pillow-8.1.0-cp37-cp37m-win_amd64.whl (2.2 MB)
     |████████████████████████████████| 2.2 MB 819 kB/s
Collecting pydload
  Using cached pydload-1.0.9-py2.py3-none-any.whl (16 kB)
Collecting progressbar2
  Using cached progressbar2-3.53.1-py2.py3-none-any.whl (25 kB)
Requirement already satisfied: six in c:\users\sdkca\appdata\local\programs\python\python37\lib\site-packages (from progressbar2->pydload->nudenet) (1.15.0)
Collecting python-utils>=2.3.0
  Using cached python_utils-2.4.0-py2.py3-none-any.whl (12 kB)
Collecting requests
  Downloading requests-2.25.1-py2.py3-none-any.whl (61 kB)
     |████████████████████████████████| 61 kB 1.3 MB/s
Collecting certifi>=2017.4.17
  Downloading certifi-2020.12.5-py2.py3-none-any.whl (147 kB)
     |████████████████████████████████| 147 kB 819 kB/s
Collecting chardet<5,>=3.0.2
  Downloading chardet-4.0.0-py2.py3-none-any.whl (178 kB)
     |████████████████████████████████| 178 kB 819 kB/sCollecting idna<3,>=2.5
  Using cached idna-2.10-py2.py3-none-any.whl (58 kB)
Collecting urllib3<1.27,>=1.21.1
  Downloading urllib3-1.26.2-py2.py3-none-any.whl (136 kB)
     |████████████████████████████████| 136 kB 819 kB/s Collecting scikit-image  Downloading scikit_image-0.18.1-cp37-cp37m-win_amd64.whl (12.1 MB)
     |████████████████████████████████| 12.1 MB 656 kB/s
Collecting imageio>=2.3.0
  Using cached imageio-2.9.0-py3-none-any.whl (3.3 MB)
Collecting matplotlib!=3.0.0,>=2.0.0
  Downloading matplotlib-3.3.3-cp37-cp37m-win_amd64.whl (8.5 MB)
     |████████████████████████████████| 8.5 MB 652 kB/s
Collecting cycler>=0.10
  Using cached cycler-0.10.0-py2.py3-none-any.whl (6.5 kB)
Collecting kiwisolver>=1.0.1
  Downloading kiwisolver-1.3.1-cp37-cp37m-win_amd64.whl (51 kB)
     |████████████████████████████████| 51 kB 2.0 MB/s
Collecting networkx>=2.0
  Using cached networkx-2.5-py3-none-any.whl (1.6 MB)
Collecting decorator>=4.3.0
  Using cached decorator-4.4.2-py2.py3-none-any.whl (9.2 kB)
Collecting pyparsing!=2.0.4,!=2.1.2,!=2.1.6,>=2.0.3
  Using cached pyparsing-2.4.7-py2.py3-none-any.whl (67 kB)
Collecting python-dateutil>=2.1
  Using cached python_dateutil-2.8.1-py2.py3-none-any.whl (227 kB)
Collecting PyWavelets>=1.1.1
  Downloading PyWavelets-1.1.1-cp37-cp37m-win_amd64.whl (4.2 MB)
     |████████████████████████████████| 4.2 MB 819 kB/s
Collecting scipy>=1.0.1
  Downloading scipy-1.6.0-cp37-cp37m-win_amd64.whl (32.5 MB)
     |████████████████████████████████| 32.5 MB 656 kB/s
Collecting tifffile>=2019.7.26
  Using cached tifffile-2020.12.8-py3-none-any.whl (157 kB)
Installing collected packages: urllib3, python-utils, python-dateutil, pyparsing, pillow, kiwisolver, idna, decorator, cycler, chardet, certifi, tifffile, scipy, requests, PyWavelets, progressbar2, networkx, matplotlib, imageio, scikit-image, pydload, opencv-python-headless, nudenet
Successfully installed PyWavelets-1.1.1 certifi-2020.12.5 chardet-4.0.0 cycler-0.10.0 decorator-4.4.2 idna-2.10 imageio-2.9.0 kiwisolver-1.3.1 matplotlib-3.3.3 networkx-2.5 nudenet-2.0.6 opencv-python-headless-4.5.1.48 pillow-8.1.0 progressbar2-3.53.1 pydload-1.0.9 pyparsing-2.4.7 python-dateutil-2.8.1 python-utils-2.4.0 requests-2.25.1 scikit-image-0.18.1 scipy-1.6.0 tifffile-2020.12.8 urllib3-1.26.2
After installing the module, you should now be able to use it to identify adult content on images. For more information about this project, please visit the official repository at Github here.
3. Using NudeNet
The NudeNet tool can be used in three different ways that I'll describe with 3 simple examples:
Classification
The classification of the images with NudeNet will tell you basically whether the image is for adults or no using the safe probability. The lower is the safe property is, the higher the probability is that the image contains stuff for adults. It can be easily used like this, import the NudeClassifier and create an instance if running for the first time, it will take a while to download the checkpoint file. Then, use the classify method and provide as the first argument the path to the image that you want to evaluate. You may evaluate as well multiple images providing an array instead of a string, the method will return an object that has as keys the provided filenames and will contain the score about the safety of the picture:
# Example #1
# classification.py

# Import module
from nudenet import NudeClassifier

# initialize classifier (downloads the checkpoint file automatically the first time)
classifier = NudeClassifier()

# A. Classify single image
print(classifier.classify('./image1.jpg'))

# This would print something like:
# {
#   './image1.jpg': {
#      'safe': 0.00015856953,
#      'unsafe': 0.99984145
#   }
# }

# B. Classify multiple images
# Returns {'path_to_image_1': {'safe': PROBABILITY, 'unsafe': PROBABILITY}}
# Classify multiple images (batch prediction)
# batch_size is optional; defaults to 4
print(
    classifier.classify(
        ['./image1.jpg', './image2.jpg', './image3.jpg', './image4.jpg'],
        batch_size=4
    )
)

# {
#    './image1.jpg': {
#         'safe': 0.00015856922,
#         'unsafe': 0.99984145
#     },
#     './image2.jpg': {
#         'safe': 0.019551795,
#         'unsafe': 0.9804482
#     },
#    './image3.jpg': {
#         'safe': 0.00052562816,
#         'unsafe': 0.99947435
#    },
#    './image4.jpg': {
#         'safe': 3.3454136e-05,
#         'unsafe': 0.9999665
#    }
# }
Detection
The detection will allow you to label the characteristics of the pictures that you want to evaluate. For example, if there's a woman or men in the picture, whether their genitalia is exposed, their breasts, and so on. The following example shows how to extract those labels from the image:
# Example #2
# detection.py
from nudenet import NudeDetector

# When running the first time, it will download the default checkpoint
# e.g Downloading the checkpoint to C:\Users\sdkca\.NudeNet/default\detector_v2_default_checkpoint_tf
detector = NudeDetector()

# Analyze the image1.jpg and create a new one with the censored suffix

# Note: Detect single image:
#   detector.detect('./image3.jpg')
# Note: fast mode is ~3x faster compared to default mode with slightly lower accuracy.
#   detector.detect('./image3.jpg', mode='fast')
print(detector.detect('./image3.jpg'))
# It would print an object like the following one
#[
#   {
#      "box":[
#         128,
#         51,
#         211,
#         132
#      ],
#      "score":0.95957077,
#      "label":"FACE_F"
#   },
#   {
#      "box":[
#         107,
#         162,
#         187,
#         223
#      ],
#      "score":0.9239791,
#      "label":"EXPOSED_BREAST_F"
#   },
#   {
#      "box":[
#         189,
#         151,
#         253,
#         203
#      ],
#      "score":0.8975705,
#      "label":"EXPOSED_BREAST_F"
#   },
#   {
#      "box":[
#         132,
#         217,
#         240,
#         292
#      ],
#      "score":0.846264,
#      "label":"EXPOSED_BELLY"
#   },
#   {
#      "box":[
#         84,
#         310,
#         159,
#         383
#      ],
#      "score":0.79144585,
#      "label":"EXPOSED_GENITALIA_F"
#   },
#   {
#      "box":[
#         0,
#         350,
#         248,
#         449
#      ],
#      "score":0.52004457,
#      "label":"EXPOSED_BUTTOCKS"
#   }
#]
You will find more information and a description of the labels in the official repository at Github here.
Censoring images
If you want to generate a censored version that may be used to review with your users what's specifically wrong with them, you may use the censoring method of NudeNet. You need to instantiate the NudeDetector class and execute the censor method that expects as the first argument the file path of the image to censor, as the second argument the output image that will contain the censored version:
# Example #3
# censoring.py
from nudenet import NudeDetector

# When running the first time, it will download the default checkpoint
# e.g Downloading the checkpoint to C:\Users\sdkca\.NudeNet/default\detector_v2_default_checkpoint_tf
detector = NudeDetector()

# Analyze the image1.jpg and create a new one with the censored suffix
detector.censor(
    './image1.jpg',
    out_path='./image1_censored.jpg',
    visualize=False
)
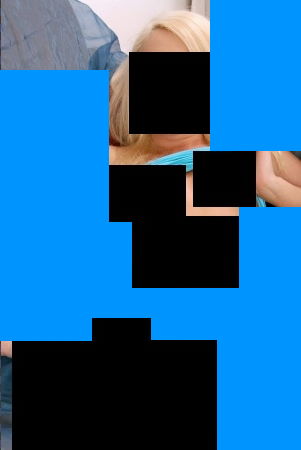
The code would place black blocks over the areas of the pictures that aren't safe for work like this:

Happy coding ❤️!


