

Redis is pretty famous nowadays, it can be used as a database, a cache system, or even a message broker. I would end up repeating myself trying to list all the possible use cases of Redis in projects out there, so let's keep it simple, Redis is used everywhere in production projects and therefore, it's pretty usual to have a local instance for development purposes.
After trying to implement a new Redis container to help me out with a Django project, I used a pretty basic configuration to start a container with Redis 7.2. It worked out of the box with the following configuration:
version: '3.8'
services:
    cache:
        image: redis:7.2-alpine
        restart: always
        ports:
            - 6379:6379
        command: redis-server --save 20 1 --loglevel warning
        volumes:
            - ./data/redis:/data
Yet I was surprised that there was a warning mentioning something critical (at least not for the moment for me): warning overcommit_memory is set to 0! Background save may fail under low memory conditions. Being disabled can also cause failures without low memory conditions.
The same warning provides a way to remove it, but in order to remove this warning properly in Docker, you will need to follow some extra steps as a default image won't be enough. In this tutorial, I will explain to you how to easily solve this warning in your Redis server containerized on Docker.
1. Create an initialization script
We need to tweak the kernel's memory overcommit handling in the container. When the vm.overcommit_memory option is set to 1, the kernel will always allow memory allocation even if it doesn't have enough memory to cover the allocation. This setting is especially useful for applications that rely on being able to allocate more memory than is physically available (which is usually the case for most of the applications that use Redis).
In the case of our docker container, we can run a .sh file to tweak this setting and start the Redis server as usual. Create the init.sh script for Redis with the following content in your project:
# WARNING overcommit_memory is set to 0! Background save may fail under low memory condition.
# To fix this issue add 'vm.overcommit_memory = 1' to /etc/sysctl.conf and then reboot
# or run the command 'sysctl vm.overcommit_memory=1' for this to take effect.
# The overcommit_memory has 3 options.
# 0, the system kernel check if there is enough memory to be allocated to the process or not,
# if not enough, it will return errors to the process.
# 1, the system kernel is allowed to allocate the whole memory to the process
# no matter what the status of memory is.
# 2, the system kernel is allowed to allocate a memory whose size could be bigger than
# the sum of the size of physical memory and the size of exchange workspace to the process.
sysctl vm.overcommit_memory=1

# Start redis server
redis-server /usr/local/etc/redis/redis.conf --loglevel warning --bind 0.0.0.0
Save the changes and continue with the next step.
2. Create a Redis configuration file
You need to have a configuration file with all the settings of Redis that you need. If you don't have any, you can visit the official Redis website here to get an example of the configuration file for each version. In my case, I'm going to use the default configuration file for Redis 7.2 from the official website and I'm going to store it in the redis.conf and it will be stored in the root directory of my project.
3. Create a Dockerfile for the Redis container
Instead of using a ready-to-use container of Redis, we need to start from the base image of Redis, in my case version 7.2, and will run some extra commands to copy the previously created redis.conf and init.sh files in the container and will allow the sh script to be executable:
FROM redis:7.2-alpine

WORKDIR /redis

COPY redis.conf /usr/local/etc/redis/redis.conf

COPY init.sh ./

RUN chmod +x init.sh
Save the changes to the file and continue with the next step.
4. Configure docker-compose.yml with the new custom Redis container
The last thing we need to do is to adjust our container to be built using the Dockerfile we created and to start with a different entry point, which is going to be the init.sh script. There is something important to note in this configuration besides the initialization script, and that's the privileged option that is set to true. This option is often used when a container needs to perform tasks that require elevated privileges, such as accessing devices or interacting with the kernel in ways that are not allowed by default, which is exactly what we need to adjust the overcommit_memory option.
The docker-compose.yml file with the Redis container will look similar to this:
version: '3.8'
services:
    cache:
        # Adjust the build context to your needs targetting the created Dockerfile
        build:
            context: ./dockerfiles/redis
            dockerfile: Dockerfile
        image: redis:7.2-alpine
        restart: always
        ports:
            - 6379:6379
        # Run the init script
        command: sh -c "./init.sh"
        # Run as privileged to allow the container to change the vm.overcommit_memory setting
        privileged: true
        volumes:
            - ./docker/data/redis:/data
After adjusting the docker-compose.yml file, restart, and rebuild your container:
docker compose up --build -dAnd you should see now that the container doesn't have this warning anymore:
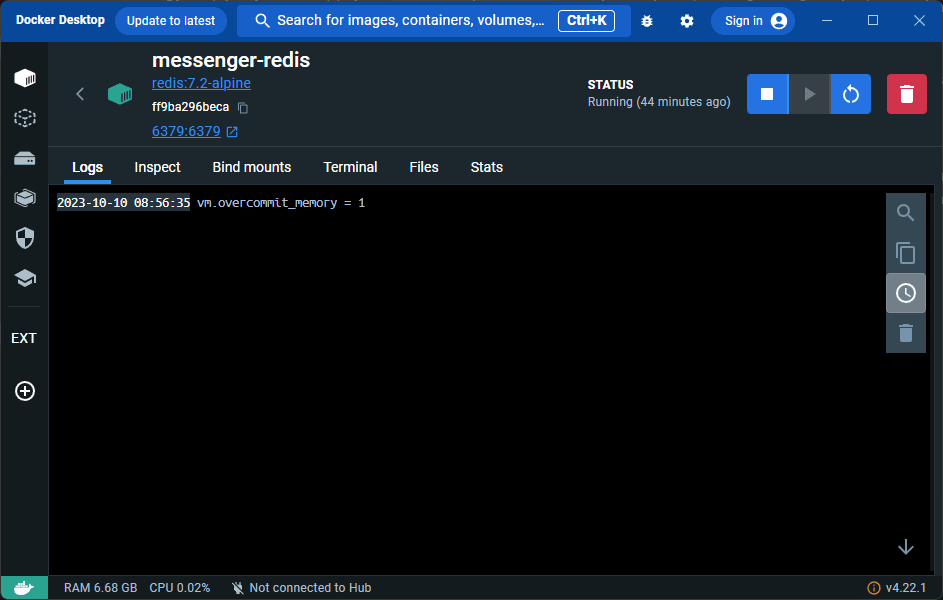
Happy coding ❤️!

