
Since Symfony 2, FOSUserBundle has been without a doubt the most used bundle to implement a database-backed user system. Its installation was pretty easy and understandable, however as a developer that loves implementing a lot of stuff from scratch (so i can customize some behaviours later), some things on the bundle weren't the right thing from me. With the introduction of Symfony 4, the FOSUserBundle doesn't provide a great compatibility, this means that you can find a lot of deprecation warnings when you simply enable the bundle on your app.
Most of the developers, only need to implement a basic database based user authentication system, this includes the creation of an user table, a registration and login form. In this series, we will explain you how to create this user system by yourself in Symfony 4.3 step by step.
1. Create User Entity
As on every application that requires authentication, it will need an User entity that will be described with at least 4 fields on your database in a table namely user:
- id (autoincrementable)
- roles
- password
Symfony 4 by default offers a pretty easy way to generate this User entity in your application through the php bin/console make:user command. However, we like to make some stuff manually so we can understand what we are doing, how it works and why it is necessary. The first step to follow to create the user entity is to create the User.php class in the src/Entity directory of your project. It will basically contain the table structure of your user table on the database. In our case, we will have a table with the 6 following fields:
- id (autoincrementable)
- roles
- password
- first_name
- last_name
The main advantage of this approach is how easily you can add new fields to the user table without issues:
<?php

// src/Entity/User.php
namespace App\Entity;

use Doctrine\ORM\Mapping as ORM;
use Symfony\Component\Security\Core\User\UserInterface;

/**
 * @ORM\Entity(repositoryClass="App\Repository\UserRepository")
 */
class User implements UserInterface
{
    /**
     * @ORM\Id()
     * @ORM\GeneratedValue()
     * @ORM\Column(type="integer")
     */
    private $id;

    /**
     * @var string|null
     *
     * @ORM\Column(name="first_name", type="string", length=255, nullable=true)
     */
    private $firstName;

    /**
     * @var string|null
     *
     * @ORM\Column(name="last_name", type="string", length=255, nullable=true)
     */
    private $lastName;

    /**
     * @ORM\Column(type="string", length=180, unique=true)
     */
    private $email;

    /**
     * @ORM\Column(type="json")
     */
    private $roles = [];

    /**
     * @var string The hashed password
     * @ORM\Column(type="string")
     */
    private $password;

    public function getId(): ?int
    {
        return $this->id;
    }

    public function getFirstName(): ?string
    {
        return $this->firstName;
    }

    public function setFirstName(?string $name): self
    {
        $this->firstName = $name;

        return $this;
    }

    public function getLastName(): ?string
    {
        return $this->lastName;
    }

    public function setLastName(?string $name): self
    {
        $this->lastName = $name;

        return $this;
    }

    public function getEmail(): ?string
    {
        return $this->email;
    }

    public function setEmail(string $email): self
    {
        $this->email = $email;

        return $this;
    }

    /**
     * A visual identifier that represents this user.
     *
     * @see UserInterface
     */
    public function getUsername(): string
    {
        return (string) $this->email;
    }

    /**
     * @see UserInterface
     */
    public function getRoles(): array
    {
        $roles = $this->roles;
        // guarantee every user at least has ROLE_USER
        $roles[] = 'ROLE_USER';

        return array_unique($roles);
    }

    public function setRoles(array $roles): self
    {
        $this->roles = $roles;

        return $this;
    }

    /**
     * @see UserInterface
     */
    public function getPassword(): string
    {
        return (string) $this->password;
    }

    public function setPassword(string $password): self
    {
        $this->password = $password;

        return $this;
    }

    /**
     * @see UserInterface
     */
    public function getSalt()
    {
        // not needed when using the "auto" algorithm in security.yaml
    }

    /**
     * @see UserInterface
     */
    public function eraseCredentials()
    {
        // If you store any temporary, sensitive data on the user, clear it here
        // $this->plainPassword = null;
    }
}
After creating the User entity, you will note as well that we have in the annotations of the class a Repository Class defined, so you need to create it as well (or you can remove the @ORM\Entity(repositoryClass="App\Repository\UserRepository") annotation). The UserRepository.php class contains the following code and it will be located inside the src/Repository directory:
<?php

// src/Repository/UserRepository.php
namespace App\Repository;

use App\Entity\User;
use Doctrine\Bundle\DoctrineBundle\Repository\ServiceEntityRepository;
use Doctrine\Common\Persistence\ManagerRegistry;

/**
 * @method User|null find($id, $lockMode = null, $lockVersion = null)
 * @method User|null findOneBy(array $criteria, array $orderBy = null)
 * @method User[]    findAll()
 * @method User[]    findBy(array $criteria, array $orderBy = null, $limit = null, $offset = null)
 */
class UserRepository extends ServiceEntityRepository
{
    public function __construct(ManagerRegistry $registry)
    {
        parent::__construct($registry, User::class);
    }

    // /**
    //  * @return User[] Returns an array of User objects
    //  */
    /*
    public function findByExampleField($value)
    {
        return $this->createQueryBuilder('u')
            ->andWhere('u.exampleField = :val')
            ->setParameter('val', $value)
            ->orderBy('u.id', 'ASC')
            ->setMaxResults(10)
            ->getQuery()
            ->getResult()
        ;
    }
    */

    /*
    public function findOneBySomeField($value): ?User
    {
        return $this->createQueryBuilder('u')
            ->andWhere('u.exampleField = :val')
            ->setParameter('val', $value)
            ->getQuery()
            ->getOneOrNullResult()
        ;
    }
    */
}
In this class, you can define custom methods for the repository like findByEmailProvider, findByAge or something custom. After creating the User Entity be sure to have a defined database connection on your .env file:
# app/.env
DATABASE_URL=mysql://user:[email protected]:3306/database_name
and run the following command to update the database structure:
php bin/console doctrine:schema:update --forceThis will create the user table in our database:
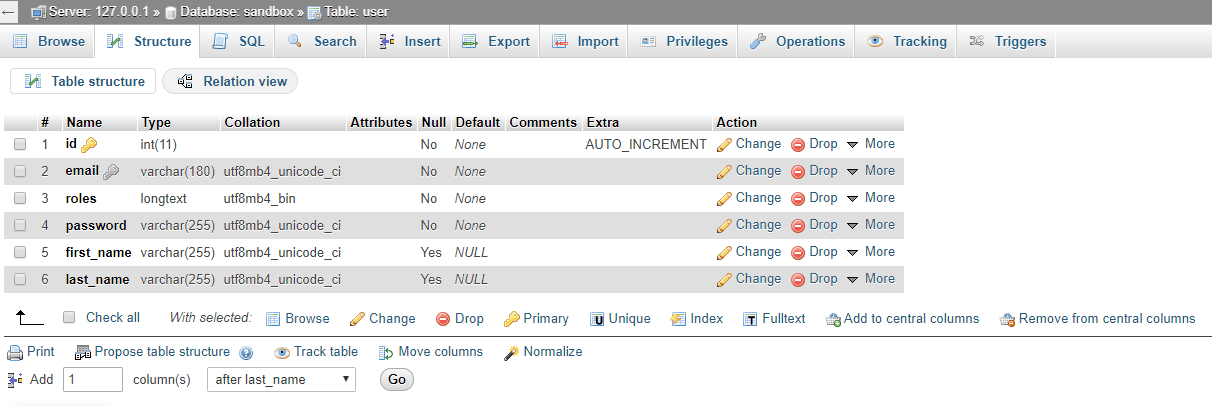
Now that we have an user entity and the table on the database, we can proceed with the configuration of the security.yaml file.
2. Configure security.yaml
The user entity has been defined and configured with the most basic fields, now we need to specify to the framework that we will be using such entity as the user provider of our application:
# app/config/packages/security.yaml
security:
    encoders:
        App\Entity\User:
            algorithm: auto

    # https://symfony.com/doc/current/security.html#where-do-users-come-from-user-providers
    providers:
        # used to reload user from session & other features (e.g. switch_user)
        app_user_provider:
            entity:
                class: App\Entity\User
                property: email
As specified in the official Symfony docs, in this version of Symfony, you will need to set the hashing algorithm for passwords to auto. If you define manually either bcrypt, argon2i or sodium, you will see a deprecation warning in the project, which is exactly what we want to avoid by implementing our own authentication system. This happens because of the fast-paced evolving nature of hashers, therefore it's less and less recommended to select a specific hashing algorithm and that's when the NativePasswordEncoder comes to play.
3. Creating test users
Now, in order to finish this part of the tutorial, we will need to create at least a single user on our database so we can play with the rest of the tutorial later. Until now, we haven't implemented any form either for registration or login, but we implemented the backend logic to make the system work with an User entity. According to our database, we could just simply register an user with an email, the first-last name and the password. The only problem for us in this step, is how to register an user with a valid password, because as you can understand now, we don't store plain text passwords for obvious reasons in the database.
As we are not implementing the forms in this part of the tutorial, we could register an user manually on our database with a sql query easily. But, from where should we obtain the hashed version of the password right now? We can do this through the UserPasswordEncoderInterface with code or using the security:encode-password command on the cli. We will explain you how to create an user in 2 ways:
A. Creating user manually with a SQL Query
The first option is to simply register an user with a SQL query in tools like PHPMyAdmin or something related. We do this so you can understand easily what's going on right now. We will need to hash the user password with the NativePasswordEncoder, so if you don't want to write PHP code to register this user, you can simply hash the password from the cli with the following command, where you can simply provide as positional argument the plain text password that will be assigned to the user, in this case it will be "MyTestPassword":
php bin/console security:encode-password MyTestPasswordRunning the previous command in the terminal will generate the following output:
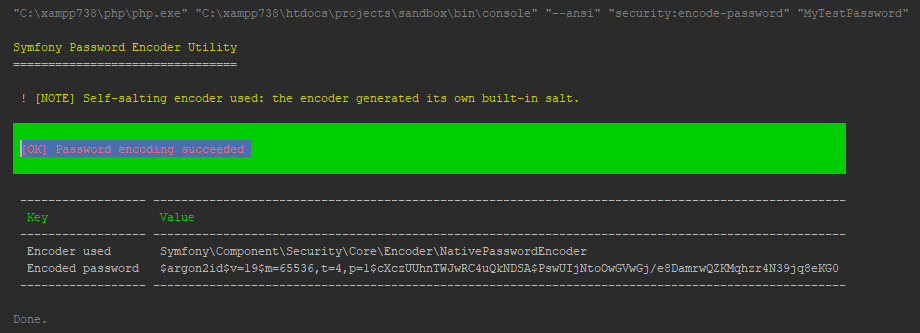
As you can see, the encoded password "MyTestPassword" with the Native Password Encoder of Symfony is $argon2id$v=19$m=65536,t=4,p=1$cXczUUhnTWJwRC4uQkNDSA$PswUIjNtoOwGVwGj/e8DamrwQZKMqhzr4N39jq8eKG0. Now that we have the password, we can easily create an user in our database with the following query (Note that the password needs to be changed with the encoded password generated by the command on your own machine):
INSERT INTO `user` (
    `id`,
    `email`,
    `roles`,
    `password`,
    `first_name`,
    `last_name`
) VALUES (
    NULL,
    '[email protected]',
    '[]',
    '$argon2id$v=19$m=65536,t=4,p=1$aU1QY2pLSjRjdzUwM2QyLw$8rwHEb9OxHusAt5yfSjHf3CtIkeWTFJxBy8IFDYa2jQ',
    'Carlos',
    'Delgado'
);
B. Creating user manually with Doctrine inside a controller
Alternatively, if you want to create the test user with PHP code, you can write quickly a custom action in a test controller with the following code, that would simply persist a new User entity in the database:
<?php

// src/Controller/TestController.php
namespace App\Controller;

use Symfony\Component\HttpFoundation\Response;
use Symfony\Component\Routing\Annotation\Route;
use Symfony\Bundle\FrameworkBundle\Controller\AbstractController;

// Import the User entity
use App\Entity\User;
// Import the Password Encoder Interface
use Symfony\Component\Security\Core\Encoder\UserPasswordEncoderInterface;

class TestController extends AbstractController
{
    /**
     * @Route("/register-test-user", name="app_register_testuser")
     */
    public function register(UserPasswordEncoderInterface $passwordEncoder)
    {
        // Retrieve the entity manager
        $entityManager = $this->getDoctrine()->getManager();

        // Create a new user with random data
        $user = new User();
        $user
            ->setEmail("[email protected]")
            ->setPassword($passwordEncoder->encodePassword(
                $user,
                'MyTestPassword'
            ))
            ->setFirstName("Carlos")
            ->setLastName("Delgado");

        $entityManager->persist($user);
        $entityManager->flush();

        return new Response(
            '<html><body>Test User Registered Succesfully</body></html>'
        );
    }
}
Following any of the previous steps of the creation of a test user, it will store a single record on the database with data like:
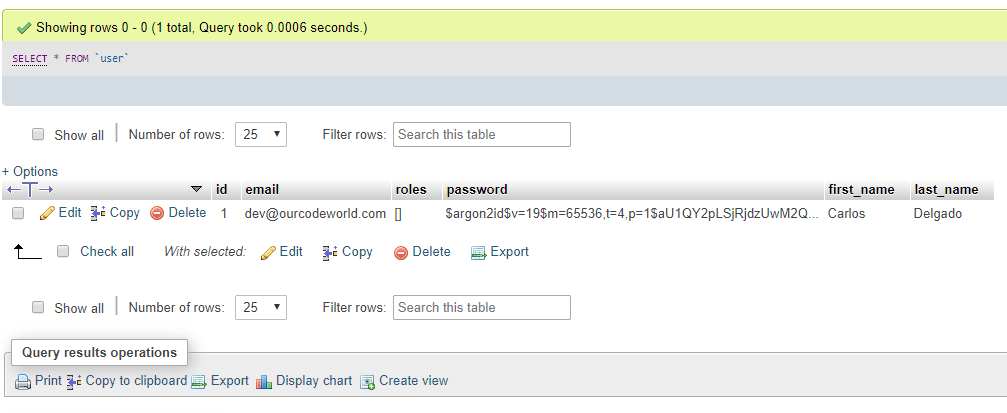
And that will be all for this part. As you can see, we implemented the most basic aspect of our authentication system, which is basically the implementation of an user entity.
Read all the parts of the tutorial "How to implement your own user authentication system in Symfony 4.3"
- Part 1: Creating a Custom User Class.
- Part 2: Creating an User Registration Form.
- Part 3: Creating a Login Form and Logout Route.
Links of interest for this tutorial
- https://symfony.com/doc/current/security.html#a-create-your-user-class
- https://symfony.com/doc/current/doctrine/registration_form.html
- https://symfony.com/doc/current/security.html#create-user-class
- https://symfony.com/doc/current/security.html#a-create-your-user-class
- https://stackoverflow.com/questions/6832445/how-can-bcrypt-have-built-in-salts
- https://stackoverflow.com/questions/23629571/create-tables-with-entities-doctrine-symfony2
Happy coding !

