
By default, Rich Text Boxes components don't offer any utility to do the most basic user interactions with a text editor, which means copy, cut, select all or remove a piece of text. This means that you will need to implement this feature by yourself. In this article, we will explain you how to add a context menu strip to your rich text boxes, so the user will be able to use a regular text editor context menu.
1. Create ExtensionMethods class
Just a specified in the MSDN website, when some feature needs to be implemented on multiple places in your project, the last thing you need to do is to rewrite your utility all over the project. Instead, as needed in this case, the RichtTextBox type exists already, so we can write an extension without creating a new derived type.
The following example shows how to create an extension methods class that will contain our helper EnableContextMenu method that should be callable from any RichTextBox instance. Create the ExtensionMethods.cs file and register the following class:
using System.Windows.Forms;
// Important ! Create the ExtensionMethods class as a "public static" class
public static class ExtensionMethods
{
public static void EnableContextMenu(this RichTextBox rtb)
{
if (rtb.ContextMenuStrip == null)
{
// Create a ContextMenuStrip without icons
ContextMenuStrip cms = new ContextMenuStrip();
cms.ShowImageMargin = false;
// 1. Add the Undo option
ToolStripMenuItem tsmiUndo = new ToolStripMenuItem("Undo");
tsmiUndo.Click += (sender, e) => rtb.Undo();
cms.Items.Add(tsmiUndo);
// 2. Add the Redo option
ToolStripMenuItem tsmiRedo = new ToolStripMenuItem("Redo");
tsmiRedo.Click += (sender, e) => rtb.Redo();
cms.Items.Add(tsmiRedo);
// Add a Separator
cms.Items.Add(new ToolStripSeparator());
// 3. Add the Cut option (cuts the selected text inside the richtextbox)
ToolStripMenuItem tsmiCut = new ToolStripMenuItem("Cut");
tsmiCut.Click += (sender, e) => rtb.Cut();
cms.Items.Add(tsmiCut);
// 4. Add the Copy option (copies the selected text inside the richtextbox)
ToolStripMenuItem tsmiCopy = new ToolStripMenuItem("Copy");
tsmiCopy.Click += (sender, e) => rtb.Copy();
cms.Items.Add(tsmiCopy);
// 5. Add the Paste option (adds the text from the clipboard into the richtextbox)
ToolStripMenuItem tsmiPaste = new ToolStripMenuItem("Paste");
tsmiPaste.Click += (sender, e) => rtb.Paste();
cms.Items.Add(tsmiPaste);
// 6. Add the Delete Option (remove the selected text in the richtextbox)
ToolStripMenuItem tsmiDelete = new ToolStripMenuItem("Delete");
tsmiDelete.Click += (sender, e) => rtb.SelectedText = "";
cms.Items.Add(tsmiDelete);
// Add a Separator
cms.Items.Add(new ToolStripSeparator());
// 7. Add the Select All Option (selects all the text inside the richtextbox)
ToolStripMenuItem tsmiSelectAll = new ToolStripMenuItem("Select All");
tsmiSelectAll.Click += (sender, e) => rtb.SelectAll();
cms.Items.Add(tsmiSelectAll);
// When opening the menu, check if the condition is fulfilled
// in order to enable the action
cms.Opening += (sender, e) =>
{
tsmiUndo.Enabled = !rtb.ReadOnly && rtb.CanUndo;
tsmiRedo.Enabled = !rtb.ReadOnly && rtb.CanRedo;
tsmiCut.Enabled = !rtb.ReadOnly && rtb.SelectionLength > 0;
tsmiCopy.Enabled = rtb.SelectionLength > 0;
tsmiPaste.Enabled = !rtb.ReadOnly && Clipboard.ContainsText();
tsmiDelete.Enabled = !rtb.ReadOnly && rtb.SelectionLength > 0;
tsmiSelectAll.Enabled = rtb.TextLength > 0 && rtb.SelectionLength < rtb.TextLength;
};
rtb.ContextMenuStrip = cms;
}
}
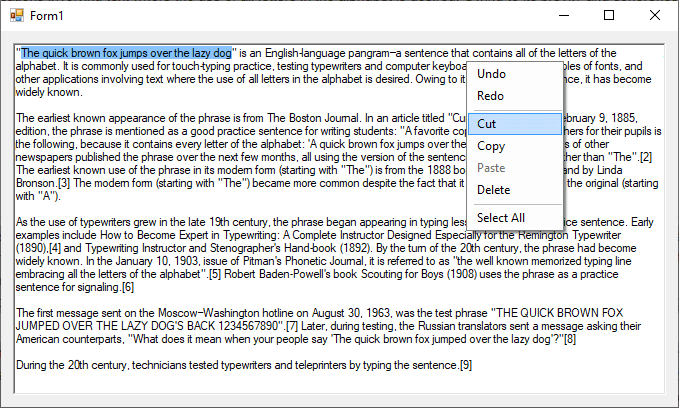
} The mentioned method, creates dinamically a ContextMenuStrip over the clicked spot (with right click) inside the RichTextBox, offering some options according to their availability.
2. Enable Context Menu on RichTextBox
As we said before, you may have multiple Rich Text Boxes that would need the same feature. The previously created extension allows specifically to call a new method from an instance of the rich text box:
richTextBox1.EnableContextMenu();In some cases, due to the context (where you create the class), you may need to bring the extension into scope calling the directive:
using ExtensionMethods;So, for example during the initialization of a very simple form (inside the constructor):
using System;

using System.Windows.Forms;

namespace Sandbox
{
    public partial class Form1 : Form
    {
        public Form1()
        {
            InitializeComponent();

            // Enable Context Menu !
            richTextBox1.EnableContextMenu();
        }

        private void Form1_Load(object sender, EventArgs e)
        {

        }
    }
}
Just as shown in the screenshot of the article, everytime you do right click on the rich text box, the menu will appear and every option will be enabled if available.
Happy coding !

