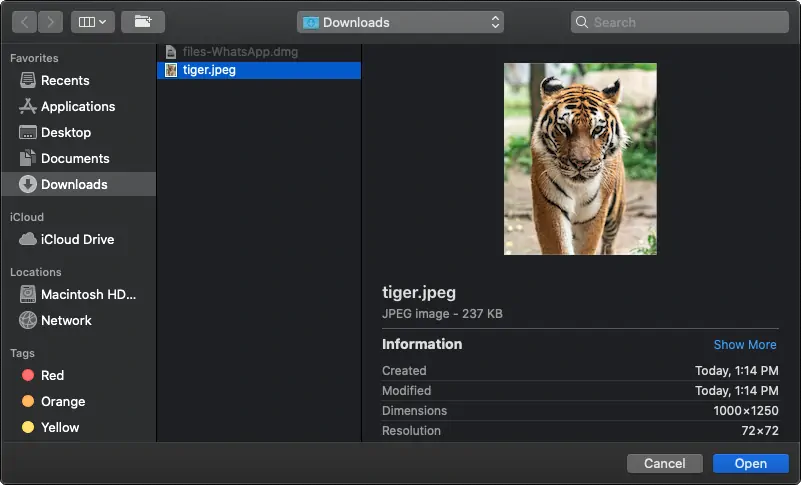
As one of the most common and regular stuff that you need to implement on every application of every platform, you should be able to select files and directories from the system easily, following official documentation of course. Unfortunately, there's not a lot of sources where you can obtain indications or examples of how to implement a file/directory picker in MacOS and the ones you find are usually outdated because they don't mention for which version of Swift are they.
In this article, i want to share with you some examples of how to use the native MacOS file/directory picker using Swift 5 that i use regularly on my applications.
A. Implementing the file picker
All the job is handled basically by the NSOpenPanel class. Instead of implementing your own file browser, the Open panel class is used as a very convenient way to allow the user to look for a file or directory in the system. The easiest way to display this dialog and handle the user selection is described on the following snippet:
let dialog = NSOpenPanel();

dialog.title                   = "Choose a file| Our Code World";
dialog.showsResizeIndicator    = true;
dialog.showsHiddenFiles        = false;
dialog.allowsMultipleSelection = false;
dialog.canChooseDirectories = false;

if (dialog.runModal() ==  NSApplication.ModalResponse.OK) {
    let result = dialog.url // Pathname of the file

    if (result != nil) {
        let path: String = result!.path

        // path contains the file path e.g
        // /Users/ourcodeworld/Desktop/file.txt
    }

} else {
    // User clicked on "Cancel"
    return
}
You simply need to create an instance of the NSOpenPanel and call the runModal method to display it. Previously, you may need to change some default properties as the possiblity of selecting multiple files etc. The method will return a code that can be compared with the NSApplication.ModalResponse struct, a set of button return values for modal dialogs. With a condition you should check if the user has selected a file and clicked on ok, finally you should verify that the url property of the dialog instance is not nil and you will be able to obtain the path of the file selected by the user.
A.1. Filtering by file extension
In some cases, the user shouldn't be able to pick any file in the system but files with specifical formats. For example, a regular case is the fact of picture manipulation software, where the user should be able to select only pictures with extensions as png, jpg or jpeg. The following snippet should display a filepicker that allows the user to select images only (like the image of the article):
let dialog = NSOpenPanel();

dialog.title                   = "Choose an image | Our Code World";
dialog.showsResizeIndicator    = true;
dialog.showsHiddenFiles        = false;
dialog.allowsMultipleSelection = false;
dialog.canChooseDirectories = false;
dialog.allowedFileTypes        = ["png", "jpg", "jpeg", "gif"];

if (dialog.runModal() ==  NSApplication.ModalResponse.OK) {
    let result = dialog.url // Pathname of the file

    if (result != nil) {
        let path: String = result!.path

        // path contains the file path e.g
        // /Users/ourcodeworld/Desktop/tiger.jpeg
    }

} else {
    // User clicked on "Cancel"
    return
}
A.2. Selecting multiple files
If you want to allow the user to select multiple files at time, be sure to set the allowsMultipleSelection option of the dialog to true. Then the user should be able to select whatever and how many files he wants. Be sure as well to change the code to manipulate the result. Instead of working with the dialog.url property, use the dialog.urls as this contains the array with the selected files. You can do whatever you want with the results, extract the path from every item of the array with the path property as shown in the following example:
let dialog = NSOpenPanel();

dialog.title                   = "Choose multiple files | Our Code World";
dialog.showsResizeIndicator    = true;
dialog.showsHiddenFiles        = false;
dialog.canChooseDirectories    = false;
dialog.allowsMultipleSelection = true;

if (dialog.runModal() ==  NSApplication.ModalResponse.OK) {
    // Results contains an array with all the selected paths
    let results = dialog.urls

    // Do whatever you need with every selected file
    // in this case, print on the terminal every path
    for result in results {
        // /Users/ourcodeworld/Desktop/fileA.txt
        print(result.path)
    }
} else {
    // User clicked on "Cancel"
    return
}
B. Implementing the directory picker
For the implementation of the directory picker, we will use the same NSOpenPanel class but you will need to change the 2 following properties to the dialog during its initialization:
dialog.canChooseFiles = false;
dialog.canChooseDirectories = true;
This will allow the user to select only directories in the system. The rest of the logic is basically the same as with the filepicker. For example:
B.1. Select a single directory
The following snippet shows the implementation of a picker that allows the user to select a single directory only:
let dialog = NSOpenPanel();

dialog.title                   = "Choose single directory | Our Code World";
dialog.showsResizeIndicator    = true;
dialog.showsHiddenFiles        = false;
dialog.canChooseFiles = false;
dialog.canChooseDirectories = true;

if (dialog.runModal() ==  NSApplication.ModalResponse.OK) {
    let result = dialog.url

    if (result != nil) {
        let path: String = result!.path

        // path contains the directory path e.g
        // /Users/ourcodeworld/Desktop/folder
    }
} else {
    // User clicked on "Cancel"
    return
}
B.2. Select multiple directories
The following snippet shows the implementation of a picker that allows the user to select multiple directories at the same time:
let dialog = NSOpenPanel();

dialog.title                   = "Choose multiple directories | Our Code World";
dialog.showsResizeIndicator    = true;
dialog.showsHiddenFiles        = false;
dialog.allowsMultipleSelection = true;
dialog.canChooseFiles = false;
dialog.canChooseDirectories = true;

if (dialog.runModal() ==  NSApplication.ModalResponse.OK) {

    // Results contains an array with all the selected paths
    let results = dialog.urls

    // Do whatever you need with every selected file
    // in this case, print on the terminal every path
    for result in results {
        // /Users/ourcodeworld/Desktop/folderA
        print(result.path)
    }
} else {
    // User clicked on "Cancel"
    return
}
Happy coding !


