
We all know how boring it is the output of the regular commands to obtain the operative system name in Linux or any other Linux flavor. It's quite common as well that we want to know which are the basic components of the server as the CPU name, amount of cores, available RAM, and so on. Knowing all of the necessary commands to display such information in every single distribution can be annoying and tedious. A lot of people think the same, and that's why an awesome package that solves this problem arose from the darkness. I'm talking about screenFetch.
screenFetch is a "Bash Screenshot Information Tool" that can be used to generate one of those nifty terminal theme information + ASCII distribution logos that you see in everyone's screenshots nowadays. It will auto-detect your distribution and display an ASCII version of that distribution's logo and some valuable information about the hardware of your server right away. There are options to specify no ASCII art, colors, taking a screenshot upon displaying info, and even customizing the screenshot command! This script is very easy to add to and can easily be extended.
Download screenFetch
As the idea of the package is to make it "universally" available, the installation of the package will vary according to your environment and the package manager that it uses. If your operative system isn't listed on the official installation manual, you may need to compile from source the package following these steps:
- Download the latest source at https://github.com/KittyKatt/screenFetch:
wget -O screenfetch-dev https://git.io/vaHfR - In a terminal, make the file executable by doing the following:
chmod +x screenfetch-dev - Then, either keep it there or move it to somewhere in your $PATH to make it available without having to use the full path to the script.
But as we mentioned, it's only if your operative system isn't listed here. The installation for the following operative systems goes like this:
SulinOS
inary it bcbusybox wget -O screenfetch-dev https://git.io/vaHfRinstall screenfetch-dev /usr/bin/screenfetch
Arch Linux
- Install
screenfetchfrom the official repositories orscreenfetch-gitfrom the AUR. That's it!
blackPanther OS
- Install
screenfetchfrom the official repositories, e.g.:installing screenfetch
ChromeOS/ChromiumOS
- Requires Developer Mode to be enabled. Instructions to enable it and enter the CLI are here - https://www.chromium.org/chromium-os/poking-around-your-chrome-os-device.
- Download the executable file and put it under the
/usr/local/bin/directory:curl -L https://git.io/vaHfR > /usr/local/bin/screenfetch-dev - Make the file executable by doing the following:
chmod +x /usr/local/bin/screenfetch-dev
Crux Linux
- Install screenfetch from either 6c37/crux-ports or 6c37/crux-ports-git.
Fedora
- Install it with dnf running:
dnf install screenfetch
FreeBSD
- Install screenfetch using the ports system:
cd /usr/ports/sysutils/screenfetch/ && make install clean - Install screenfetch as a binary package:
pkg install screenFetch - Make sure fdescfs(5) and procfs(5) are mounted, they're required by bash(1).
Alternative installation for systems not needing X11 support:
- Install screenfetch-nox11 using the ports system:
cd /usr/ports/sysutils/screenfetch-nox11/ && make install clean - Install screenfetch as a binary package:
pkg install screenFetch-nox11 - Make sure fdescfs(5) and procfs(5) are mounted, they're required by bash(1).
Fux
- Installation:
dnf install screenfetch
Gentoo or Sabayon
- Emerge screenfetch from portage using
emerge app-misc/screenfetch - Sabayon users can install screenfetch from entropy using
equo install screenfetch
KaOS
- Install screenfetch from the official repositories with octopi or pacman. e.g.:
pacman -S screenfetch
Mac
- Run
brew install screenfetchafter installing Homebrew
Mageia
- Install screenfetch from the official repositories with urpmi or rpmdrake. e.g.:
urpmi screenfetch
MSYS2
- Install screenfetch from the official repositories:
pacman -S screenfetch
Netrunner Rolling
- Install
screenfetch-netrunnerfrom the official repositories.
openSUSE
- If using 13.2 or earlier, add "utilities" repo:
zypper ar -r http://download.opensuse.org/repositories/utilities/openSUSE_$(lsb_release -rs)/utilities.repo - Install it with zypper running:
zypper install screenfetch
Solus
- Install screenfetch from the official repositories by running
eopkg install screenfetch
Ubuntu and Debian
- Install from the official repositories:
apt install screenfetch - There is also a PPA for Ubuntu located at https://launchpad.net/%7Edjcj/+archive/ubuntu/screenfetch
For more information about this package, please visit the official repository at Github here.
Using screenFetch
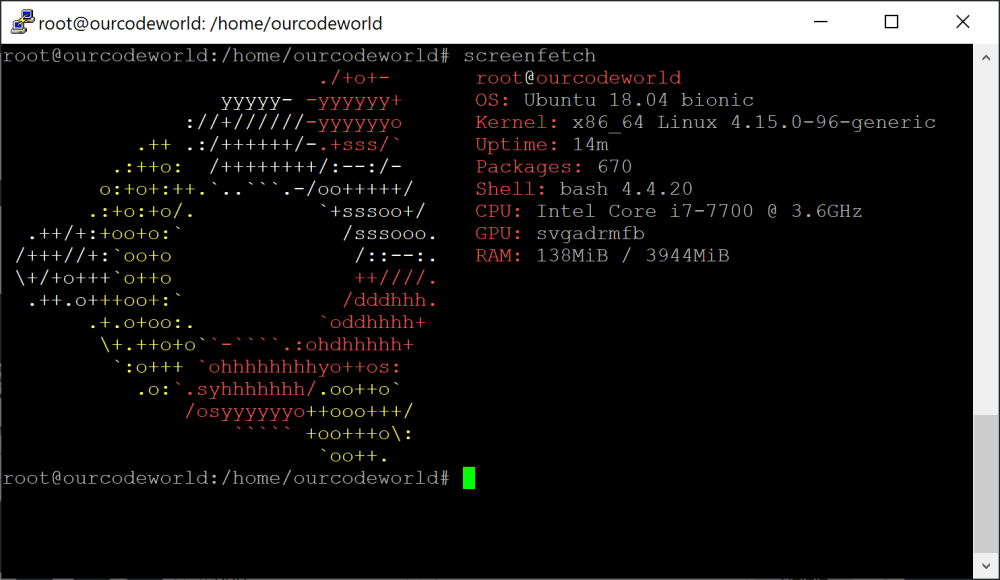
To get started with this tool, simply run the command on the terminal:
screenfetchThis will generate the output with the information as you can see in the image of the article. For more details about the commands, you can print the help with:
screenfetch -hThis would output something similar to:
  -v                 Verbose output.
  -o 'OPTIONS'       Allows for setting script variables on the
                     command line. Must be in the following format...
                     'OPTION1="OPTIONARG1";OPTION2="OPTIONARG2"'
  -d '+var;-var;var' Allows for setting what information is displayed
                     on the command line. You can add displays with +var,var. You
                     can delete displays with -var,var. Setting without + or - will
                     set display to that explicit combination. Add and delete statements
                     may be used in conjunction by placing a ; between them as so:
                     +var,var,var;-var,var.
  -n                 Do not display ASCII distribution logo.
  -N                 Strip all color from output.
  -w                 Wrap long lines.
  -t                 Truncate output based on terminal width (Experimental!).
  -p                 Output in portrait mode, with logo above info.
  -s [-u IMGHOST]    Using this flag tells the script that you want it
                     to take a screenshot. Use the -m flag if you would like
                     to move it to a new location afterwards.
  -c string          You may change the outputted colors with -c. The format is
                     as follows: [0-9][0-9],[0-9][0-9]. The first argument controls the
                     ASCII logo colors and the label colors. The second argument
                     controls the colors of the information found. One argument may be
                     used without the other.
  -a 'PATH'          You can specify a custom ASCII art by passing the path
                     to a Bash script, defining `startline` and `fulloutput`
                     variables, and optionally `labelcolor` and `textcolor`.
                     See the `asciiText` function in the source code for more
                     information on the variables format.
  -S 'COMMAND'       Here you can specify a custom screenshot command for
                     the script to execute. Surrounding quotes are required.
  -D 'DISTRO'        Here you can specify your distribution for the script
                     to use. Surrounding quotes are required.
  -A 'DISTRO'        Here you can specify the distribution art that you want
                     displayed. This is for when you want your distro
                     detected but want to display a different logo.
  -E                 Suppress output of errors.
  -C                 Add custom (extra) lines.
                     For example:
                           screenfetch -C 'IP WAN=192.168.0.12,IP BRIDGED=10.1.1.10'
                     ... will add two extra lines:
                           IP WAN: 192.168.0.12
                           IP BRIDGED: 10.1.1.10
  -V, --version      Display current script version.
  -h, --help         Display this help.
Happy coding ❤️!

