
Our Code World loves dark user interfaces. We love to take care of our eyes especially on those long nights of coding with pizza and soda. This is a not so common practice that fortunately, is beginning to being adopted by many websites like Stack Overflow, Dev.to, and so on.
As developers, we may need to introduce the same features to the products you are working on, like a CMS. If some of your projects use one of the best WYSIWYG editors for JavaScript out there, specifically TinyMCE, you won't need to develop a custom dark mode as it already offers one that may possibly fit with your current interface design. In this short article, I'll explain to you how to easily use the dark mode of TinyMCE in your project easily with JavaScript.
Using the dark mode
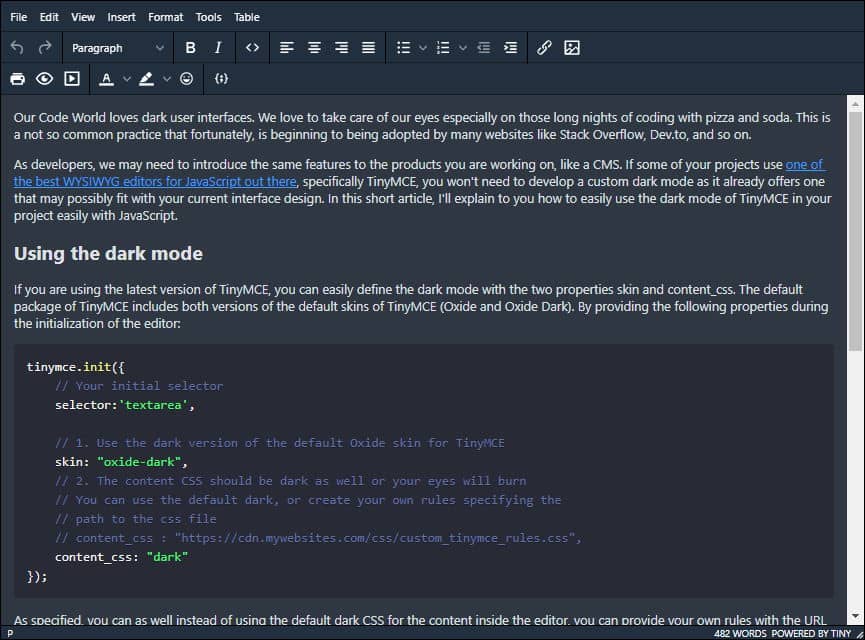
If you are using the latest version of TinyMCE, you can easily define the dark mode with the two properties skin and content_css. The default package of TinyMCE includes both versions of the default skins of TinyMCE (Oxide and Oxide Dark). By providing the following properties during the initialization of the editor:
tinymce.init({
    // Your initial selector
    selector:'textarea',

    // 1. Use the dark version of the default Oxide skin for TinyMCE
    skin: "oxide-dark",
    // 2. The content CSS should be dark as well or your eyes will burn
    // You can use the default dark, or create your own rules specifying the
    // path to the css file
    // content_css : "https://cdn.mywebsites.com/css/custom_tinymce_rules.css",
    content_css: "dark"
});
As specified, you can as well instead of using the default dark CSS for the content inside the editor, you can provide your own rules with the URL of the CSS file with these rules. That's basically all that you need to do to use a dark mode in TinyMCE.
Using according to the user's preferences
As we described in previous articles, there's a pretty useful way to know when the user prefers a darker or lighter color schema in their applications with JavaScript and CSS easily. We can use this to define the theme of TinyMCE accordingly:
tinymce.init({
    // Your initial selector
    selector:'textarea',

    // 1. Use the dark version of the default Oxide skin for TinyMCE
    skin: (window.matchMedia("(prefers-color-scheme: dark)").matches ? "oxide-dark" : ""),
    // 2. The content CSS should be dark as well or your eyes will burn
    // You can use the default dark, or create your own rules specifying the
    // path to the css file
    // content_css : "https://cdn.mywebsites.com/css/custom_tinymce_rules.css",
    content_css: (window.matchMedia("(prefers-color-scheme: dark)").matches ? "dark" : "")
});
In this way, if the users prefer a dark schema, then the Oxide dark theme will be used, otherwise, the default skin will be used.
Customize the skin by yourself
And remember, if this isn't what you are looking for and instead, you want to customize every single detail in the editor, check out the official guidelines of how to create a custom skin for TinyMCE on their official website here.
Happy coding ❤️!

