
In case you haven't noticed yet and you are just embedding any useful video of youtube that you find on a single website page, embedding a single video from youtube, for example:
<iframe width="560" height="315" src="https://www.youtube.com/embed/2knO_yUy2hE" frameborder="0" allow="accelerometer; autoplay; clipboard-write; encrypted-media; gyroscope; picture-in-picture" allowfullscreen></iframe>It adds automatically an extra 272KB size to your page. This by itself, is not an insignificant amount considering that the ideal size of a fast-loading page is 1MB (1024KB). If you are looking for a way to optimize your web pages that contains YouTube embed videos, you definitely need to lazy load them.
In this article, we are going to show you 2 approaches that will solve your problem.
A. LazyLoading with the IntersectionObserver API
To understand what we are going to do in this approach with the IntersectionObserver API, consider the following example of a vertically scrollable webpage that contains a single YouTube video:

In this case, if you embed the video as you traditionally would with the markup, the iframe of YouTube would add immediately the 272KB to the size of your page, even though the video is not visible to the user in the viewport. In terms of optimization, this is really awful. So the solution, to remove those 272KBs that aren't needed yet, would be to load them only when it's visible on the viewport (using LazyLoad it wouldn't load immediately):
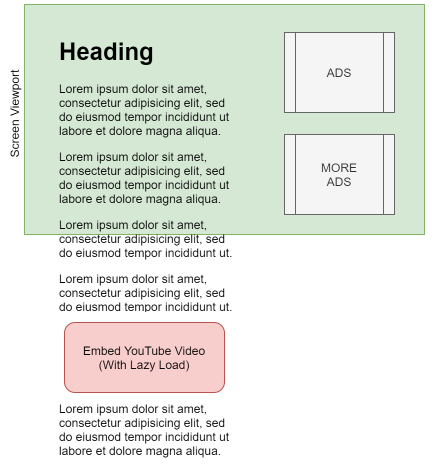
It would only load when the video container is inside the viewport, loading the 272KB that the user would now see:

In this article, I'm going to explain how to optimally load an embedded YouTube video using lazy loading with JavaScript.
A.1. Include VanillaLazyLoad
For this implementation of LazyLoading, we will use the LazyLoad vanilla script. LazyLoad is a lightweight (2.4 kB) and flexible script that speeds up your web application by deferring the loading of your below-the-fold images, videos, and iframes to when they will enter the viewport. It's written in plain "vanilla" JavaScript, it leverages the IntersectionObserver API, it supports responsive images, it optimizes your website for slower connections, and can enable native lazy loading.
If you use NPM to handle packages, install with the following command:
npm install vanilla-lazyloadOr if you don't use NPM, include it directly through some markup:
<script
  async
  src="https://cdn.jsdelivr.net/npm/vanilla-lazyload@latest/dist/lazyload.min.js"
></script>
The size of the Vanilla Lazyload script is only 7.34 KB, so it is definitely a gain for your project considering the 272 that you would add with just the embed video. For more information about this library, please visit the official repository at Github here.
A.2. LazyLoad YouTube iframe
Now all that we need to do, is to include the iframe of the YouTube video, be sure to add the lazy class to the iframe, and change the src attribute to data-src, so that the iframe won't be loaded automatically. Include as well the JavaScript logic to initialize the lazy loading globally:
<!-- Embedded YouTube video Markup with the lazy class -->
<iframe
    class="lazy"
    data-src="https://www.youtube.com/embed/NuMvHeAqJ2I"
    frameborder="0"
    allow="accelerometer; autoplay; clipboard-write; encrypted-media; gyroscope; picture-in-picture"
    allowfullscreen
>
</iframe>
<script>
// Set the options globally
// to make LazyLoad self-initialize
window.lazyLoadOptions = {
    // Your custom settings go here
};

// Listen to the initialization event
// and get the instance of LazyLoad
window.addEventListener("LazyLoad::Initialized", function (event) {
    window.lazyLoadInstance = event.detail.instance;
}, false);
</script>
With this approach, the YouTube video will load only until the user scrolls to the area where the video is located.
B. Play video manually
Now, the solution of loading the video manually is great for those that cannot rely on the LazyLoading through the IntersectionObserver. For example, if your video appears immediately on the viewport of the user, there's simply no point in implementing the mentioned implementation, so you will need to implement a different one. The recommended solution, in this case, is to simply display the thumbnail of the video that you want to include, so if the user wants to play the video, the user would simply click on the image and the YouTube video would be loaded:

This approach is way longer, however, it's worth it as in comparison to the 272KB of the embedded video, you would only add the size of the thumbnail image (which is about 25KB only). So, let's get started!
B.1. Create markup
In this case, the markup to display the video will be totally different from what you are used to of simply embedding the iframe of youtube. You need to know the ID of the video. For example, the iframe to embed the video is the following one:
<iframe width="560" height="315" src="https://www.youtube.com/embed/2knO_yUy2hE" frameborder="0" allow="accelerometer; autoplay; clipboard-write; encrypted-media; gyroscope; picture-in-picture" allowfullscreen></iframe>The URL of the video is: https://www.youtube.com/embed/2knO_yUy2hE so the ID of the video is 2knO_yUy2hE.
Knowing this, the markup that we will place instead of embedding directly the youtube video will be the following one:
<!-- 1. Video Wrapper Container -->
<div class="embed-youtube" data-video-id="2knO_yUy2hE">
    <!-- 2. The preview button that will contain the Play icon -->
    <div class="embed-youtube-play"></div>
</div>
B.2. Add CSS
As you can see, the ID of the video will be stored in the data-video-id attribute that we will obtain with JavaScript to embed the original YouTube video. Now, let's add some CSS so the preview container looks good and calls the user to click to play the YouTube video:
.embed-youtube {
    background-color: #000;
    margin-bottom: 30px;
    position: relative;
    padding-top: 56.25%;
    overflow: hidden;
    cursor: pointer;
}
.embed-youtube img {
    width: 100%;
    top: -16.84%;
    left: 0;
    opacity: 0.7;
}
.embed-youtube .embed-youtube-play {
    width: 68px;
    height: 48px;
    background-color: #333;
    box-shadow: 0 0 30px rgba( 0,0,0,0.6 );
    z-index: 1;
    opacity: 0.8;
    border-radius: 6px;
}
.embed-youtube .embed-youtube-play:before {
    content: "";
    border-style: solid;
    border-width: 15px 0 15px 26.0px;
    border-color: transparent transparent transparent #fff;
}
.embed-youtube img,
.embed-youtube .embed-youtube-play {
    cursor: pointer;
}
.embed-youtube img,
.embed-youtube iframe,
.embed-youtube .embed-youtube-play,
.embed-youtube .embed-youtube-play:before {
    position: absolute;
}
.embed-youtube .embed-youtube-play,
.embed-youtube .embed-youtube-play:before {
    top: 50%;
    left: 50%;
    transform: translate3d( -50%, -50%, 0 );
}
.embed-youtube iframe {
    height: 100%;
    width: 100%;
    top: 0;
    left: 0;
}

.embed-youtube .embed-youtube-play:hover {
    background-color: #f00;
}
The given CSS will retain that 16:9 aspect ratio that every YouTube video should keep and will have a play icon so the user can interact with it.
B.3. Add JavaScript
JavaScript is required to automatically load the thumbnail image of the video. The logic will add as well a click event listener that will inject the iframe of the embedded youtube video when the user wants to play the video:
(function(){
    let YouTubeContainers = document.querySelectorAll(".embed-youtube");

    // Iterate over every YouTube container you may have
    for (let i = 0; i < YouTubeContainers.length; i++) {
        let container = YouTubeContainers[i];
        let imageSource = "https://img.youtube.com/vi/"+ container.dataset.videoId +"/sddefault.jpg";

        // Load the Thumbnail Image asynchronously
        let image = new Image();
        image.src = imageSource;
        image.addEventListener("load", function() {
            container.appendChild(image);
        });

        // When the user clicks on the container, load the embedded YouTube video
        container.addEventListener("click", function() {
            let iframe = document.createElement( "iframe" );

            iframe.setAttribute("frameborder", "0");
            iframe.setAttribute("allowfullscreen", "");
            iframe.setAttribute("allow", "accelerometer; autoplay; clipboard-write; encrypted-media; gyroscope; picture-in-picture");
            // Important: add the autoplay GET parameter, otherwise the user would need to click over the YouTube video again to play it
            iframe.setAttribute("src", "https://www.youtube.com/embed/"+ this.dataset.videoId +"?rel=0&showinfo=0&autoplay=1");

            // Clear Thumbnail and load the YouTube iframe
            this.innerHTML = "";
            this.appendChild( iframe );
        });
    }
})();
Alternatively, you can easily obtain the YouTube thumbnail from a video URL (https://www.youtube.com/watch?v=2knO_yUy2hE) with this online YouTube thumbnail downloader tool, so you may tweak the logic a little bit.
You can see a full running example in the following JSFiddle that includes the markup, CSS, and JavaScript:
Note that with the given example, you may be able to inject multiple videos in a single page without compromising the website speed.
Happy coding ❤️!

