
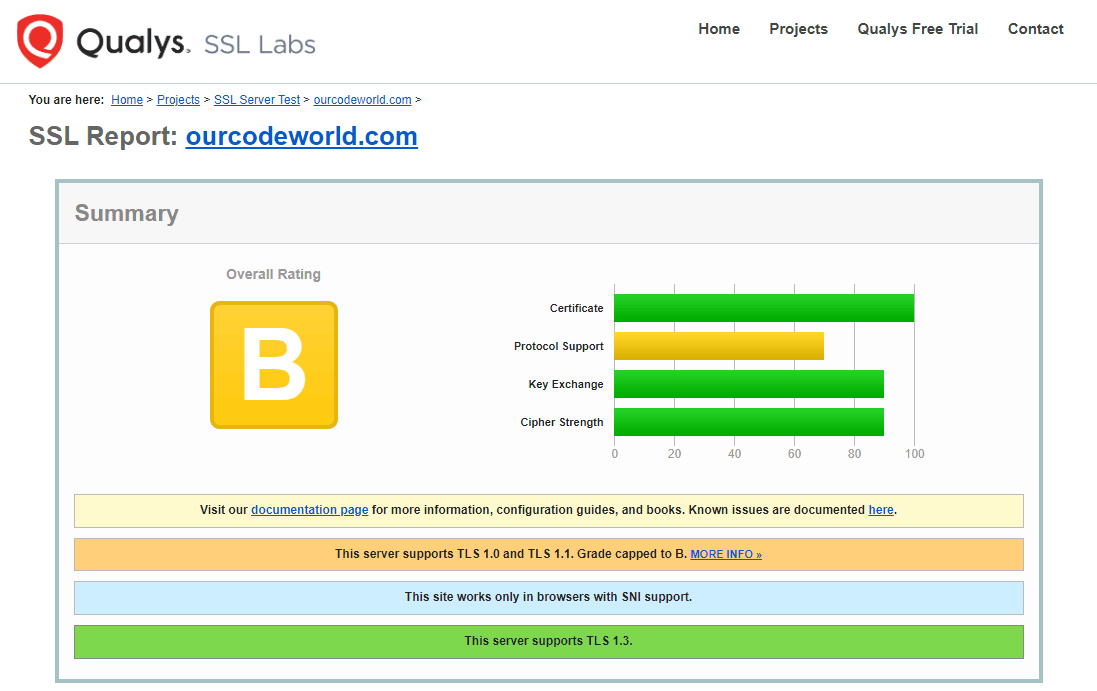
On these days, I was hired to deploy a website that required an A+ SSL Rating on their website, because the client requested specifically that it was necessary to have the highest security standards implemented on the project. Initially, the first thing I asked was why wouldn't be enough to use the SSL certificate provided by Cloudflare, their reverse proxy provider. To my surprise, It seems that when you have the most basic plan of Cloudflare, the highest overall rating you can achieve with a standard certificate is B:
If you want to get a higher rating, you will need to pay for their Advanced Certificate Manager service, which adds $10 USD extra per zone to the monthly billing. As cost reduction is important in this project as well and they wanted to remove the cost of Cloudflare, besides from a paid wildcard certificate, we decided to move on with a Let's Encrypt certificate.
After some research, I found a way to use a Let's Encrypt certificate and configure it with Nginx to achieve the highest rating on the SSL Labs test. In this article, I will share with you how to easily configure it with an NGINX setup.
Trade-offs
Having an SSL certificate with a grade A+ is usually a good thing, because it means a higher level of security for your website, yet there are some trade-offs to consider when implementing such a kind of certificate. I will mention a few of them:
- Compatibility: If your SSL certificate employs cutting-edge encryption algorithms, there's a possibility of compatibility issues for a small portion of users, particularly those utilizing older browsers or devices that lack support for the latest encryption standards.
- Performance impact: using a strong encryption requires more processing power, which can impact the performance of your website, specially when you handle a large volume of transactions.
- Mixed content troubles: a very strict SSL configuration can cause issues with mixed content (when you load insecure elements on your website through HTTP). This means that you will need to review and adjust your site's content to make it work properly in case you have mixed content.
Considering that, be sure to know what you're doing before implementing this type of configuration in your web server.
Requirements
- A domain/subdomain.
- Access to the DNS Record management of the domain.
- A Server.
Although not required, it will be useful to know how to work with the following technologies in order to follow the whole tutorial without any issues:
- Docker
- NGINX
Having said that, let's get started with the implementation of our super-safe SSL-protected website with a grade of A+ in SSL Labs!
1. Create an A record for your domain/subdomain
In your DNS Management panel of your DNS provider, create a A record that targets your server IP address. In my case, I use Cloudflare, and I will follow this tutorial with a subdomain that will be supersafe.ourcodeworld.com and will point to one of our testing servers:
Note: if you're using a service like Cloudflare that offers a reverse proxy, be sure to not use the proxy service (DNS Only), as we will be configuring our server to use our own SSL certificate instead of Cloudflare's.
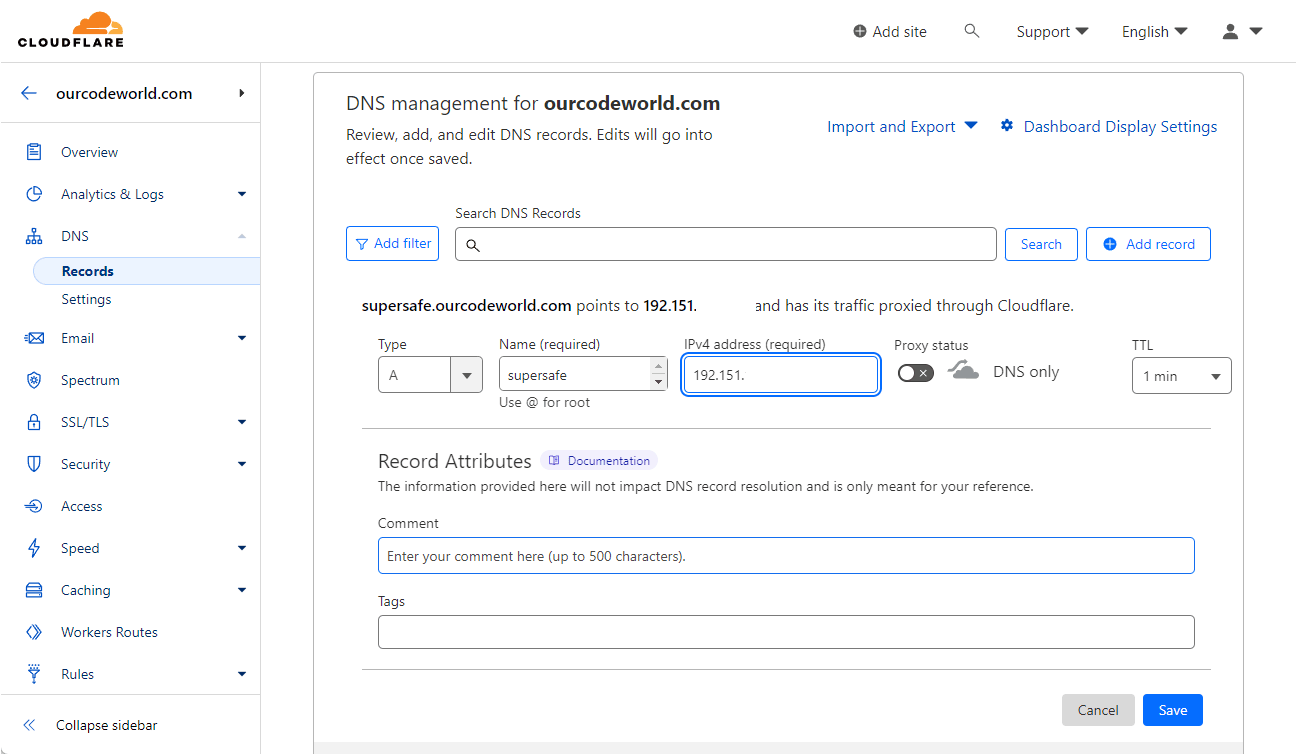
Save your record and wait for it to propagate properly. If you don't create the record, you will have a problem similar to the following one when trying to generate the SSL certificate later with Certbot:
Certbot failed to authenticate some domains (authenticator: standalone). The Certificate Authority reported these problems:
  Domain: supersafe.ourcodeworld.com
  Type:   dns
  Detail: DNS problem: NXDOMAIN looking up A for supersafe.ourcodeworld.com - check that a DNS record exists for this domain; DNS problem: NXDOMAIN looking up AAAA for supersafe.ourcodeworld.com - check that a DNS record exists for this domain

Hint: The Certificate Authority failed to download the challenge files from the temporary standalone webserver started by Certbot on port 80. Ensure that the listed domains point to this machine and that it can accept inbound connections from the internet.

Some challenges have failed.
2. Install Certbot
Certbot is an awesome open-source tool designed to automate the process of enabling and renewing SSL/TLS certificates on your web servers. It's part of the Let's Encrypt project and supports various web servers including Nginx, Apache, and others. Certbot is primarily operated through a command-line interface, making it pretty suitable for server administrators and developers like us who prefer command-line tools.
In this case, my host machine is running Ubuntu 22.04, so I can install the Certbot tools with the following commands:
sudo snap install --classic certbotThen create a symbolic link to the binary:
sudo ln -s /snap/bin/certbot /usr/bin/certbotAnd just in case your port 443 is not open, open it!:
sudo ufw allow 443Finally, test Cerbot in the command line by printing the installed version:
certbot --version
# Outputs in my case: certbot 2.7.1
3. Generate a Let's Encrypt certificate
The Let's Encrypt certificate should be enough to achieve the A+ SSL Rating, however, it's very important to know that it's necessary to request a certificate with a 4096-bit RSA Key Size. The main difference between a 4096-bit key over a 2048-bit key is a significant increase in strength. There's an important increase as well in the CPU usage for the time of handshaking as a result of using a key of this size.
Let's Encrypt allows you to request this kind of certificate, by simply adding the extra parameter --rsa-key-size with a value of 4096 instead of the default 2048:
sudo certbot certonly --standalone -d supersafe.ourcodeworld.com --rsa-key-size 4096This will start the prompt if you haven't provided your email, and will generate the certificate as requested in the default Let's Encrypt directory:
Saving debug log to /var/log/letsencrypt/letsencrypt.log
Requesting a certificate for supersafe.ourcodeworld.com
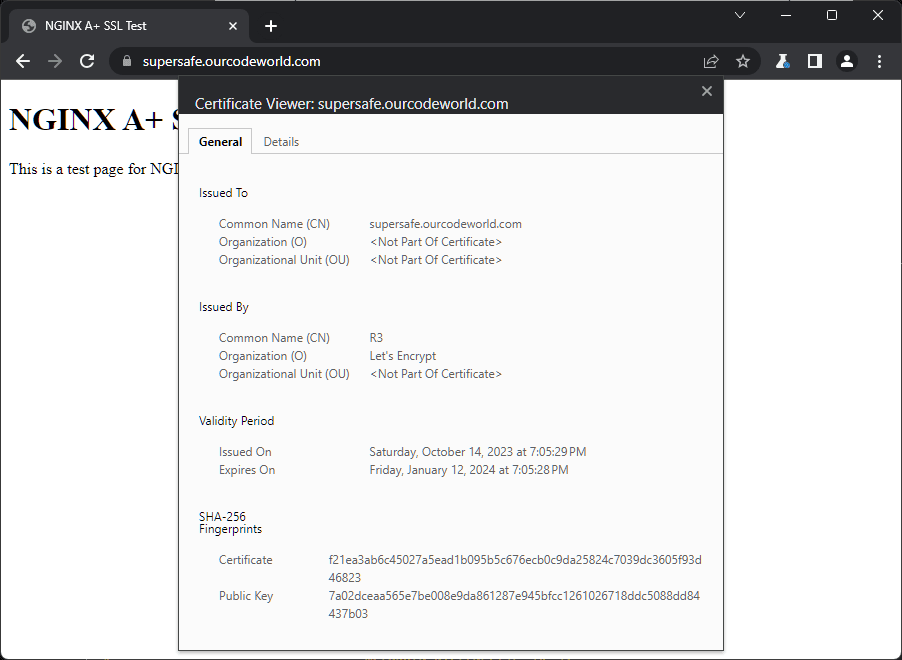
Successfully received certificate.
Certificate is saved at: /etc/letsencrypt/live/supersafe.ourcodeworld.com/fullchain.pem
Key is saved at: /etc/letsencrypt/live/supersafe.ourcodeworld.com/privkey.pem
This certificate expires on 2024-01-12.
These files will be updated when the certificate renews.
Certbot has set up a scheduled task to automatically renew this certificate in the background.
- - - - - - - - - - - - - - - - - - - - - - - - - - - - - - - - - - - - - - - -
If you like Certbot, please consider supporting our work by:
* Donating to ISRG / Let's Encrypt: https://letsencrypt.org/donate
* Donating to EFF: https://eff.org/donate-le
- - - - - - - - - - - - - - - - - - - - - - - - - - - - - - - - - - - - - - - -That's it! We have now an incredibly secure SSL certificate. It's important to mention as well that the tool will generate the chain.pem file as well in the same directory: /etc/letsencrypt/live/supersafe.ourcodeworld.com/chain.pem. This file will be used as well in our Nginx configuration file later.
4. Create an NGINX container (optional)
This step is optional, as you may have already NGINX installed and configured with the default configuration in your own bare metal server. In this step, I will explain how to set quickly up a working project that displays a simple HTML website and is served with NGINX. Create a Dockerfile in a folder with the following content in your host server. In this image we:
- Use Nginx 1.25.2 with Alpine as the base image.
- Create a directory inside the container specifically
/etc/nginx/ssl, where we are going to mount the SSL certificates generated by Certbot. - Remove the default configuration file of Nginx.
- Copy the
nginx.conffile that will be stored in the same directory as this Dockerfile and we'll create it later with the necessary configuration. - Copy the index.html file that we will create later in the container to serve it through Nginx.
FROM nginx:1.25.2-alpine

RUN apk update && apk add openssl

# Create a diffie-hellman group with 4096 bit encryption
# This will be used in the SSL configuration
# This task will take long to generate
RUN openssl dhparam -out /etc/nginx/dhparam.pem 4096

# Create directory for SSL certificates
RUN mkdir /etc/nginx/ssl

# Chown the directory to root
RUN chown -R root:root /etc/nginx/ssl

# Set permissions to 600
RUN chmod -R 600 /etc/nginx/ssl

# Remove default configuration file
RUN rm /etc/nginx/conf.d/default.conf

COPY ./nginx.conf /etc/nginx/conf.d

COPY ./index.html /var/www/html/index.html
Then, create the docker-compose.yml file with the following content:
- We create a single service, which uses the Dockerfile that we created previously.
- We open the ports 80 and 443.
- Mount the volumes of the Let's Encrypt certificate from the host machine to the container.
version: '3.8'
services:
    web:
        build:
            context: .
            dockerfile: Dockerfile
        # Open the port 80 and 443 of the container
        ports:
            - 80:80
            - 443:443
        # Mount the volumes of the certificates, be sure to change the path of the certificates to your own
        # as well as your domain. In this tutorial, we're using the domain supersafe.ourcodeworld.com
        # and the certificates are located in the host machine in the following path:
        #   /etc/letsencrypt/live/supersafe.ourcodeworld.com
        # and binded to the container in the following path:
        #   /etc/nginx/ssl/supersafe.ourcodeworld.com
        volumes:
            - /etc/letsencrypt/live/supersafe.ourcodeworld.com/fullchain.pem:/etc/nginx/ssl/supersafe.ourcodeworld.com/fullchain.pem
            - /etc/letsencrypt/live/supersafe.ourcodeworld.com/privkey.pem:/etc/nginx/ssl/supersafe.ourcodeworld.com/privkey.pem
            - /etc/letsencrypt/live/supersafe.ourcodeworld.com/chain.pem:/etc/nginx/ssl/supersafe.ourcodeworld.com/chain.pem
And finally, create a index.html file with the following content that will be served by the container at https://supersafe.ourcodeworld.com:
<!DOCTYPE html>
<html lang="en">
    <head>
        <meta charset="UTF-8">
        <meta name="viewport" content="width=device-width, initial-scale=1.0">
        <title>
            NGINX A+ SSL Test
        </title>
    </head>
    <body>
        <p>
            This is a test page for NGINX A+ SSL Test!
        </p>
    </body>
</html>
5. Configuring NGINX to achieve Rating A+
You have arrived at the most important part of the tutorial, how to configure Nginx to achieve the highest overall rating in SSL Labs. To achieve this rating, you will need to configure the most basic things such as enabling a server that listens in port 443 (HTTPS), and enabling the HTTP Strict Transport Security (HSTS) setting:
- Specify the
ssl_certificate,ssl_certificate_key,ssl_trusted_certificateparameters with the paths to the Let's Encrypt certificate files. - Use
ssl_protocolsto provide support for TLS 1.2 and TLS 1.3. - Use
ssl_dhparamto specify the path to a file containing Diffie-Hellman (DH) parameters for key exchange. - Specify the list of accepted ciphers with
ssl_ciphers. - Enable the OCSP stapling used in the context of SSL/TLS to enhance the security and performance of certificate revocation checks with
ssl_stapling_verifyandssl_stapling.
All of those settings adjusted in this file, are done following the SSL Server Rating Guide, provided officially by the SSL Labs team. It is recommended to use the Mozilla SSL Configuration Generator to adjust the Ciphers used in your NGINX configuration (and use the up-to-date version of this NGINX configuration) file to achieve the A+ Rating. In my case, until today the following nginx.conf configuration file helped me to obtain the highest rating on SSL Labs:
Note: we are not handling redirection, you may implement it as you need it.
server {
    listen              443 ssl;
    server_name         supersafe.ourcodeworld.com;

    # Define the location of the SSL certificates generated with certbot
    ssl_certificate     /etc/nginx/ssl/supersafe.ourcodeworld.com/fullchain.pem;
    ssl_certificate_key /etc/nginx/ssl/supersafe.ourcodeworld.com/privkey.pem;
    ssl_trusted_certificate /etc/nginx/ssl/supersafe.ourcodeworld.com/chain.pem;

    # Define the root directory of our application
    # In my example, the application is located in /var/www/html
    # and servers a basic HTML file. You should change this to your needs!
    root /var/www/html;
    index index.html;

    ssl_protocols TLSv1.2 TLSv1.3;
    # This file was generated with `openssl dhparam -out /etc/nginx/dhparam.pem 4096`
    # Diffie-Hellman parameter for DHE ciphersuites, recommended 4096 bits
    ssl_dhparam /etc/nginx/dhparam.pem;

    # Configure the ciphers accepted
    ssl_ciphers ECDHE-ECDSA-AES128-GCM-SHA256:ECDHE-RSA-AES128-GCM-SHA256:ECDHE-ECDSA-AES256-GCM-SHA384:ECDHE-RSA-AES256-GCM-SHA384:ECDHE-ECDSA-CHACHA20-POLY1305:ECDHE-RSA-CHACHA20-POLY1305:DHE-RSA-AES128-GCM-SHA256:DHE-RSA-AES256-GCM-SHA384:DHE-RSA-CHACHA20-POLY1305;
    ssl_prefer_server_ciphers off;
    ssl_ecdh_curve secp384r1;

    ssl_session_timeout 10m;
    ssl_session_cache   shared:SSL:10m;
    ssl_session_tickets off;

    # OCSP stapling
    ssl_stapling on;
    ssl_stapling_verify on;

    port_in_redirect off;
    resolver 8.8.8.8 8.8.4.4 valid=300s;
    resolver_timeout 5s;

    # Mime settings
    include             /etc/nginx/mime.types;
    default_type        application/octet-stream;

    # HSTS (ngx_http_headers_module is required) (63072000 seconds)
    add_header Strict-Transport-Security "max-age=63072000" always;

    add_header X-Frame-Options "SAMEORIGIN"  always;
    add_header X-Content-Type-Options "nosniff"  always;
    add_header X-XSS-Protection "1; mode=block";
    add_header Content-Security-Policy "frame-ancestors https://supersafe.ourcodeworld.com/;";
    add_header Referrer-Policy strict-origin-when-cross-origin;
    add_header Feature-Policy "accelerometer 'none'; ";
}
Save the changes to the nginx.conf file and launch the docker stack:
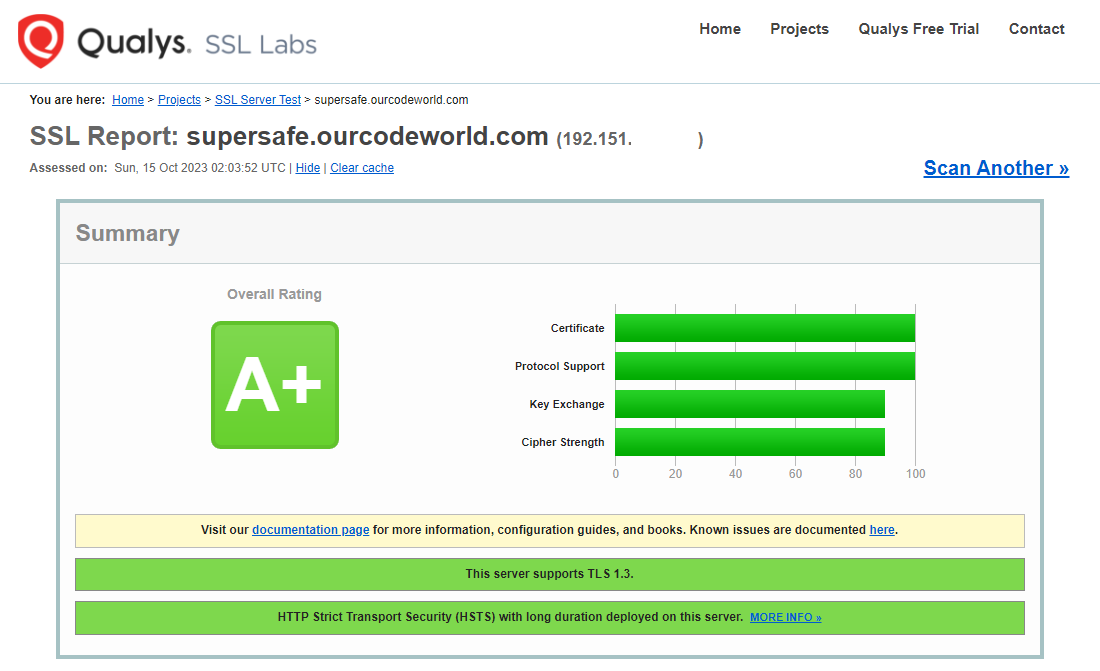
docker compose up --build -dFinally, try to access the website, if everything is properly configured, you should be able to access it through HTTPS:
and if you run the SSL Labs test, the rating of your certificate will be A+:
Happy coding ❤️!

