
If you’re running MariaDB in production, chances are you’re storing some pretty valuable data, whether it’s user info, financial records, or the odd side project that turned into something bigger than you expected. Protecting that data isn’t a “nice to have” according to a lot of standards just it’s essential. One of the simplest and most effective ways to lock things down and comply with regulations such as the ISO 27001 is by enabling data at rest encryption. Think of it like this: if someone somehow got ahold of your database files (through a server breach, stolen backup, or just an unlucky misconfiguration), encryption ensures those files look like gibberish without the proper keys. The good news? MariaDB has built-in support for this, and turning it on isn’t nearly as scary as it sounds.
In this guide, I'll walk you through step by step through enabling encryption in MariaDB 10.11, from the prerequisites to configuration, to making sure your keys are stored safely. By the end, you'll have a database that’s a whole lot harder to snoop on, and you’ll sleep better knowing your data isn’t lying around in plain text.
1. Create the Key Directory
The first step in setting up encryption for MariaDB is to create the key directory, which will serve as the secure location where your encryption keys are stored. This directory should be created in a location with restricted access, ensuring that only the MariaDB service account and authorized administrators can read or write to it. Proper file permissions and ownership must be configured to prevent unauthorized access, as the security of your encryption depends heavily on keeping the keys safe. By establishing this dedicated and protected directory, you create a controlled environment where MariaDB can reliably access the keys needed for encryption and decryption, while minimizing the risk of exposure to malicious users or processes.
Create a secure location for your encryption keys with the following command and change to the created directory:
sudo mkdir -p /etc/mysql/keys && cd /etc/mysql/keys2. Generate Raw Keys
The second step will be to generate the raw encryption keys that MariaDB will use to protect your data. This is done by creating a keys file that contains multiple key entries, each identified by a unique key ID followed by a randomly generated 256-bit key in hexadecimal format. Using the openssl rand -hex 32 command ensures that each key is cryptographically secure and unpredictable.
To create the file, run the following commands that will create the keys file and append the keys to it:
echo "1;"$(openssl rand -hex 32) > keys
echo "2;"$(openssl rand -hex 32) >> keys
echo "3;"$(openssl rand -hex 32) >> keys
echo "4;"$(openssl rand -hex 32) >> keys
3. Generate the Password File
Now you need to generate a password file, which provides an additional layer of protection for your encryption keys. This password is used by MariaDB to access the raw key file securely. By running the command:
openssl rand -hex 128 > passwordYou will generate the password file that contains a randomly generated 1024-bit (128 bytes) hexadecimal string. This long and complex value ensures a strong protection against brute-force or guessing attacks. Just like the key file, the password file must be stored in the secure directory you created earlier, with strict file permissions so only the MariaDB service account and authorized administrators can access it. This separation between the raw keys and the password strengthens the overall encryption setup, making unauthorized access to your data significantly more difficult.
4. Encrypt the Keys
It is necessary now to encrypt the raw keys file using the password you generated earlier. This ensures that even if someone gains access to the keys file, they cannot use it without the corresponding password. The following command performs this encryption:
openssl enc -aes-256-cbc -md sha1 -pass file:password -in keys -out keys.encHere’s what happens in detail with the execution of this command:
openssl enc -aes-256-cbc: specifies the AES-256-CBC encryption algorithm, which is a strong and widely used cipher.-md sha1: defines the message-digest algorithm (sha1) for deriving the encryption key from the password.-pass file:password: tells OpenSSL to use the password stored in the password file instead of typing it manually.-in keys: indicates the input file containing the raw keys.-out keys.enc: specifies the encrypted output file that MySQL will later use.
Once complete, the original keys file should either be securely deleted or moved out of reach, leaving only the encrypted keys.enc file and the protected password file in the secure directory. This setup ensures that MySQL can decrypt the keys when needed while keeping them protected from unauthorized access.
When you execute this command, you'll likely find a warning message like the following one:
*** WARNING : deprecated key derivation used.
Using -iter or -pbkdf2 would be better.
In the official documentation, you will find that the MariaDB team notices this as well. This happens because you're using a newer version of OpenSSL (3+) when running this command. The warning suggests using iter or pbkdf2; however, according to the official docs (and trial and error), keys generated that way won't work with the current implementation of the plugin of MariaDB. Also, as SHA1 is only used to generate the actual AES encryption key from a long random string, it's not really an issue here. SHA1 deprecation is mostly related to checksum/signing use cases, not to what we are using it here for.
So ignore the warning for now and continue with the next steps.
5. Harden Key Directory Permissions
Once your encryption keys are generated and stored, it's critical to restrict access to them. As these keys are the foundation of the encryption setup, if an unauthorized user gains access, the entire encryption mechanism becomes useless. The /etc/mysql/keys directory should only be readable by the MySQL service account (usually mysql) and not accessible to other users. Similarly, the encrypted key files and password files inside should have even stricter permissions.
Run the following commands to enforce proper access control:
chmod 500 /etc/mysql/keys

chmod 400 /etc/mysql/keys/keys.enc /etc/mysql/keys/password

chown -R mysql:mysql /etc/mysql/keys
chmod 500 /etc/mysql/keys: grants read and execute permissions only to the directory owner (MySQL). This allows MySQL to navigate into the directory but prevents anyone else from listing or modifying its contents.chmod 400 /etc/mysql/keys/keys.enc /etc/mysql/keys/password: restricts access to read-only for the owner. No other users can read, write, or execute these files. This ensures that even if a user has shell access, they cannot view or modify the encryption key or password.
6. Configure MariaDB
Now that your key files and permissions are secured, it's time to enable and configure encryption inside MariaDB. This step tells MariaDB where to find your encrypted key file and how to apply encryption across all storage engines and temporary files.
Open the MariaDB server configuration file (with a default installation usually named 50-server.cnf, if you have a custom file, change it there):
nano /etc/mysql/mariadb.conf.d/50-server.cnfThen, add (or update) the mariadb section:
[mariadb]
## File key management
plugin_load_add = file_key_management              # Enable file key plugin
file_key_management_filename = /etc/mysql/keys/keys.enc   # Encrypted keys file
file_key_management_filekey = FILE:/etc/mysql/keys/password # Master key file
file_key_management_encryption_algorithm = aes_cbc # Algorithm for key file

## InnoDB encryption
innodb_default_encryption_key_id = 1   # Default key ID
innodb_encrypt_tables = ON             # Encrypt InnoDB tables
innodb_encrypt_log = ON                # Encrypt redo logs
innodb_encryption_threads = 4          # Threads for encryption tasks

## Aria Encryption
aria_encrypt_tables = ON               # Encrypt Aria tables

## Temporary and Log encryption
encrypt-tmp-disk-tables = 1            # Encrypt temp on-disk tables
encrypt-tmp-files = 1                  # Encrypt other temp files
encrypt_binlog = ON                    # Encrypt binary logs
The function of each property is described like this:
File Key Management
-
plugin_load_add = file_key_management– Loads the file key management plugin for encryption key handling. -
file_key_management_filename– Path to the encrypted keys file (keys.enc) used by MariaDB. -
file_key_management_filekey– Path to the master key file that decrypts the keys file. -
file_key_management_encryption_algorithm– Defines the encryption algorithm used for the keys file (e.g.,aes_cbc).
InnoDB Encryption
-
innodb_default_encryption_key_id– Specifies which key ID to use as the default encryption key. -
innodb_encrypt_tables– Enables encryption for all InnoDB tables. -
innodb_encrypt_log– Encrypts redo logs, which store transactional changes. -
innodb_encryption_threads– Sets how many threads handle encryption tasks concurrently.
Aria Encryption
-
aria_encrypt_tables– Encrypts Aria tables, used for internal temporary storage or non-transactional data.
Temporary and Log Encryption
-
encrypt-tmp-disk-tables– Encrypts temporary tables that MariaDB stores on disk. -
encrypt-tmp-files– Encrypts other temporary files created during query execution. -
encrypt_binlog– Encrypts binary logs that record database changes for replication and recovery.
7. Verify that the encryption is working
To confirm that encryption at rest is correctly enabled in MariaDB, you can perform a verification step by examining both the configuration and the system’s internal status. Restart the MariaDB service after applying all the changes:
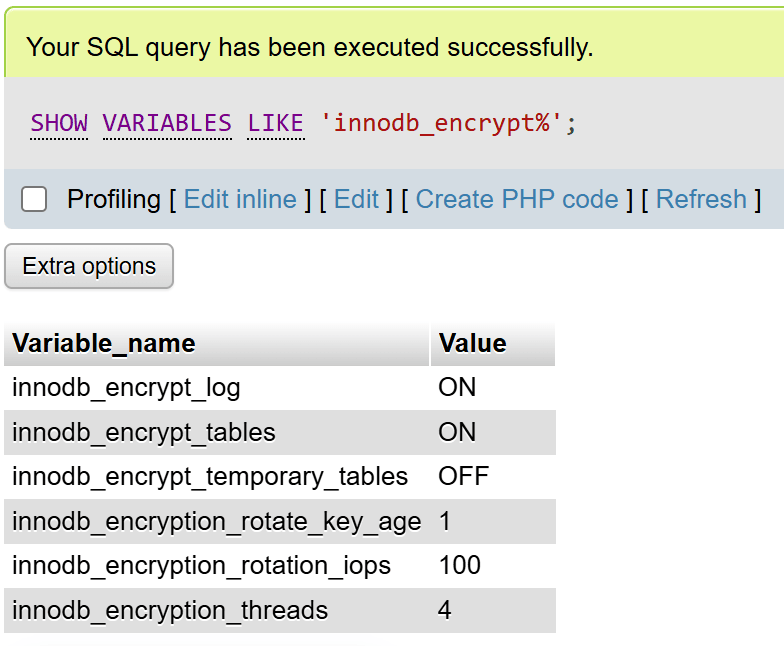
sudo systemctl restart mariadbYou can then run the following queries to verify that the data-at-rest encryption has been enabled successfully:
SHOW VARIABLES LIKE '%file_key_management%';

SHOW VARIABLES LIKE 'innodb_encrypt%';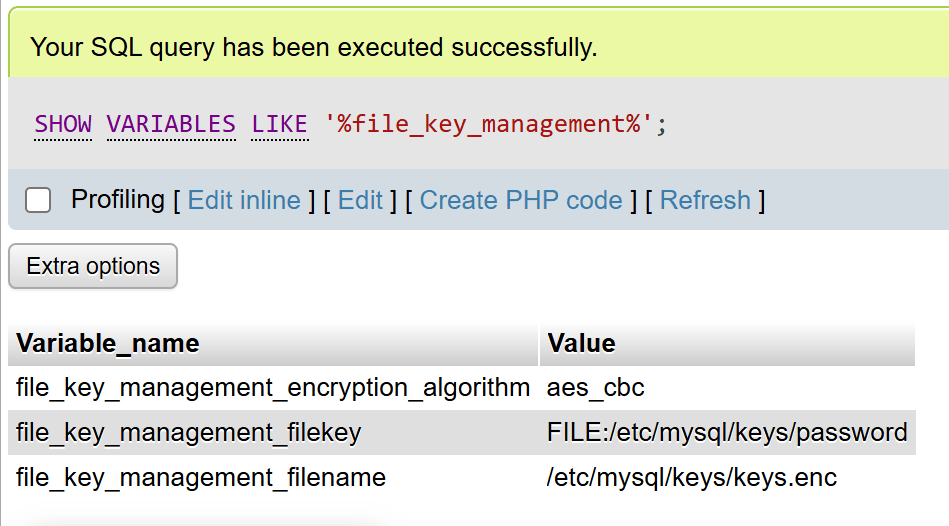
You can also create a new database in your database engine and create a new table. With innodb_encrypt_tables=ON, MariaDB encrypts all new InnoDB tables by default, while existing tables remain unencrypted until converted with ALTER TABLE … ENCRYPTION='Y'. You can confirm table-level status in information_schema.INNODB_TABLESPACES_ENCRYPTION (ENCRYPTION_SCHEME=1 means encrypted) and ensure innodb_file_per_table=ON so each table has its own encrypted tablespace. For full at-rest coverage, also enable encryption for temporary files, redo/undo logs, and the binary log.
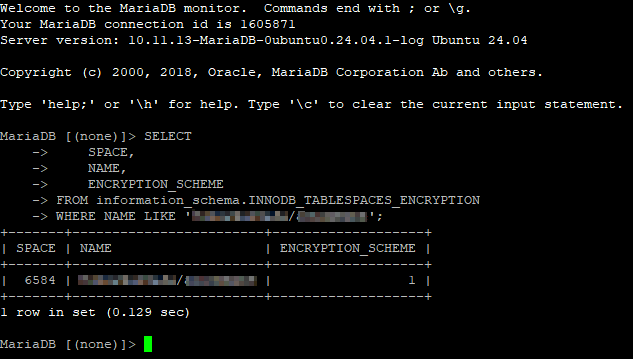
Using the following query, you can check if a table in your database is encrypted:
SELECT
    SPACE,
    NAME,
    ENCRYPTION_SCHEME
FROM information_schema.INNODB_TABLESPACES_ENCRYPTION
WHERE NAME LIKE 'databasename/tablename';
You should see that the ENCRYPTION_SCHEME is set to 1:
Enabling and verifying data-at-rest encryption in MariaDB is a vital step toward safeguarding sensitive information stored on disk. With innodb_encrypt_tables=ON, new InnoDB tables are automatically protected, while existing data can be encrypted as needed to meet compliance or security standards. By combining table encryption with options for temporary files, redo logs, and binary logs, administrators can ensure a comprehensive encryption strategy that protects data across all layers of the database. Once properly configured and verified, encryption at rest provides a strong foundation for maintaining confidentiality, integrity, and regulatory compliance in any MariaDB deployment.

