

You may think that create a chat is a difficult task to achieve, however it's more easier than you think (as everything we blog on this website).
Sockets have traditionally been the solution around which most realtime chat systems are architected, providing a bi-directional communication channel between a client and a server. This means that the server can push messages to clients. Whenever you write a chat message, the idea is that the server will get it and push it to all other connected clients.
Note: as mentioned in the title, this implementation is agnostic an we are covering only the backend and the basic functionality in the client side. Is up to you how to customize it with CSS or other things.
Requirements
- Ratchet Socketome package : Ratchet is a loosely coupled PHP library providing developers with tools to create real time, bi-directional applications between clients and servers over WebSockets.
To include socketome in your symfony project use composer and execute the following command
composer require cboden/ratchetAlternatively you can modify your composer.json file an then use composer install.
{
    "require": {
        "cboden/ratchet": "0.3.*"
    }
}- A browser that supports sockets.
And you're ready to go !
Creating the chat
To get started with a simple chat, we are going to create an open room accesible to all (as long as the WebSocket targets the specified URL).
Steps to follow
- Create the Chat.php class into the
Socketsfolder in your bundle. - Create a symfony command in the
Commandfolder to start the chat via command console. - Handle the socket with Javascript in a view.
- Start and test your chat.
Create a socket
To get started, create a folder in the root folder of your bundle named "Sockets" and create the following class (Chat.php) on it.
This class will handle all the connections, messages etc. This will be used later in the initialization via console (remember to change the namespace according to your bundle).
<?php
// myapp\src\yourBundle\Sockets\Chat.php;

// Change the namespace according to your bundle, and that's all !
namespace sandboxBundle\Sockets;

use Ratchet\MessageComponentInterface;
use Ratchet\ConnectionInterface;

class Chat implements MessageComponentInterface {
    protected $clients;

    public function __construct() {
        $this->clients = new \SplObjectStorage;
    }

    public function onOpen(ConnectionInterface $conn) {
        // Store the new connection to send messages to later
        $this->clients->attach($conn);

        echo "New connection! ({$conn->resourceId})\n";
    }

    public function onMessage(ConnectionInterface $from, $msg) {
        $numRecv = count($this->clients) - 1;
        echo sprintf('Connection %d sending message "%s" to %d other connection%s' . "\n"
            , $from->resourceId, $msg, $numRecv, $numRecv == 1 ? '' : 's');

        foreach ($this->clients as $client) {
            if ($from !== $client) {
                // The sender is not the receiver, send to each client connected
                $client->send($msg);
            }
        }
    }

    public function onClose(ConnectionInterface $conn) {
        // The connection is closed, remove it, as we can no longer send it messages
        $this->clients->detach($conn);

        echo "Connection {$conn->resourceId} has disconnected\n";
    }

    public function onError(ConnectionInterface $conn, \Exception $e) {
        echo "An error has occurred: {$e->getMessage()}\n";

        $conn->close();
    }
}
Now that we have our socket handler in the server side we need to create the code to start it.
Create a command to start the chat
Normally you should save the code to start it in a php file and then use the console using php file.php. However, as a good practice in Symfony, we are going to execute that code in a symfony command which will make the things easier for you and you'll be able if you want to execute commands in controllers or other crazy things that you want to do.
To continue, create a folder in the root folder of your bundle named "Command" (if it doesn't exists yet) and create the following command (SocketCommand.php) on it (you can read how to create custom symfony console command here if you want to know how the following step works).
Do not forget to change the namespace according to your bundle.
<?php
// myapplication/src/sandboxBundle/Command/SocketCommand.php
// Change the namespace according to your bundle
namespace sandboxBundle\Command;

use Symfony\Component\Console\Command\Command;
use Symfony\Component\Console\Input\InputInterface;
use Symfony\Component\Console\Output\OutputInterface;

// Include ratchet libs
use Ratchet\Server\IoServer;
use Ratchet\Http\HttpServer;
use Ratchet\WebSocket\WsServer;

// Change the namespace according to your bundle
use sandboxBundle\Sockets\Chat;

class SocketCommand extends Command
{
    protected function configure()
    {
        $this->setName('sockets:start-chat')
            // the short description shown while running "php bin/console list"
            ->setHelp("Starts the chat socket demo")
            // the full command description shown when running the command with
            ->setDescription('Starts the chat socket demo')
        ;
    }

    protected function execute(InputInterface $input, OutputInterface $output)
    {
        $output->writeln([
            'Chat socket',// A line
            '============',// Another line
            'Starting chat, open your browser.',// Empty line
        ]);

        $server = IoServer::factory(
            new HttpServer(
                new WsServer(
                    new Chat()
                )
            ),
            8080
        );

        $server->run();
    }
}
Now everything in the server side is ready and we'll be able to start our chat using php bin/console sockets:start-chat in the command line, however we need to handle the socket in the client side.
Handle client side socket using Javascript
To handle the client side, you can simply add the following code in your view. It's pretty straight forward as you can see, it open a Javascript WebSocket, attaches the most basic events and it sends and receive a JSON string from and to the server, which is processed in the client side. Feel free to make it better !
Note: is up to you where you want to put the client side code. The following snippet can be used i.e in any twig view or plain html response in any of your controllers. Remember to change the URL of the socket (in this case ws://sandbox:8080 according to your test domain or localhost).
<h1>Public chat</h1>
<ul id="chat-list"></ul>
<hr>
<textarea id="form-message" placeholder="Your public message here"></textarea>
<input type="button" id="form-submit" value="Send message"/>

<script>
    // This object will be sent everytime you submit a message in the sendMessage function.
    var clientInformation = {
        username: new Date().getTime().toString()
        // You can add more information in a static object
    };

    // START SOCKET CONFIG
    /**
     * Note that you need to change the "sandbox" for the URL of your project.
     * According to the configuration in Sockets/Chat.php , change the port if you need to.
     * @type WebSocket
     */
    var conn = new WebSocket('ws://sandbox:8080');

    conn.onopen = function(e) {
        console.info("Connection established succesfully");
    };

    conn.onmessage = function(e) {
        var data = JSON.parse(e.data);
        Chat.appendMessage(data.username, data.message);

        console.log(data);
    };

    conn.onerror = function(e){
        alert("Error: something went wrong with the socket.");
        console.error(e);
    };
    // END SOCKET CONFIG


    /// Some code to add the messages to the list element and the message submit.
    document.getElementById("form-submit").addEventListener("click",function(){
        var msg = document.getElementById("form-message").value;

        if(!msg){
            alert("Please send something on the chat");
        }

        Chat.sendMessage(msg);
        // Empty text area
        document.getElementById("form-message").value = "";
    }, false);

    // Mini API to send a message with the socket and append a message in a UL element.
    var Chat = {
        appendMessage: function(username,message){
            var from;

            if(username == clientInformation.username){
                from = "me";
            }else{
                from = clientInformation.username;
            }

            // Append List Item
            var ul = document.getElementById("chat-list");
            var li = document.createElement("li");
            li.appendChild(document.createTextNode(from + " : "+ message));
            ul.appendChild(li);
        },
        sendMessage: function(text){
            clientInformation.message = text;
            // Send info as JSON
            conn.send(JSON.stringify(clientInformation));
            // Add my own message to the list
            this.appendMessage(clientInformation.username, clientInformation.message);
        }
    };
</script>
And your general chat is basically ready to work.
Start the chat and test it
To start the chat use the previous created command in the console :
php bin/console sockets:start-chatNow if you have just copy-pasted the client side code (markup and javascript), to test it start Google Chrome and Mozilla Firefox (not necessarily those, but 2 different browsers), navigate to your view in your project and see the magic.

You'll be able to see the connections in the console where you started the chat:
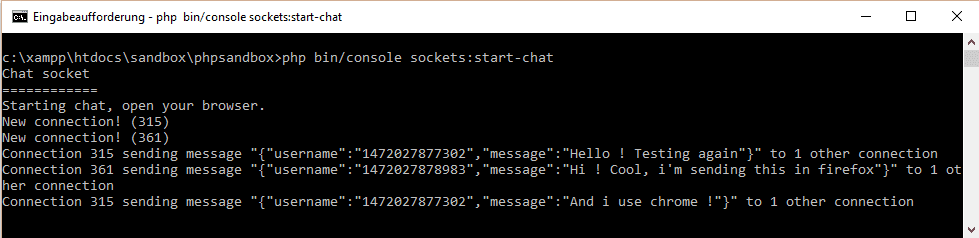
Congratulations ! You've just made a simple chat ready to customize by yourself.
Multiple chats
The previous chat example targets the root path of your domain in the 8080 port, however if your chat doesn't target only one chat room, you can create different sockets routes with different handlers.
In this case, we are going to use the same Chat.php class, but notice that the initialization is different and your symfony command needs to be changed.
In this case instead of ws://sandbox:8080 as the socket route, now we'll change it for ws://sandbox:8080/chat . Now our command to start the chat will be :
<?php
// myapplication/src/sandboxBundle/Command/SocketCommand.php
// Change the namespace according to your bundle
namespace sandboxBundle\Command;

use Symfony\Component\Console\Command\Command;
use Symfony\Component\Console\Input\InputInterface;
use Symfony\Component\Console\Output\OutputInterface;

// Ratchet libs
use Ratchet\App;
// Chat instance
use sandboxBundle\Sockets\Chat;

class SocketCommand extends Command
{
    protected function configure()
    {
        $this->setName('sockets:start-chat')
            // the short description shown while running "php bin/console list"
            ->setHelp("Starts the chat socket demo")
            // the full command description shown when running the command with
            ->setDescription('Starts the chat socket demo')
        ;
    }

    protected function execute(InputInterface $input, OutputInterface $output)
    {
        $output->writeln([
            'Chat socket',// A line
            '============',// Another line
            'Starting chat, open your browser.',// Empty line
        ]);

        // The domain of your app as first parameter

        // Note : if you got problems during the initialization, add as third parameter '0.0.0.0'
        // to prevent any error related to localhost :
        // $app = new \Ratchet\App('sandbox', 8080,'0.0.0.0');
        // Domain as first parameter
        $app = new App('sandbox', 8080,'0.0.0.0');
        // Add route to chat with the handler as second parameter
        $app->route('/chat', new Chat);

        // To add another routes, then you can use :
        //$app->route('/america-chat', new AmericaChat);
        //$app->route('/europe-chat', new EuropeChat);
        //$app->route('/africa-chat', new AfricaChat);
        //$app->route('/asian-chat', new AsianChat);

        // Run !
        $app->run();
    }
}
As you can see, it's easy to add more routes to the sockets port as long as you have more socket handler classes. Now in the client side, the websocket should be now :
var conn = new WebSocket('ws://sandbox:8080/chat');Basic troubleshooting
Works locally but not remotely or in the server || The first example works but multiple routes doesn't
This is a security feature! By default Ratchet binds to 127.0.0.1 which only allows connections from itself. The recommended approach is to put Ratchet behind a proxy and only that proxy (locally) will connect.
If you want to open Ratchet up (not behind a proxy) set the third parameter of App to '0.0.0.0' (as mentioned in the example).
The basic troubleshooting of Ratchet Socketome contains another problems that you may find later.
Have fun !

