

Unlike Windows, the Android Studio version of Linux based OS aren't an automatic installer that will setup all for you, so you need to know how to configure Android Studio manually if you want to work with Android in Linux environments.
In this article you'll learn how to install Android Studio easily in Ubuntu.
1. Download Java
You'll require the JDK in order to use Android Studio, to download a Java distribution (the Java Development Kit) in Ubuntu, execute the following command in your Terminal:
sudo add-apt-repository ppa:webupd8team/javaThen proceed to update all the packages using:
sudo apt-get updateAnd finally execute the Java installer:
sudo apt-get install oracle-java8-installerAccept all the terms and conditions on any menu that could appear:

And Java is ready to be used.
2. Download and install Android Studio
Visit the Download page of Android Studio here, the Linux Bundle will be downloadable in .zip format and needs to be later configured manually. Download the bundle and wait till its completed.
Once completed, to proceed with the installation of Android Studio, you need to decompress the downloaded .zip package somewhere in your system (in this case we've just decompressed the file in the downloads directory in the following location /home/sdkcarlos/Downloads/android-studio).
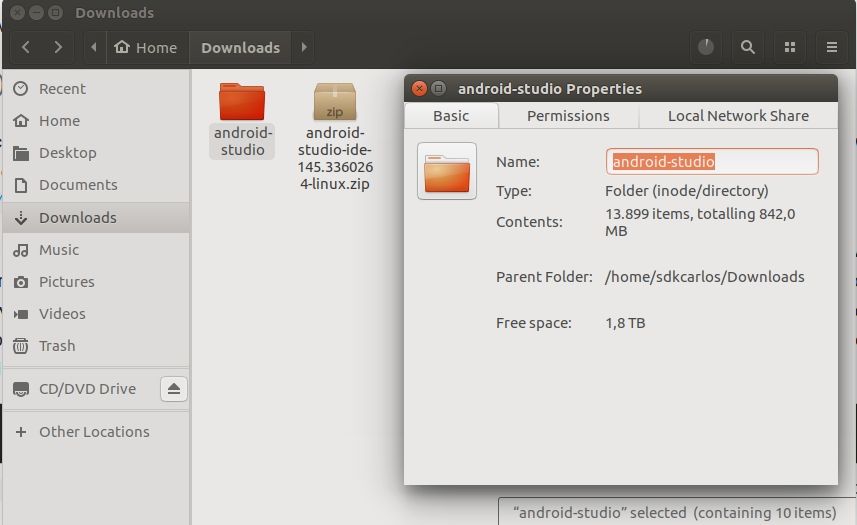
Normally you need to unpack the .zip file you downloaded to an appropriate location for your applications, such as within /usr/local/ for your user profile, or /opt/ for shared users, however to prevent problems with the permissions we've just extracted the content in the Downloads directory to finally copy the folder into the appropiate location using the terminal. For example, the following command will copy the android-studio folder into /usr/local/ without generate permissions problems (remember to change the username according to yours):
sudo cp -r /home/<your-username-here>/Downloads/android-studio /usr/local/android-studioThe -r parameters stands for recursive, since it is a folder (parent), with sub-folders/files (children) we need to copy all its content.
Before start it, note that for 64-bit machines you need to install the following packages:
If you are running a 64-bit version of Ubuntu, you need to install some 32-bit libraries with the following command:
sudo apt-get install libc6:i386 libncurses5:i386 libstdc++6:i386 lib32z1 lib32bz2-1.0If you are running 64-bit Fedora, the command is:
sudo yum install zlib.i686 ncurses-libs.i686 bzip2-libs.i686Now proceed to execute Android Studio for first time, to achieve this navigate to the location of Android Studio in the bin folder using the terminal:
cd /usr/local/android-studio/binYou'll be located in the bin folder where the initialization .sh script is located, to start Android Studio execute finally:
./studio.shAndroid Studio should start and will download all updates and other required components and you're ready to use Android Studio!
3. Create a system executable
Unless you want to navigate to the bin folder in the Android Studio location and executing the script to start Android Studio everytime you need to, you will probably want to create a "Desktop Entry" to start Android Studio with a single click in the search menu of Ubuntu.
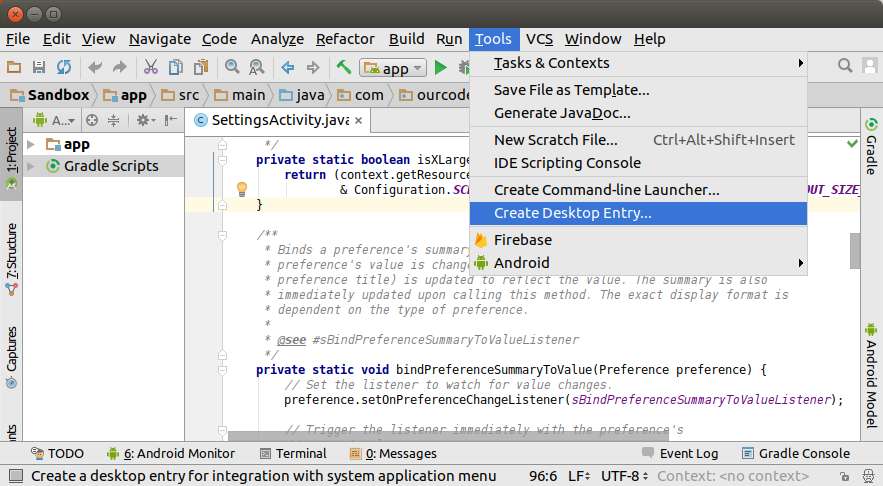
By following the previous step, you should have available Android Studio in your search menu:

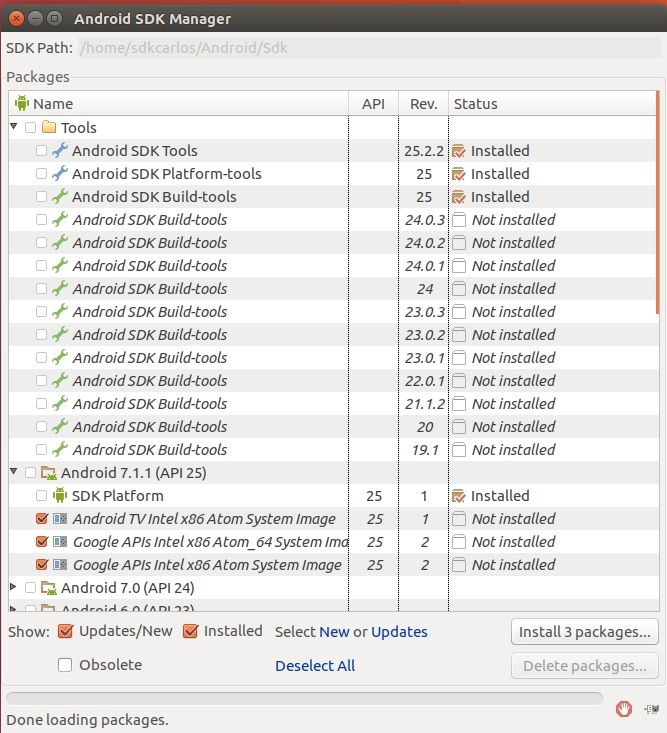
4. Setting up the SDK Manager and the AVD Manager
In order to access the SDK Manager and the AVD Manager easily in your system, we need to create some environment variables that targets to the tools and platform-tools folders (generated probably generated in /home/sdkcarlos/Android/Sdk after the installation). To achieve this, execute the following command to edit the environment variables file:
sudo gedit ~/.bashrcand append (at the end of the document) the following lines (and change the path according to the location of the SDK in your computer):
export PATH=${PATH}:/home/<your-user-name-folder>/Android/Sdk/tools
export PATH=${PATH}:/home/<your-user-name-folder>/Android/Sdk/platform-tools
That will create static environment variables available in a new instance of the terminal (in case you have problems, please read this question in askubuntu about how to create environment variables properly).
In case you are in a x64 environment, execute the following command to add some 32 bit libraries:
sudo apt-get install lib32stdc++6
sudo apt-get install lib32z1
After doing this, let's check if you did everything right. Quit from all the directories using:
cd ~The android variable should be accesible globally in any path of your system. To execute the SDK Manager, use:
android sdkThat should start the following manager:
And to execute the AVD Manager to setup the emulators, execute:
android avdThat should start the following manager:

Happy coding !

