
Let's imagine that you need to digitize a page of a book or a printed document, you will use a scanner to create an image of the real page. However although you have the rights to edit the content of the scanned book, you can't edit it in your computer because it's an image, and you can't simply edit an image as if it were a digital document. Yeah, the user can use programs that creates PDF with selectable text and then they can do what they want, however as a developer, you can offer your user the possibility of extract the text from images using the Optical Character Recognition technology. To achieve our goal of converting images to text, we are going to use Tesseract written in C++ installing it in the system and then using the command line with the PHP wrapper.
In this article you will learn how to extract the text from an image in a Symfony project with the help of Tesseract.
1. Install Tesseract in your system
In order to use the optical character recognition API, as mentioned in the article, we are going to use Tesseract. Tesseract is an open source Optical Character Recognition (OCR) Engine, available under the Apache 2.0 license. It can be used directly using an API to extract typed, handwritten or printed text from images. It supports a wide variety of languages (that needs to be installed). Tesseract supports various output formats: plain-text, hocr(html) and pdf.
The installation process of Tesseract in your system will vary according to the Operative System that you use:
Windows
The installation of Tesseract in Windows is pretty simple, we recommend you to use the unnofficial installer mentioned in the wiki here (tesseract-ocr-setup-<version>.exe). You can get a list of all the available setups in the official website of tesseract here (download always the most recent version).
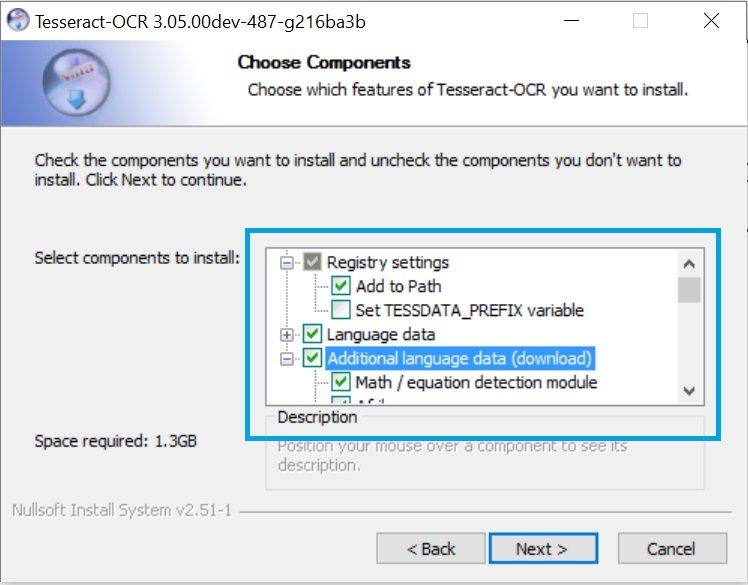
The installation process is very straightforward, just follow the wizard. However we recommend you to install directly all the languages that you need for tesseract in the setup (only the ones you need, otherwise the download process will take long) and register tesseract in the PATH:
Wait till the installation finishes and you're ready to go. You can test if it was correctly installed executing in a new command prompt window tesseract -v (that should output the installed version).
Ubuntu
Install Tesseract using the following command:
sudo apt-get install tesseract-ocrThen, install the languages that you need to recognize (e.g . -deu, -fra , -eng , -spa english required):
sudo apt-get install tesseract-ocr-engThen tesseract should be available on any terminal and therefore accesible by our PHP scripts later.
MacOS
If you're using Mac OS X, you can install tesseract using either MacPorts or Homebrew:
MacPorts
To install Tesseract run this command:
sudo port install tesseractTo install any language data, execute:
sudo port install tesseract-<langcode>A complete list of available langcodes can be found on MacPorts tesseract page.
Homebrew
To install Tesseract run this command:
brew install tesseractIn case you need more information or your operative system isn't listed, please refer to the Installation wiki of the Tesseract repository in Github here.
2. Install the Tesseract PHP wrapper
To handle Tesseract with PHP, we are going to use the most known Wrapper of Tesseract written by @thiagoalessio. Tesseract OCR for PHP is an useful and very easy to use wrapper of the command line instructions for Tesseract OCR inside PHP.
The preferred way of installation is via composer, you can execute the following command directly in the terminal:
composer require thiagoalessio/tesseract_ocr 1.0.0-RCOr if you want, edit the composer.json file and add the following dependency and execute then composer install:
{
    "require": {
        "thiagoalessio/tesseract_ocr": "1.0.0-RC",
    }
}
After the installation, you'll be able to use the Wrapper in your symfony controllers.
Note: you need to install the specified version as in the documentation of the library, the method to recognize the text in the image using Tesseract is $tesseract->run(). In the older versions you need to use $tesseract->recognize() instead.
3. Implementation within a controller
The usage of the library is pretty simple and easy to understand:
<?php
// Include the Tesseract Wrapper
use TesseractOCR;
// or without using the use statement
// $tesseractInstance = new \TesseractOCR($filepath);
// Absolute or relative path to the image to recognize
$filepath = "image-to-recognize.jpeg";
// Create an instanceof tesseract with the filepath as first parameter
$tesseractInstance = new TesseractOCR($filepath);
// Execute tesseract to recognize text
$result = $tesseractInstance->run();
// Show recognized text
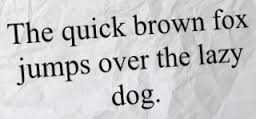
echo $result;The following example shows how to recognize the text of the following image:
Note that the file, will be located in /your-project/web/text.jpeg:
<?php

namespace myBundle\Controller;

use Symfony\Bundle\FrameworkBundle\Controller\Controller;
use Symfony\Component\HttpFoundation\Response;

// Include the Tesseract Wrapper
use TesseractOCR;

class DefaultController extends Controller
{
    public function indexAction()
    {
        // Retrieve the webpath in symfony
        $webPath = $this->get('kernel')->getRootDir().'/../web/';
        // The filename of the image is text.jpeg and is located inside the web folder
        $filepath = $webPath.'text.jpeg';

        // Is useful to verify if the file exists, because the tesseract wrapper
        // will throw an error but without description
        if(!file_exists($filepath)){
            return new Response("Warning: the providen file [".$filepath."] doesn't exists.");
        }

        // Create a  new instance of tesseract and provide as first parameter
        // the local path of the image
        $tesseractInstance = new TesseractOCR($filepath);

        // Execute tesseract to recognize text
        $result = $tesseractInstance->run();

        // Return the recognized text as response (expected: The quick brown fox jumps over the lazy dog.)
        return new Response($result);
    }
}
Navigate to the route that matches the index action of this controller, and you will see as output the recognized text of the image.
4. Support languages
As you known, there are other languages in the world that uses special characters, that's why Tesseract offer different languages packs. For example, if you try to recognize the following image without the german package:

You'll get as result "griiï¬en". That isn't true at all, that happens because these characters are of the german language. To solve it, you need to add the german package (identified with deu):
<?php

// Create a  new instance of tesseract and provide as first parameter
// the local path of the image
$tesseractInstance = new TesseractOCR("image.jpeg");

// Set the german language, note that it needs to be installed
$tesseractInstance->lang("deu");

// Execute tesseract to recognize text
$result = $tesseractInstance->run();

echo $result;
Now, as result you should get "grüßen" as expected. You can set multiple languages to work at time providing multiple arguments:
$tesseractInstance->lang("deu", "spa", "por");Note: in order to use different languages, you will need the respective packages installed too.
5. Custom options
If you already read some content of the documentation of Tesseract usage with the command line, you know that there are a lot of properties that you can change. The PHP wrapper of tesseract provide some methods for the most used options:
Change executable path
For different reasons, you may not have tesseract available directly in the environment variable PATH, therefore the execution of a command with the php wrapper "tesseract imagename.jpeg outputbase" won't work. You can specify the location of the tesseract executable with the executable method:
$tsaInstance = new TesseractOCR("image.jpeg");

// For example in Windows, you need to wrapp the path in double quotes to make it work.
$executablePath = '"C:/Program Files (x86)/Tesseract-OCR/tesseract.exe"';

$tsaInstance->executable($executablePath);

$recognized = $tsaInstance->run();
Page segmentation
You can set the segmentation mode of the page with the ->psm($mode) instruction, which instructs tesseract how to interpret the given image:
$tsaInstance = new TesseractOCR("image.jpeg");

$tsaInstance->psm(1);

$recognized = $tsaInstance->run();
The possible values for the page segmentation are:
| Value | Description |
| 0 | Orientation and script detection (OSD) only. |
| 1 | Automatic page segmentation with OSD. |
| 2 | Automatic page segmentation, but no OSD, or OCR. |
| 3 | Fully automatic page segmentation, but no OSD. (This value is used by default if none providen) |
| 4 | Assume a single column of text of variable sizes. |
| 5 | Assume a single uniform block of vertically aligned text. |
| 6 | Assume a single uniform block of text. |
| 7 | Treat the image as a single text line. |
| 8 | Treat the image as a single word. |
| 9 | Treat the image as a single word in a circle. |
| 10 | Treat the image as a single character. |
Set languages to recognize
You can define one or more languages to be used during the recognition using the ->lang($lang1, $lang2) method. You can get a list of all the supported languages by tesseract in the documentation here:
$tsaInstance = new TesseractOCR("image.jpeg");

// To provide full chinese recognition
$tsaInstance->lang('chi_sim', 'chi_tra');

$recognized = $tsaInstance->run();
Use words from a list
You can provide a list. this list needs to be a plain text file containing a list of words that you want to be considered as a normal dictionary words by tesseract, for example (mywords.txt):
jargon
artyom.js
recognition
And add it with the wrapper:
$tsaInstance = new TesseractOCR("image.jpeg");

// Custom words
$tsaInstance->userWords('mywords.txt');

$recognized = $tsaInstance->run();
This list is really useful when dealing with contents that contain technical terminology.
Whitelist characters
You can even limit the characters that tesseract will recognize, for example with the following image:
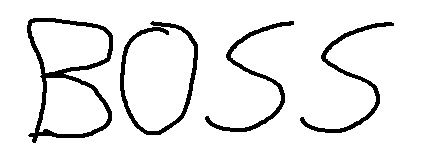
Tesseract will recognize "BOSS". That's great, cause in the image seems that someone wrote BOSS however, the user (probably a child or someone with bad calligraphy) wrote the number "8055" ? That's where the whitelist comes in handy, in this case we can limitate the characters to recognize only numbers using a range from 0 to 9:
$tsaInstance = new TesseractOCR("image.jpeg");

// Recognize all in numbers
$tsaInstance->whitelist(range(0,9));

$recognized = $tsaInstance->run();
Giving as result the expected number "8055".
Set config value
Tesseract offers more than 600 customizable properties (you can list them using in the console tesseract --print-parameters) that you can modify using the ->config($propertyName, $value):
$tsaInstance = new TesseractOCR("image.jpeg");

// Size of window for spline segmentation
$tsaInstance->config("textord_spline_medianwin", 6 );
// For smooth factor
$tsaInstance->config("textord_skewsmooth_offset", 3);

$recognized = $tsaInstance->run();
If you need more information about the supported methods of this wrapper, please visit the official repository here.
Happy coding !

