

In order to work with the scanner in WinForms with C# in Visual Studio, we are going to use the WIA API. Windows Image Acquisition (WIA) sometimes also called Windows Imaging Architecture) is a Microsoft driver model and application programming interface (API) for Microsoft Windows 2000 and later operating systems that enables graphics software to communicate with imaging hardware such as scanners, digital cameras and Digital Video-equipment.
WIA makes easy to application developers, device manufacturers, and scanner users who need to interact with imaging hardware. The API set exposes imaging applications to still image acquisition hardware functionality by providing support for:
- Enumeration of available image acquisition devices (installed scanners in Windows).
- Creating connections to multiple devices simultaneously.
- Querying properties of devices in a standard and expandable manner.
- Acquiring device data by using standard and high performance transfer mechanisms.
- Maintaining image properties across data transfers.
- Notification of device status and scan event handling.
In this article, you will learn how to manipulate an image scanner through WIA with C#.
Requirements
- Visual Studio >= 2007 (we are going to use Visual Studio Community)
- An installed and functional scanner
Let's get started !
1. Add the WIA reference
Create a new WinForms project with the latest .NET framework version (or an old C# project). Then proceed to reference the Windows Image Acquisition COM component directly from visual studio. A Component Object Model (COM) is a platform-independent, distributed, object-oriented system for creating binary software components that can interact. .NET components can call and interact with COM components.
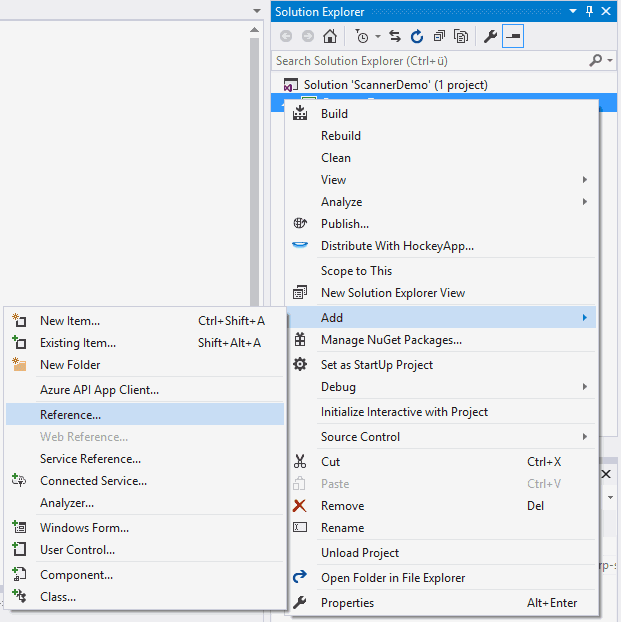
Go to the solution explorer located in the top right corner of Visual Studio and do right click on your project, then click on Add > Reference.
In the emergent window, select the COM option in the left menu and search for the Microsoft Windows Image Acquisition Library v2.0 and click on OK.

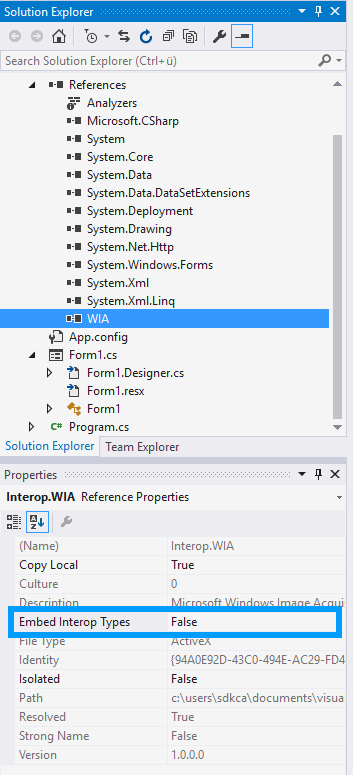
Once you click ok, the reference will be added to your project. Now you need to set the Embed Interop Types property of the WIA component to False. With Visual Studio go to the Solution Explorer and select your project, then in your project click on References from the tree view component and search for WIA. Select the WIA reference and look for the Embed Interop Types option in the Properties panel and set this value to False:
Now you will be able to use WIA in your project.
2. Listing scanner devices
To list the devices, you need to retrieve the list from the DevicesManager object of WIA. As first step, you need to import the WIA component in your code at the top of your class:
using WIA;Then just iterate over the device manager to list the devices:
// Create a DeviceManager instance
var deviceManager = new DeviceManager();

// Loop through the list of devices
for (int i = 1; i <= deviceManager.DeviceInfos.Count; i++)
{
    // Skip the device if it's not a scanner
    if (deviceManager.DeviceInfos[i].Type != WiaDeviceType.ScannerDeviceType)
    {
        continue;
    }

    // Print something like e.g "WIA Canoscan 4400F"
    Console.WriteLine(deviceManager.DeviceInfos[i].Properties["Name"].get_Value());
    // e.g Canoscan 4400F
    //Console.WriteLine(deviceManager.DeviceInfos[i].Properties["Description"].get_Value());
    // e.g \\.\Usbscan0
    //Console.WriteLine(deviceManager.DeviceInfos[i].Properties["Port"].get_Value());
}
The Properties object has other properties like Id, Port, Manufacturer and Type, visit the MSDN page about the WIA device info class for more information.
3. Using a device to scan
To save the scanned image you will need to import the following types:
using WIA;
using System.IO;
Then the logic to use the scanner is the following:
- Retrieve a
DeviceInfoinstance of the scanner that you want to use. - Connect to the scanner using the DeviceInfo instance.
- Select the scanner through the element with index 1 inside the items property with the connection instance.
- Use the Transfer method of the selected scanner and provide as first argument the output format of the scanned image.
- Save the returned image data to a file.
The previous logic is implemented with the following code. We are going to select the first available scanner on the system and we'll follow the previous algorithm:
Note
The process to select the scanner and then use the rest of code to start the scanning process can be a little tricky if you don't handle it properly. We recommend you for example to add a List Box item to your form and append a new item that displays the name and the DeviceInfos object too (you will see an example at the end of the article).
 // Create a DeviceManager instance
var deviceManager = new DeviceManager();

// Create an empty variable to store the scanner instance
DeviceInfo firstScannerAvailable = null;

// Loop through the list of devices to choose the first available
for (int i = 1; i <= deviceManager.DeviceInfos.Count; i++)
{
    // Skip the device if it's not a scanner
    if (deviceManager.DeviceInfos[i].Type != WiaDeviceType.ScannerDeviceType)
    {
        continue;
    }

    firstScannerAvailable = deviceManager.DeviceInfos[i];

    break;
}

// Connect to the first available scanner
var device = firstScannerAvailable.Connect();

// Select the scanner
var scannerItem = device.Items[1];

// Retrieve a image in JPEG format and store it into a variable
var imageFile = (ImageFile)scannerItem.Transfer(FormatID.wiaFormatJPEG);

// Save the image in some path with filename
var path = @"C:\Users\<username>\Desktop\scan.jpeg";

if (File.Exists(path))
{
    File.Delete(path);
}

// Save image !
imageFile.SaveFile(path);
If you test it, the code will work and the scanner will start, however the image will be incompleted on most of the scanners. That's because we didn't set any of the common properties of the scanner, that you will learn to set in the following step.
4. Changing WIA properties
There are some modifiable properties of WIA like the scanning width and height, the color mode etc. To set this properties, we need to retrieve the property of the WIA.Properties class and then set the new value. Import the required types as first:
using WIA;
using System.IO;
The following method AdjustScannerSettings will set some basic properties through the helper function SetWIAProperty, to make it work at least in most of the scanning devices. Note that you need to provide a scanner item as first parameter in the AdjustScannerSettings (the scanner selected and assigned to a variable through the element with index 1 inside the items property with the connection instance) method and the other parameters that are documented in the function.
Important
Remember that WIA has a lot of properties constants that you can modify and that may be or not available on different scanning devices (e.g to modify the horizontal resolution use the constant 6147), read the following MSDN page for more information.
/// <summary>
/// Adjusts the settings of the scanner with the providen parameters.
/// </summary>
/// <param name="scannnerItem">Scanner Item</param>
/// <param name="scanResolutionDPI">Provide the DPI resolution that should be used e.g 150</param>
/// <param name="scanStartLeftPixel"></param>
/// <param name="scanStartTopPixel"></param>
/// <param name="scanWidthPixels"></param>
/// <param name="scanHeightPixels"></param>
/// <param name="brightnessPercents"></param>
/// <param name="contrastPercents">Modify the contrast percent</param>
/// <param name="colorMode">Set the color mode</param>
private static void AdjustScannerSettings(IItem scannnerItem, int scanResolutionDPI, int scanStartLeftPixel, int scanStartTopPixel, int scanWidthPixels, int scanHeightPixels, int brightnessPercents, int contrastPercents, int colorMode)
{
    const string WIA_SCAN_COLOR_MODE = "6146";
    const string WIA_HORIZONTAL_SCAN_RESOLUTION_DPI = "6147";
    const string WIA_VERTICAL_SCAN_RESOLUTION_DPI = "6148";
    const string WIA_HORIZONTAL_SCAN_START_PIXEL = "6149";
    const string WIA_VERTICAL_SCAN_START_PIXEL = "6150";
    const string WIA_HORIZONTAL_SCAN_SIZE_PIXELS = "6151";
    const string WIA_VERTICAL_SCAN_SIZE_PIXELS = "6152";
    const string WIA_SCAN_BRIGHTNESS_PERCENTS = "6154";
    const string WIA_SCAN_CONTRAST_PERCENTS = "6155";
    SetWIAProperty(scannnerItem.Properties, WIA_HORIZONTAL_SCAN_RESOLUTION_DPI, scanResolutionDPI);
    SetWIAProperty(scannnerItem.Properties, WIA_VERTICAL_SCAN_RESOLUTION_DPI, scanResolutionDPI);
    SetWIAProperty(scannnerItem.Properties, WIA_HORIZONTAL_SCAN_START_PIXEL, scanStartLeftPixel);
    SetWIAProperty(scannnerItem.Properties, WIA_VERTICAL_SCAN_START_PIXEL, scanStartTopPixel);
    SetWIAProperty(scannnerItem.Properties, WIA_HORIZONTAL_SCAN_SIZE_PIXELS, scanWidthPixels);
    SetWIAProperty(scannnerItem.Properties, WIA_VERTICAL_SCAN_SIZE_PIXELS, scanHeightPixels);
    SetWIAProperty(scannnerItem.Properties, WIA_SCAN_BRIGHTNESS_PERCENTS, brightnessPercents);
    SetWIAProperty(scannnerItem.Properties, WIA_SCAN_CONTRAST_PERCENTS, contrastPercents);
    SetWIAProperty(scannnerItem.Properties, WIA_SCAN_COLOR_MODE, colorMode);
}

/// <summary>
/// Modify a WIA property
/// </summary>
/// <param name="properties"></param>
/// <param name="propName"></param>
/// <param name="propValue"></param>
private static void SetWIAProperty(IProperties properties, object propName, object propValue)
{
    Property prop = properties.get_Item(ref propName);
    prop.set_Value(ref propValue);
}
It's worth to say again, that is up to you the customization of the properties, but we provide you a simple way to customize them with the SetWIAProperty method.
Finally, to start the scan correctly you just need to execute the AdjustScannerSettings method before the initialization of the scanner (mixing the step 3 and 4):
// Create a DeviceManager instance
var deviceManager = new DeviceManager();

// Create an empty variable to store the scanner instance
DeviceInfo firstScannerAvailable = null;

// Loop through the list of devices to choose the first available
for (int i = 1; i <= deviceManager.DeviceInfos.Count; i++)
{
    // Skip the device if it's not a scanner
    if (deviceManager.DeviceInfos[i].Type != WiaDeviceType.ScannerDeviceType)
    {
        continue;
    }

    firstScannerAvailable = deviceManager.DeviceInfos[i];

    break;
}

// Connect to the first available scanner
var device = firstScannerAvailable.Connect();

// Select the scanner
var scannerItem = device.Items[1];

/**
 * Set the scanner settings
 */
int resolution = 150;
int width_pixel = 1250;
int height_pixel = 1700;
int color_mode = 1;
AdjustScannerSettings(scannerItem, resolution, 0, 0, width_pixel, height_pixel, 0, 0, color_mode);

// Retrieve a image in JPEG format and store it into a variable
var imageFile = (ImageFile)scannerItem.Transfer(FormatID.wiaFormatJPEG);

// Save the image in some path with filename
var path = @"C:\Users\<username>\Desktop\scan.jpeg";

if (File.Exists(path))
{
    File.Delete(path);
}

// Save image !
imageFile.SaveFile(path);
5. Catching exceptions
WIA functions methods can throw exceptions that can be identified through error codes. The list of error codes can be found in the documentation of WIA in the MSDN website here. To handle the errors of WIA, catch the COMException object. Remember to import previously the InteropServices type:
using System.Runtime.InteropServices;And then wrap the code that uses WIA inside a try-catch statement. You can identify the error with the ErrorCode property of the exception, but remember to convert it to its uint representation to be able to compare it with the error codes of the table in MSDN.
try
{
    // Some code that uses WIA
    // e.g
    //
    // var device = firstScannerAvailable.Connect();
    // var scannerItem = device.Items[1];
    // var imageFile = (ImageFile)scannerItem.Transfer(FormatID.wiaFormatJPEG);
}
catch (COMException e)
{
    // Convert the error code to UINT
    uint errorCode = (uint)e.ErrorCode;

    // See the error codes
    if (errorCode ==  0x80210006)
    {
        Console.WriteLine("The scanner is busy or isn't ready");
    }
    else if(errorCode == 0x80210064)
    {
        Console.WriteLine("The scanning process has been cancelled.");
    }
    else if(errorCode == 0x8021000C)
    {
        Console.WriteLine("There is an incorrect setting on the WIA device.");
    }
    else if(errorCode == 0x80210005)
    {
        Console.WriteLine("The device is offline. Make sure the device is powered on and connected to the PC.");
    }
    else if(errorCode == 0x80210001)
    {
        Console.WriteLine("An unknown error has occurred with the WIA device.");
    }
}
6. Showing scanning progress
To show the progress of the scanner, you can use the ShowTransfer method of the CommonDialogClass. The CommonDialog control is an invisible-at-run-time control that you can create using "WIA.CommonDialog" as the ProgID in a call to CreateObject or by dropping a CommonDialog object on a form. You can retrieve the image by converting the scan result (object returned from the ShowTransfer method) to the ImageFile type.
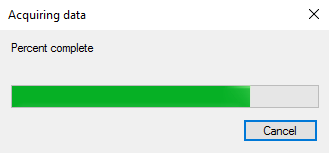
This method will display a mini dialog with a progress bar that indicates and is updated during the scanning process. It expects as first parameter the scanner item, as second parameter the format of the scanned image and as third parameter a boolean that indicates wheter the Cancel scan button should be shown or not. If the user cancels the scanning process, then be aware of adding a try-catch statement to prevent your app from crashing. Import the following types at the top of your class:
using WIA;
using System.Runtime.InteropServices;
Then select a scanner and start the scanning process
// Create a DeviceManager instance
var deviceManager = new DeviceManager();

// Create an empty variable to store the scanner instance
DeviceInfo firstScannerAvailable = null;

// Loop through the list of devices to choose the first available
for (int i = 1; i <= deviceManager.DeviceInfos.Count; i++)
{
    // Skip the device if it's not a scanner
    if (deviceManager.DeviceInfos[i].Type != WiaDeviceType.ScannerDeviceType)
    {
        continue;
    }

    firstScannerAvailable = deviceManager.DeviceInfos[i];

    break;
}

// Connect to the first available scanner
var device = firstScannerAvailable.Connect();

// Select the scanner
var scannerItem = device.Items[1];

CommonDialogClass dlg = new CommonDialogClass();

try
{
    object scanResult = dlg.ShowTransfer(scannerItem, WIA.FormatID.wiaFormatPNG, true);

    if (scanResult != null){
        ImageFile image = (ImageFile)scanResult;

        // Do the rest of things as save the image
    }
}
catch (COMException e)
{
    // Display the exception in the console.
    Console.WriteLine(e.ToString());

    uint errorCode = (uint)e.ErrorCode;

    // Catch 2 of the most common exceptions
    if (errorCode ==  0x80210006)
    {
        Console.WriteLine("The scanner is busy or isn't ready");
    }else if(errorCode == 0x80210064)
    {
        Console.WriteLine("The scanning process has been cancelled.");
    }
}
With all these basic instructions, you will be able to create your own scanning application in WinForms with C#.
Implementation example
We've just written an example application that lists all the available scanner devices in a list box and allow you to scan and save the file in a custom path. It implements the scanning progress dialog and allows you to save the image in different formats as PNG,JPEG or TIFF:

Just clone the repository, open the project with Visual studio and test it. The source code can be found in this Github repository.
Happy coding !

