
A lot of developers publish their packages on NPM everyday. Most of them are very useful, they offer the usage of the module with code and command line, however not all of them expose their modules globally (not because you didn't execute the install command with the -g flag but the module ain't configured to be globally used). If they offer an utility (script.js) that does some special trick, to execute it from the command line you will need to provide the path to the script and invoke it with node:
node ../path/to/my-awesome/tool/script.js --arguments somevalueA little bit painful if you work a lot with it. You would like instead, as developer of the application have some authority, originality and expose global commands for your app as famous frameworks and toolsets like Cordova or TypeScript do, the toolname as a command instruction and the rest of the command:
cordova do-something
REM or other tools
tsc do-other-thing
nodemon do-other-thing
What would be better that do the same for your own module:
mymodule do-somethingIn this article you will learn how to create a suitable module for global installation easily.
1. Create a normal module
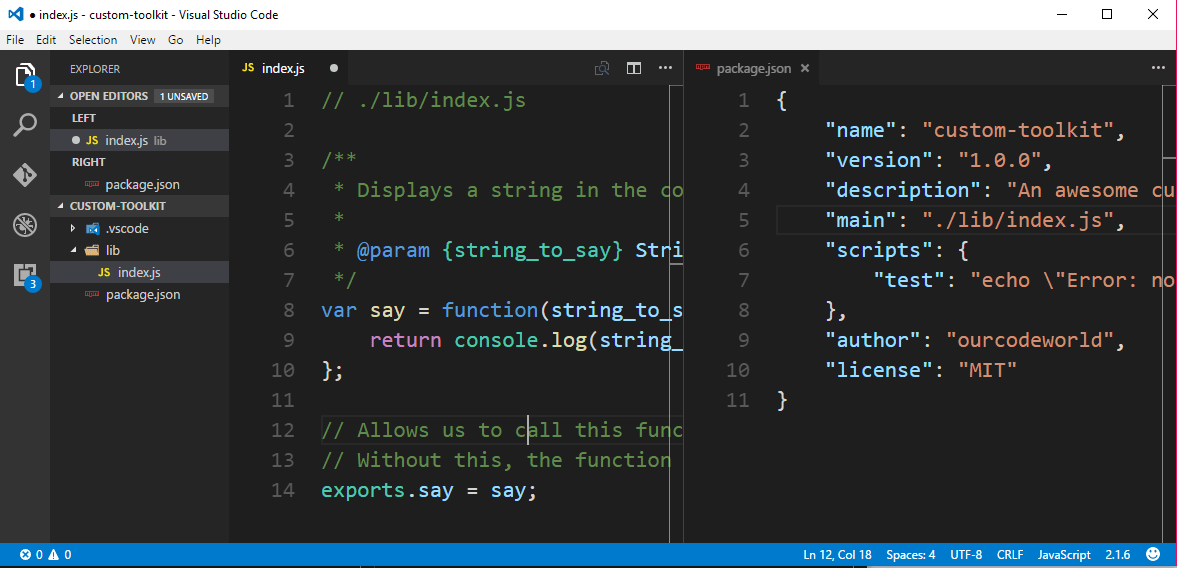
As first step proceed to create an empty module. The name of our module will be custom-toolkit (change it as you wish) located in the desktop inside the custom-toolkit folder, inside the custom-toolkit folder create a new folder that will contain the code of your module with the name lib, finally create inside the lib folder a single file (index.js) that has the following content:
// ./lib/index.js

/**
 * Displays a string in the console
 *
 * @param {string_to_say} String string to show in the console
 */
var say = function(string_to_say) {
    return console.log(string_to_say);
};

// Allows us to call this function from outside of the library file.
// Without this, the function would be private to this file.
exports.say = say;
The main script of our module will expose the say method that shows some text in the console. You can create the module (create the package.json) using npm init:
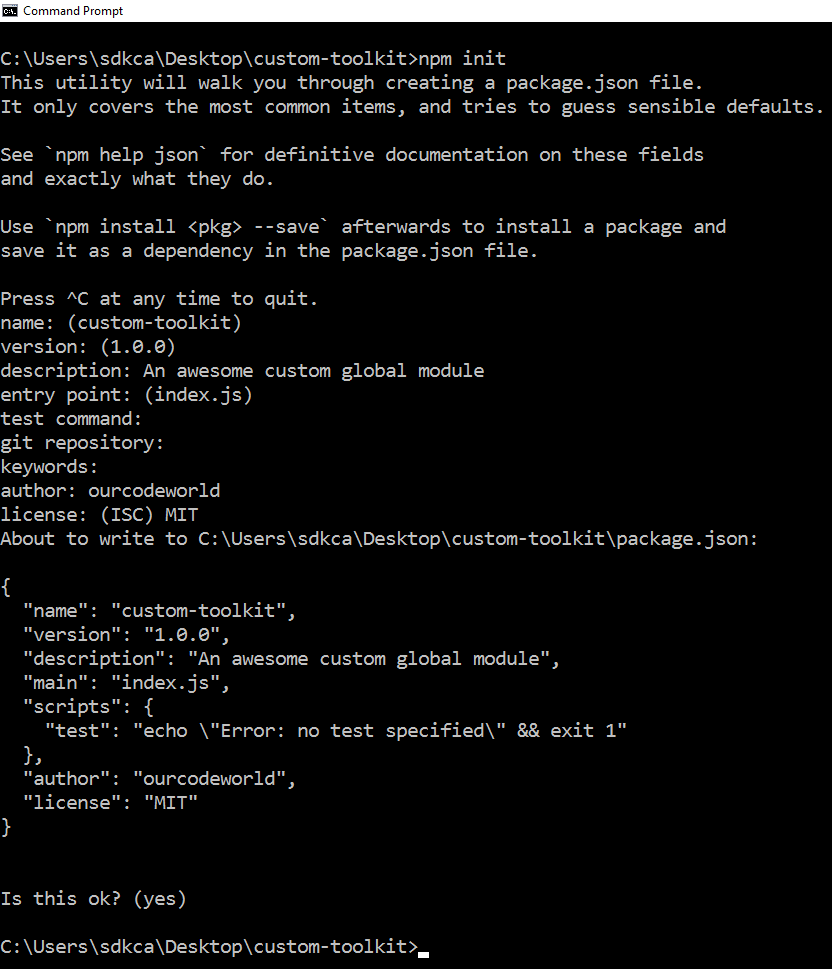
Or manually creating a package.json with the following content (change the fields you want except the main):
{
    "name": "custom-toolkit",
    "version": "1.0.0",
    "description": "An awesome custom global module",
    "main": "./lib/index.js",
    "scripts": {
        "test": "echo \"Error: no test specified\" && exit 1"
    },
    "author": "ourcodeworld",
    "license": "MIT"
}
That should be enough for our example module, simple isn't ? The structure of the module would be:
2. Create global module files
Create a new folder named bin inside the root directory of your module with a new js file inside (demo-global.js) with the following content inside:
#!/usr/bin/env node

var myLibrary = require('../lib/index.js');

// Displays the text in the console
myLibrary.say('Jack, get back, come on before we crack Lose your blues, everybody cut footloose');
Important
Note that the first line (#!/usr/bin/env node) will allow npm to correctly generate an executable for this module. In case someone works in Windows, it ignores the shebang line #!/usr/bin/env node and will execute it according to the .js file association.
If you package for npm, use the bin property in package.json (that's what we're going to do on step 3). Then on Windows, Npm will install a .cmd wrapper along side your script so users can execute it from the command-line
This script demo-global.js will be the one that we'll expose globally with a custom name on our package.json.
3. Expose your module for global installation
In this case, we want our global module to have the name dosomethingawesome, npm makes it pretty easy, to register our global module we need to specify the bin property to our package.json. Note that you can do as many commands you want, a lot of packages have one or more executable files that they'd like to install into the PATH.
Edit the package.json and register the dosomethingawesome instruction that executes the demo-global.js script:
{
    ...
    "bin": {
      "dosomethingawesome": "./bin/demo-global.js"
    },
    ..-
}
That would be enough to register the module globally when someone installs your module with npm install -g yourmodule. Note that if your package is primarily a command-line application that should be installed globally, then you can add the preferGlobal property to true to provide a warning if it is installed locally. It doesn't actually prevent users from installing it locally, but it does help prevent some confusion if it doesn't work as expected:
{
    ...
    "preferGlobal": true,
    ..-
}
Then your package.json should look finally like:
{
    "name": "custom-toolkit",
    "version": "1.0.0",
    "description": "An awesome custom global module",
    "main": "./lib/index.js",
    "scripts": {
        "test": "echo \"Error: no test specified\" && exit 1"
    },
    "bin": {
      "dosomethingawesome": "./bin/demo-global.js"
    },
    "preferGlobal": true,
    "author": "ourcodeworld",
    "license": "MIT"
}
And your module is ready to be installed.
4. Install your module
The final step is up to you, you only need to install the module globally in the way you want. You can install it from a local source, publish it in Github, then on NPM etc. In this case we are going to install the module globally from a folder in the desktop, therefore our command that theoretically is npm install -g custom-toolkit will look like:
npm install -g C:\Users\sdkca\Desktop\custom-toolkitRemember to add the -g flag to install the package globally and you're ready to go. Now your module (the exposed dosomethingawesome instruction) is available everywhere:

To uninstall it (even if installed from a local source) execute npm uninstall -g custom-toolkit.
Final tips
The tutorial was explained so simple as possible. If you want to increase the complexity of your first global module, then you can obviously play with arguments (tipical tasks of a CLI). The following modified script would accept and expect a name as argument of our dosomethingawesome command:
#!/usr/bin/env node

// Delete the 0 and 1 argument (node and script.js)
var args = process.argv.splice(process.execArgv.length + 2);

// Retrieve the first argument
var name = args[0];

var myLibrary = require('../lib/index.js');

// Displays the text in the console
myLibrary.say(name + ', get back, come on before we crack Lose your blues, everybody cut footloose');
Which could be triggered using:
dosomethingawesome CarlosAnd would generate the output:

If you really want to work with arguments and options in your script, we encourage the use of a library to manipulate them as command-line-args or stdio.
Happy coding !

