
Although there are plenty of UI framework for python, most of them aren't so easy to use and implement. At least not for a programming beginner in the python language, that's why today we want to make an introduction of how to create a basic user interface with the most common UI elements like dropbox, radioboxes, text inputs, buttons etc using the appJar package for Python.
What is appJar
appJar is an useful package written by a teacher, in the classroom, for students. appJar is designed to run on as many versions of Python as possible so it should work almost everywhere. There are no other dependencies, so you can simply download, unzip, and put it in your code folder. The ease with which you can create basic interactive interfaces with appJar is simply awesome, it makes it one of the best packages to learn how to code with Python and for very simple programs where you don't need a futurist UI as well.
GUIs in Python are pretty hard to achieve by yourself, so if you are a beginner that wants to get started with python and create your own UI for simple applications, appJar is one of the most reliable solutions.
1. Install appJar
The preferred installation method of appJar is via pip. Open your terminal and run the following command anyhwere:
python -m pip install appjarAfter the installation you can update the package whenever you want:
python -m pip install appjar --upgradeAnd you can obviously import the appJar namespace from your python code. For more information about this awesome library, please visit the official repository at Github here or visit the official website.
2. Using AppJar
Unlike many other tools for visual GUI design, like visual studio, you will need to build your own GUI with plain code, that mean line per line. AppJar offers a lot of component, so list them here is not appropiate. That's why we'll only describe the features of the library and how easily it can be used.
- Designed to be as easy as possible, yet still provide a lot of tkinter functionality
- Provides 3 functions for most widgets:
- add(name, value) this adds a new widget (usually with a name and a value)
- set(name, value) this updates the value of the named widget
- get(name) this gets the value of the named widget
- Uses grid layout
- When adding widgets, up to 4 numerical "positions" can be supplied:
- column - the coloumn to appear in, starting at 0
- row - row to appear in, stating at 0
- columnspan - how many columns to span across
- rowspan - how many rows to span down
- Provides loads of extra bits and pieces outside of core tkinter
- Some of this was from the excellent resources @ http://effbot.org
- Some of this was from slashdot examples of how to solve common problems
- Some of this has been incorporated from other people's modules:
- Michael Lange's ToolTip
- Johann C. Rocholl's tkinter_png support
- Martin J. Fiedler's NanoJPEG library
- I've tried to get as much functionality into this library as possible, without requiring any other modules
The initialization of an application with a UI can be so simple as the following code:
# import the library
from appJar import gui


# create a GUI variable called app
app = gui()

# add & configure widgets - widgets get a name, to help referencing them later
app.addLabel("title", "Welcome to appJar")
app.setLabelBg("title", "red")

# start the GUI
app.go()
Which makes the library pretty easy to use with simple scripts.
Example
The following example implements a very basic login form that follows a class-structured application with some custom methods (they don't follow any pattern). To run it, create a new python file namely main.py and put the following inside:
# main.py
from appJar import gui

# Example of a semi-structured application
class MyApplication():

    # Build the GUI
    def Prepare(self, app):
        # Form GUI
        app.setTitle("Login Form")
        app.setFont(16)
        app.setStopFunction(self.BeforeExit)

        # Add labels & entries
        # in the correct row & column
        app.addLabel("userLab", "Username:", 0, 0)
        app.addEntry("username", 0, 1)
        app.addLabel("passLab", "Password:", 1, 0)
        app.addSecretEntry("password", 1, 1)
        app.addButtons( ["Submit", "Cancel"], self.Submit, colspan=2)

        return app

    # Build and Start your application
    def Start(self):
        # Creates a UI
        app = gui()

        # Run the prebuild method that adds items to the UI
        app = self.Prepare(app)

        # Make the app class-accesible
        self.app = app

        # Start appJar
        app.go()

    # Callback execute before quitting your app
    def BeforeExit(self):
        return self.app.yesNoBox("Confirm Exit", "Are you sure you want to exit the application?")

    # Define method that is executed when the user clicks on the submit buttons
    # of the form
    def Submit(self, btnName):
        if btnName == "Submit":
            username = self.app.getEntry("username")
            password = self.app.getEntry("password")

            # Very stupid login system (both strings equal to ourcodeworld)
            if username and password == "ourcodeworld":
                self.app.infoBox("Logged in", "You are now logged in !")
            else:
                self.app.errorBox("Error", "Your credentials are invalid !")

# Run the application
# `python main.py`
if __name__ == '__main__':
    # Create an instance of your application
    App = MyApplication()
    # Start your app !
    App.Start()
Then, run the script in your terminal using:
python main.pyThis will start a new window with your basic user interface as shown in the following image:
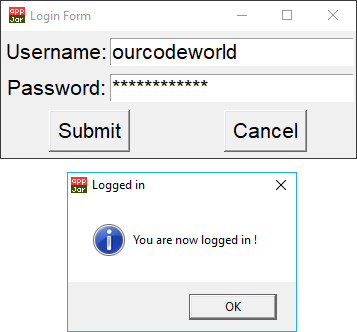
Happy coding !

