

When you work with a Git repository, your project may be actively modified by a lot of people. Some of them may not be trustworthy as they may be new employees or something like that. In this case, if they need to do git pull in the server to update the changes of a commit in your production server, you may not want that everybody knows the password of the repository. Another case where you don't want to provide the password of the repository everytime you do git pull or git clone, are automatized deployments.
That's why the the "deployment keys" feature exist in Gitlab, A deploy key is an SSH key that is stored on your server and grants access to a single Gitlab repository. This key is attached directly to the repository instead of to a personal user account. In this article, we'll show you step by step how you can automatize the deployment process of your project hosted on Gitlab.
1. Find or create an SSH Key for your server
The first thing that you need to do is to verify if your server has already a public key created in the .ssh directory of the user in the server, so start a SSH session to your server and type the following command:
cat ~/.ssh/id_rsa.pubThis will automatically search in the folder of your user that in our case is /home/vagrant/.ssh, if the output of the command shows a string that starts with ssh-rsa, then you already have an SSH Key that you can use to add to your repository, so you can skip to the step 2. If instead, you get the output : cat: ~/.ssh/id_rsa.pub: No such file or directory, then you will need to create an SSH Key first. You can create a SSH Key in Ubuntu via SSH with the following command (navigate to the .ssh directory first and type):
ssh-keygen -t rsaTo make the process easy, we won't add a Keyphrase for the SSH Key, so as mentioned in the creation wizard just press enter to don't use a keyphrase:
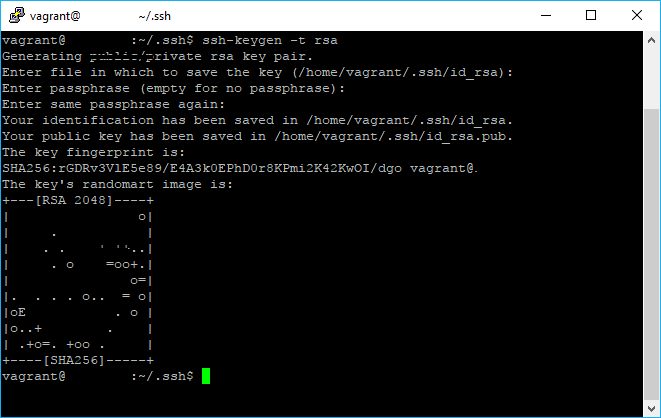
As shown in the image, we no have the id_rsa and id_rsa.pub file in our .ssh directory. This key works as a "pass" that allows to clone/pull your project in the current server, till this point it doesn't do anything, so you will need to follow the other steps.
2. Configure SSH client to find your GitLab private SSH in the server
As next step you need to establish that, when cloning from Gitlab, the deployment key should be used as authentication instead of an username and a password. For this you need to ensure that ssh-agent is enabled by running the following command:
eval $(ssh-agent -s)Then you can proceed to add your key to the SSH registry using the following command:
# Add your private key
ssh-add ~/.ssh/id_rsa
To retain these settings you'll need to save them to a configuration file. Normally on OpenSSH clients you can configure this in the ~/.ssh/config file. If the file doesn't exist, you can create it:
# Go to SSH directory
cd ~/.ssh/

# Create the config file
# alternatively create the file using SFTP
# or in the way you want, we are using touch
touch config
And register your key in the file. In this tutorial we are adding a single SSH Key from the Gitlab website (non self hosted version), so our config file content will be:
# GitLab.com server
Host gitlab.com
RSAAuthentication yes
IdentityFile ~/.ssh/id_rsa
As you may have multiple projects in one server or a project that uses different repositories that need to be updated, you can without a problem implement multiple SSH Keys in the same file following the notation:
# GitLab.com server
Host gitlab.com
RSAAuthentication yes
IdentityFile ~/.ssh/config/private-key-filename-01

# Private GitLab server
Host gitlab.mycompany.com
RSAAuthentication yes
IdentityFile ~/.ssh/config/private-key-filename
3. Add the Server Key as a deployment key in your Repository configuration
Now you need the public key of your server (created in step 1), in this step you are saying to Gitlab "Hey, if someone uses this SSH Key to clone, allow him to do it". You can get the content of the public file using a text editor via SFTP, or just by printing the output of the file with SSH using the following command:
cat ~/.ssh/id_rsa.pubThis would output in our case the content of the public key:
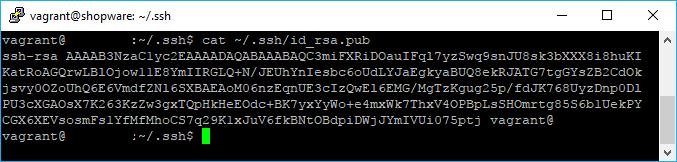
Keep that long string in the clipboard as you will need it to paste it in Gitlab. As next acccess the Settings of your Repository in Gitlab, in our case as we are using the non self hosted version of Gitlab the configuration for the Deploy Keys is in https://gitlab.com/<username>/<repository-name>/settings/repository. The menu to add a new deploy key looks like this:

Here you would only need to add the content of the id_rsa.pub file, provide a title and decide wheter the server can be used to push changes as well or not (normally unchecked as it is production). Once the key is added in your repository, you should be able now to clone/pull your repository in the deployment server.
4. Clone and pull repository to test
As final step, to verify if everything went right you can clone your repository to see if the credentials of the repository are requested or not, in case it does, please read the tutorial again and check what you did wrong. Otherwise, you will be able to clone your project using the following command:
Note
Remember to clone via SSH, not HTTPS, otherwise you may obviously be asked for the credentials.
git clone [email protected]:username/repositoryname.git

# Or once the project is clone, pull changes

git pull origin master
By doing this you may have noticed that you didn't have to input your Gitlab username nor password thanks to the deployment key!
Happy coding !

