
The face_recognition library is widely known around the web for being the world's simplest facial recognition api for Python and the command line, and the best of all is that you won't need to pay a dime for it, the project is totally open source, so if you have some development knowledge and you are able to build a library from scratch, you'll surely know how to work with this library.
In this article, we'll teach you how to install, setup and use basically the python library "face recognition" in Ubuntu 16.04.
Requirements
Before proceeding with the usage of this library, you will need on your system:
Python 3
In this tutorial, we'll follow the installation of the library with Python 3.
cmake
Your system needs CMake installed, an open-source, cross-platform family of tools designed to build, test and package software. CMake is used to control the software compilation process using simple platform and compiler independent configuration files, and generate native makefiles and workspaces that can be used in the compiler environment of your choice. The suite of CMake tools were created by Kitware in response to the need for a powerful, cross-platform build environment for open-source projects such as ITK and VTK.
If it's not installed in your system, you can run the following commands to install it:
# Update repo
sudo apt-get update

# Install cmake if it's not installed
sudo apt-get install build-essential cmake
1. Install and compile dlib
Before proceeding with the usage and installation of the face recognition library in Python, you will need the distributable of dlib installed on your system and the python binding as well. Dlib is a modern C++ toolkit containing machine learning algorithms and tools for creating complex software in C++ to solve real world problems. It is used in both industry and academia in a wide range of domains including robotics, embedded devices, mobile phones, and large high performance computing environments. Dlib's open source licensing allows you to use it in any application, free of charge.
To start with the compilation of dlib in your system, clone the repository in some directory in your system:
# Clone the dlib library in some directory of the system
git clone https://github.com/davisking/dlib.git
Then, proceed to build dlib with the following commands:
# get into the cloned directory
cd dlib

# create build directory inside the cloned directory
mkdir build

# Switch to the created directory
cd build

# generate a Makefile in the current directory
cmake ..

# Build dlib !
cmake --build .
This will start the build process and once it finishes, the native library of dlib will be available in your system. For more information about Dlib, please visit the official website here.
2. Install Python binding for dlib
After building dlib, switch again to the cloned directory in the previous step:
cd ..And proceed with the installation of the python bindings running the setup.py file with Python 3 with the following command:
python3 setup.py installThis will install the binding and you will be able to import dlib later in your Python code. In case that you face the following exception during the execution of the previous command:
Traceback (most recent call last):
  File "setup.py", line 42, in <module>
    from setuptools import setup, Extension
ImportError: No module named 'setuptools'
Install the Python 3 setup tools with the following command:
sudo apt-get install python3-setuptoolsAnd now try again to run the python3 setup.py install command.
3. Install face recognition library
As mentioned, we'll use the face recognition library. This library recognize and manipulate faces from Python or from the command line with the world's simplest face recognition library. Built using dlib's state-of-the-art face recognition built with deep learning. The model has an accuracy of 99.38% on the Labeled Faces in the Wild benchmark.
This also provides a simple face_recognition command line tool that lets you do face recognition on a folder of images from the command line easily. You can install it with the following command:
Note
The installation will take a while to download and install, so be patient.
pip3 install face_recognitionIf you don't have pip3 installed, install it with the following command:
sudo apt-get -y install python3-pipFor more information about this library, please visit the official repository at Github here. After installing the library, you will be able to use it either from the CLI or your python scripts.
4. How to use
When you install face_recognition, you get two simple command-line programs:
face_recognition- Recognize faces in a photograph or folder full for photographs.face_detection- Find faces in a photograph or folder full for photographs.
You will have as well the possibility of import the library in your scripts and use it from there !
Face recognition
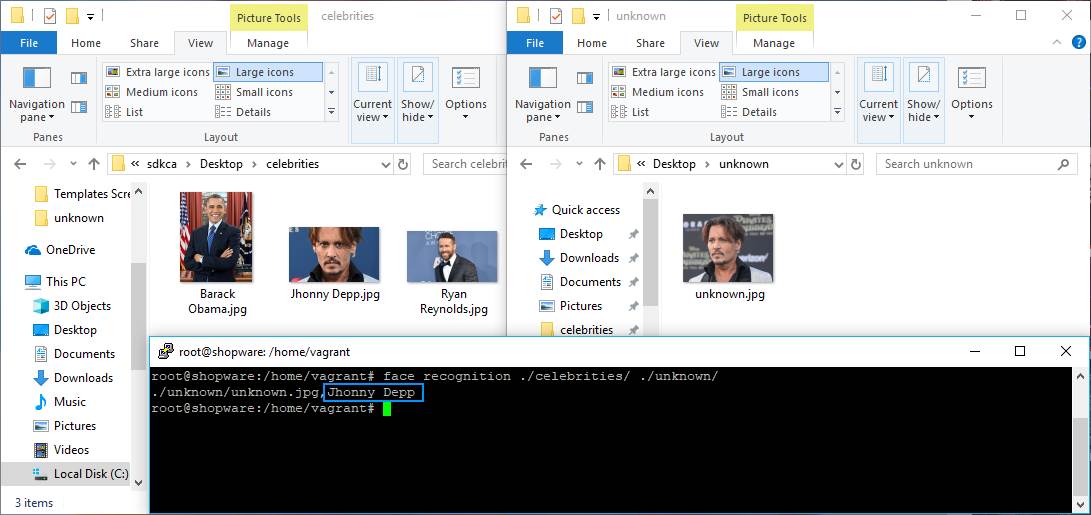
For example, with this library you will be able to identify some faces according to some little database as source. Create a directory that contains the possible persons that the script will be able to identify, in this example we'll have a directory with 3 celebrities:

In our command, we'll identify this directory as our source of images. In other directory, we'll store the image of the celebrity that we want to identify from our database, obviously we'll use one of the regitered celebrities, but with another image:

The logic is the following, the library will use the directory of images celebrities as database and we'll search from who's the image(s) stored in the unknown directory. You can run the following command to accomplish the mentioned task:
face_recognition ./celebrities/ ./unknown/Then, the output will be:

The command will output the path to the image that was processed, in our case unknown_celebrity.jpg and will add the name of the matched image from the celebrities directory as suffix. In this case, the library was able to identify the actor Ryan Reynolds from our images. Note that this can work with multiple images as well.
As mentioned, the CLI utility is just an extra, one of the fun facts is the hability of writing some code by yourself and identifying the faces with some logic, for example:
import face_recognition

# Load the jpg files into numpy arrays
obama_image = face_recognition.load_image_file("Barack Obama.jpg")
justin_image = face_recognition.load_image_file("Justin Timberlake.jpg")
ryan_image = face_recognition.load_image_file("Ryan Reynolds.jpg")
unknown_image = face_recognition.load_image_file("unknown_celebrity.jpg")

# Get the face encodings for each face in each image file
# Since there could be more than one face in each image, it returns a list of encodings.
# But since I know each image only has one face, I only care about the first encoding in each image, so I grab index 0.
try:
    obama_face_encoding = face_recognition.face_encodings(obama_image)[0]
    justin_face_encoding = face_recognition.face_encodings(justin_image)[0]
    ryan_face_encoding = face_recognition.face_encodings(ryan_image)[0]

    unknown_face_encoding = face_recognition.face_encodings(unknown_image)[0]
except IndexError:
    print("I wasn't able to locate any faces in at least one of the images. Check the image files. Aborting...")
    quit()

known_faces = [
    obama_face_encoding,
    justin_face_encoding,
    ryan_face_encoding
]

# results is an array of True/False telling if the unknown face matched anyone in the known_faces array
results = face_recognition.compare_faces(known_faces, unknown_face_encoding)

print("Is the unknown face a picture of Obama? {}".format(results[0]))
print("Is the unknown face a picture of Justin? {}".format(results[1]))
print("Is the unknown face a picture of Ryan? {}".format(results[2]))
print("Is the unknown face a new person that we've never seen before? {}".format(not True in results))
The idea is basically the same, compare the face encoding generated by the images that you have in your "database" with the encoding generated by the image that you want to identify.
Face detection
The face detection allows you to identify the location of faces inside an image. The library will return the coordinates of the images in the image, so you can use those coordinates to draw squares in the images. Exactly like the face recognition tool, the command will print the path of the image in the providen directory followed by the coordinates as suffix, for example:
face_detection ./celebrities/This will generate the following output:

As you can see, you can obtain the coordinates of the identified faces in the image after the first comma of the string. You can use it with your code as well:
import face_recognition

image = face_recognition.load_image_file("Ryan Reynolds.jpg")
face_locations = face_recognition.face_locations(image)

# [(98, 469, 284, 283)]
print(face_locations)
Happy coding !

