
A lot of web based projects allow the upload of files from unknown sources, specially those apps that are public (available widely on the internet). Those files end up in the server, but nobody verifies whether the file is malicious or not. If you are willing to scan those files with an antivirus in Ubuntu, we recommend you the open source ClamAV antivirus. ClamAV® is an open source (GPL) anti-virus engine used in a variety of situations including email scanning, web scanning, and end point security. It provides a number of utilities including a flexible and scalable multi-threaded daemon, a command line scanner and an advanced tool for automatic database updates.
- Command-line scanner
- Milter interface for sendmail
- Advanced database updater with support for scripted updates and digital signatures
- Virus database updated multiple times per day
- Built-in support for all standard mail file formats
- Built-in support for various archive formats, including Zip, RAR, Dmg, Tar, Gzip, Bzip2, OLE2, Cabinet, CHM, BinHex, SIS and others
- Built-in support for ELF executables and Portable Executable files packed with UPX, FSG, Petite, NsPack, wwpack32, MEW, Upack and obfuscated with SUE, Y0da Cryptor and others
- Built-in support for popular document formats including MS Office and MacOffice files, HTML, Flash, RTF and PDF
In this article, we will show you how install this antivirus in your Ubuntu 16.04 system and how to use it from the CLI.
1. Install ClamAV
To install ClamAV proceed to update the package lists of your system with:
sudo apt-get updateThen, proceed to install ClamAV with the following command:
sudo apt-get install clamavIf you want to use the daemon as well, run the following command too:
sudo apt-get install clamav-daemonOnce the setup finishes, continue with the next step. For more information about this tool, please visit the official website here.
2. Update virus database
Once the antivirus has been installed, be sure to update the virus database with the following command:
sudo freshclamThis will start the update process of the database and it will took while depending on how old is your database:
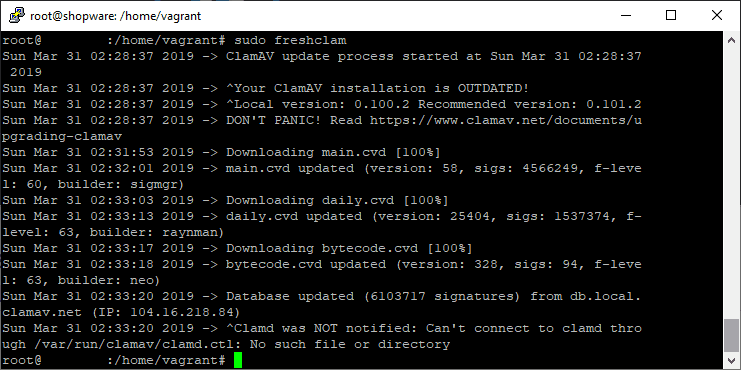
Once this database has been updated, you are ready to get started with the scanning !
3. Scanning with the CLI
We will share with you the most used commands by the community and that we know, you may need often:
A. Scanning the whole system (verbose and non verbose)
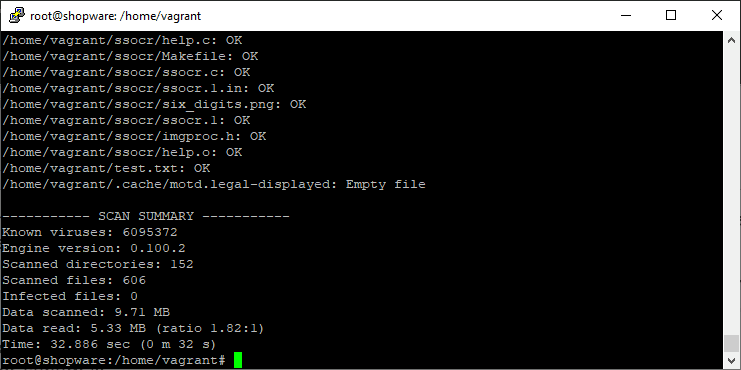
Clamscan accepts as argument the path of the path to scan, so if you want to scan the entire system, provide the root directory as argument with the -r option that allows to scan subdirectories recursively as well:
clamscan -r /This will take a while until it starts to initialize and then it will print line by line the scanned files and the status (OK). At the end you will get a short summary:
B. Scanning the whole system with alarm
If you want a non verbose output and an alarm that only notifies if there are infected files on your system, use the --bell option to show the alarm on the -i option to display only the infected files:
clamscan -r --bell -i /C. Scanning the whole system (with alarm) except the sys dir
The sys directory is an interface to the kernel. Specifically, it provides a filesystem-like view of information and configuration settings that the kernel provides, much like /proc. Writing to these files may or may not write to the actual device, depending on the setting you're changing. It isn't only for managing devices, though that's a common use case. A lot of system admins may want to skip the directory, so just exclude it from the scan command with the --exclude-dir option:
clamscan -r -i ––exclude-dir="^/sys" --bell / D. Scanning multiple specific directories
You can scan multiple directories in the same command specifying a list with the directories (in a txt file):
clamscan -r -i --bell --file-list=/home/vagrant/specific_directories.txtThe content of specific_directories.txt will be in our case:
/opt/directory1
/opt/directory1
/opt/directory1
/www/vhosts/mywebsite/uploads
You can simply change the content of the file with the directories that you want to scan and that's it. Remember that you can display all the options of the CLI tool with:
clamscan --helpDon't forget as well to check the official website for more information about how to use this CLI tool.
Happy scaning !

