The UAC management in Windows is pretty troublesome for different reasons. The most simple and usual one, is the fact that some applications will need to execute system level tasks, like stopping or starting services of Windows or even services created by you. If the user runs the application with administrator rights, everything will work properly, however we know how the users are ! We know they forget (we do as well) to run applications with the necessary privileges, so you can't expect the same always. Instead, you may want to search for a secure solution that guarantees the execution of your application with the mentioned rights.
In this article, we'll explain you briefly how to request administrator rights at the beginning of the execution of a C# based WinForms application.
1. Verify that your app has an application manifest
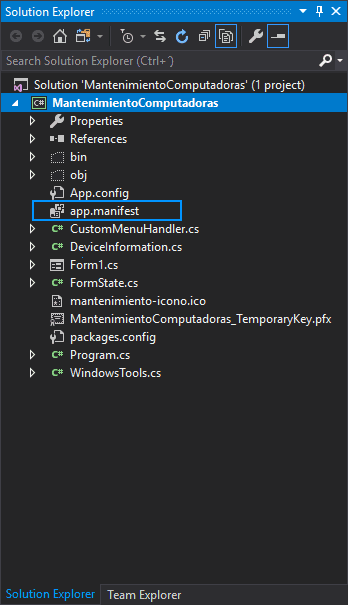
As first step, you need to verify if your application does have the manifest in the root directory:

If it doesn't exist, you will have to create it as described in the following description.
If you don't have any, create it with the default information
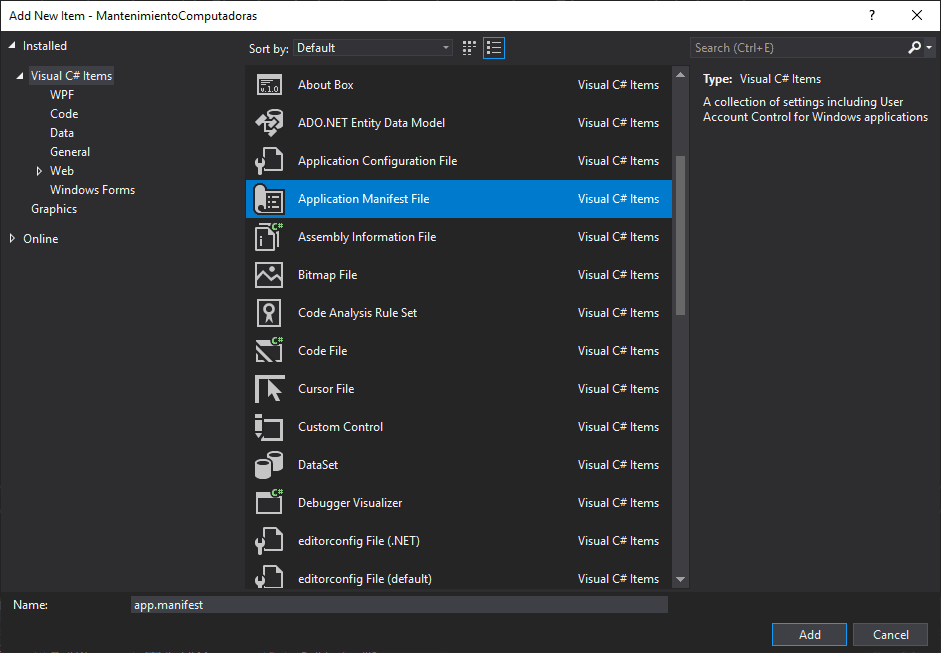
In case that you don't have the mentioned manifest registered in your application, then proceed to create it. Open your project in Visual Studio and do right click on your project, click on Add and New Item:

In the new dialog, select from the Visual C# Items, the Application Manifest File:

This will create a file with a similar content in the root directory of your application namely app.manifest:
<?xml version="1.0" encoding="utf-8"?>
<assembly manifestVersion="1.0" xmlns="urn:schemas-microsoft-com:asm.v1">
  <assemblyIdentity version="1.0.0.0" name="MyApplication.app"/>
  <trustInfo xmlns="urn:schemas-microsoft-com:asm.v2">
    <security>
      <requestedPrivileges xmlns="urn:schemas-microsoft-com:asm.v3">
        <!-- UAC Manifest Options
             If you want to change the Windows User Account Control level replace the
             requestedExecutionLevel node with one of the following.

        <requestedExecutionLevel  level="asInvoker" uiAccess="false" />
        <requestedExecutionLevel  level="requireAdministrator" uiAccess="false" />
        <requestedExecutionLevel  level="highestAvailable" uiAccess="false" />

            Specifying requestedExecutionLevel element will disable file and registry virtualization.
            Remove this element if your application requires this virtualization for backwards
            compatibility.
        -->
        <requestedExecutionLevel level="asInvoker" uiAccess="false" />
      </requestedPrivileges>
    </security>
  </trustInfo>

  <compatibility xmlns="urn:schemas-microsoft-com:compatibility.v1">
    <application>
      <!-- A list of the Windows versions that this application has been tested on
           and is designed to work with. Uncomment the appropriate elements
           and Windows will automatically select the most compatible environment. -->

      <!-- Windows Vista -->
      <!--<supportedOS Id="{e2011457-1546-43c5-a5fe-008deee3d3f0}" />-->

      <!-- Windows 7 -->
      <!--<supportedOS Id="{35138b9a-5d96-4fbd-8e2d-a2440225f93a}" />-->

      <!-- Windows 8 -->
      <!--<supportedOS Id="{4a2f28e3-53b9-4441-ba9c-d69d4a4a6e38}" />-->

      <!-- Windows 8.1 -->
      <!--<supportedOS Id="{1f676c76-80e1-4239-95bb-83d0f6d0da78}" />-->

      <!-- Windows 10 -->
      <!--<supportedOS Id="{8e0f7a12-bfb3-4fe8-b9a5-48fd50a15a9a}" />-->

    </application>
  </compatibility>

  <!-- Indicates that the application is DPI-aware and will not be automatically scaled by Windows at higher
       DPIs. Windows Presentation Foundation (WPF) applications are automatically DPI-aware and do not need
       to opt in. Windows Forms applications targeting .NET Framework 4.6 that opt into this setting, should
       also set the 'EnableWindowsFormsHighDpiAutoResizing' setting to 'true' in their app.config. -->
  <!--
  <application xmlns="urn:schemas-microsoft-com:asm.v3">
    <windowsSettings>
      <dpiAware xmlns="http://schemas.microsoft.com/SMI/2005/WindowsSettings">true</dpiAware>
    </windowsSettings>
  </application>
  -->

  <!-- Enable themes for Windows common controls and dialogs (Windows XP and later) -->
  <!--
  <dependency>
    <dependentAssembly>
      <assemblyIdentity
          type="win32"
          name="Microsoft.Windows.Common-Controls"
          version="6.0.0.0"
          processorArchitecture="*"
          publicKeyToken="6595b64144ccf1df"
          language="*"
        />
    </dependentAssembly>
  </dependency>
  -->

</assembly>
Once you know you have this file in your application, you can proceed with the last step.
2. Request Administrator Rights
In order to start the application with administrator rights, you will need to change the value of the requestedExecutionLevel child node inside the trustInfo element. The requestedExecutionLevel node identifies the security level at which the application requests to be executed. This element has no children and has the following 2 attributes:
-
LevelRequired. Indicates the security level the application is requesting. Possible values are:-
asInvoker, requesting no additional permissions. This level requires no additional trust prompts. -
highestAvailable, requesting the highest permissions available to the parent process. -
requireAdministrator, requesting full administrator permissions. -
ClickOnce applications will only install with a value of
asInvoker. Installing with any other value will fail.
-
-
uiAccessOptional. Indicates whether the application requires access to protected user interface elements. Values are either
trueorfalse, and the default is false. Only signed applications should have a value of true.
In a default manifest you will find it with the next value:
<requestedExecutionLevel level="asInvoker" uiAccess="false" />However, you need to change it to the next one in order to require administrator rights:
<requestedExecutionLevel level="requireAdministrator" uiAccess="false" />Once you save the changes on the app.manifest file and you start the application with the Visual Studio Debugger, you will see the following warning (only if you didn't run Visual Studio as administrator).

Happy coding !


