
Image search engines analyze an image and ask some basic questions about it, for example is there a face on the picture or more than 1? Which color appears on the image and how frequently? Whats the resolution? Searchers can then narrow down their search based on this information. Surely this is a very huge topic that we won't explain deeply, but we will explain you how to implement your own image search engine with some tools that are already out there ready to work exactly as you need, and if it doesn't, you can of course modify it and make it match with your own needs.
In this article, we will explain you briefly how you can quickly implement your own image search engine using Keras and Tensorflow with Python in Ubuntu 18.04.
Requirements
You will need to have Python 3 installed on your system and Pip 3 as well, you can install them respectively on your Ubuntu system with:
sudo apt-get install python3And Pip with:
sudo apt-get install python3-pipHaving said that, let's get started !
1. Clone SIS project and install dependencies
In order to implement your own local image search engine using the mentioned technologies, we will rely on an open source project namely SIS. Simple image search engine is an Image Search Engine written from Scratch by @matsui528, he's an Assistant Professor at the Institute of Industrial Science, the University of Tokyo, Japan.
To get started, clone the source code of the project with Git using the following command in your terminal (if you don't have git, install it previously with sudo apt-get install git):
git clone https://github.com/matsui528/sis.gitThe project is very lightweight initially, as it contains just 62 lines (python) + 24 lines (html). After cloning the source code, switch to the sis directory with:
cd sisAnd proceed with the installation of the dependencies of the project using Pip. You can install them from the list provided by the project with:
pip3 install -r requirements.txtThis will install 5 dependencies:
- Pillow: Pillow is the friendly PIL fork by Alex Clark and Contributors. PIL is the Python Imaging Library by Fredrik Lundh and Contributors.
- h5py: The h5py package is a Pythonic interface to the HDF5 binary data format. It lets you store huge amounts of numerical data, and easily manipulate that data from NumPy.
- tensorflow: The core open source library to help you develop and train ML models. Get started quickly by running Colab notebooks directly in your browser.
- Keras: Keras is a high-level neural networks API, written in Python and capable of running on top of TensorFlow, CNTK, or Theano. It was developed with a focus on enabling fast experimentation.
- Flask: Flask is a microframework for Python based on Werkzeug, Jinja 2 and good intentions. It will be used to display graphical results of the search engine, so when you upload a file it will be analized and will return the images that match with your search.
For more information about this project, please visit the official repository at Github here.
2. Store your images
Now that the project has been downloaded and you installed all the dependencies, we can proceed with some manual work. Inside the project structure, you will need to store the images of your "image database" that will be so to speak, compared with the query image.
Store all the images that you want to have as reference, and that the user will be able to search for, inside the directory /sis/static/img. All the images need to be in JPEG format:
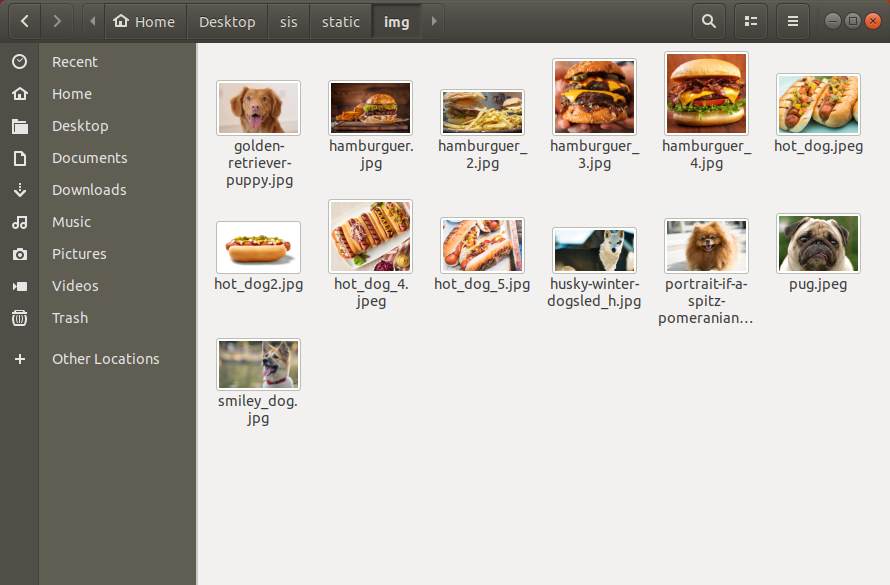
This step is totally up to you, you will be the one that decides the information and kind of images that your project will be able to offer. Once you have them, we will be able to extract the information on the next step.
3. Generate PKL files of every image
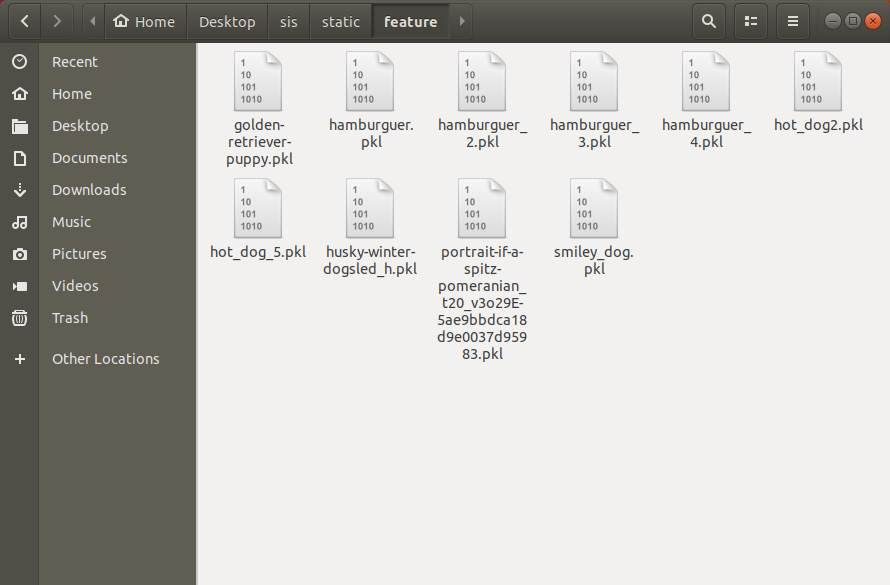
This script extracts deep features from images. Given a set of database images, a 4096D fc6-feature is extracted for each image using the VGG16 network with ImageNet pre-trained weights. To generate the pkl files, run the offline.py script on the root directory of sis with python:
python3 offline.pyDue to its depth and number of fully-connected nodes, VGG16 is over 533MB. This will be downloaded once you run the script for the first time.
After running the script, you will find new binary files with information about the pictures. This extracted information by the FeatureExtractor class (Keras Models) will be serialized using pickle into PKL binary files in the /sis/static/feature directory:
They will be used by Tensorflow to match your image query on the background logic.
4. Testing with a web interface
Now, as mentioned during the installation of dependencies, the project comes with a ready to use example based on a web interface that has been built using Flask. This interface (which is basically a simple HTML page with a single file input and some titles) will allow you to upload a file to the same page and it will return as result, images that are related to your search. You can start the server running the server.py script:
python3 server.pyThis will start the demo at http://0.0.0.0:5000 and you will be able to test it (as long as you have already some images on your database):
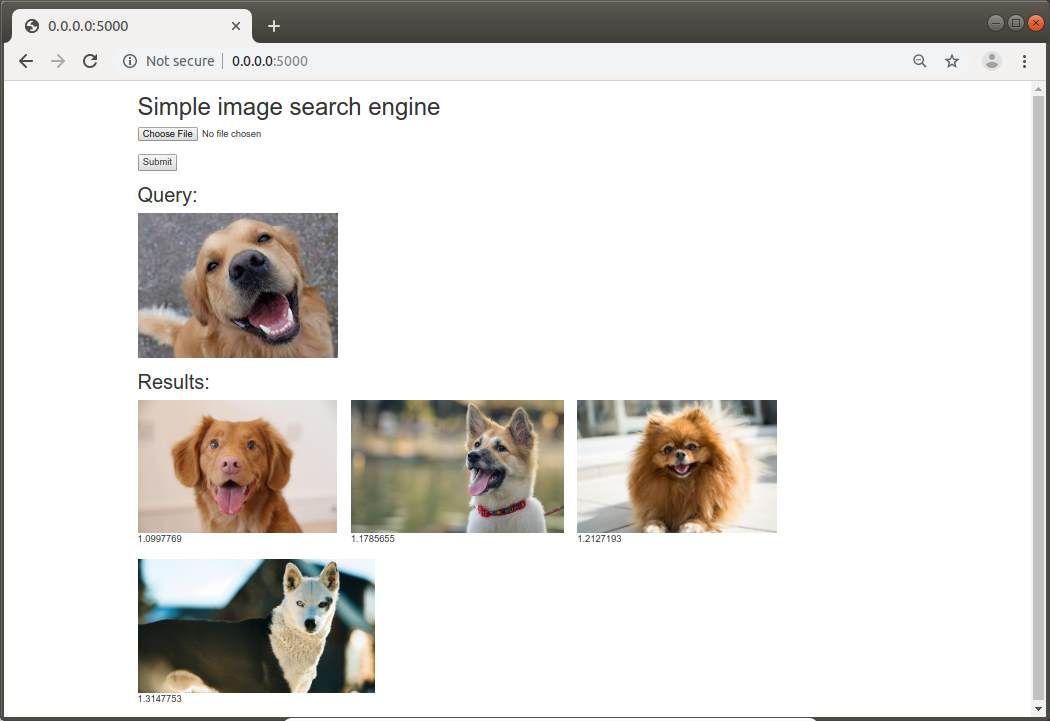
The logic in the background classifies an image with an uncertainty value, as you can see in the example, the closest the value it is to 1 and lower, the better match it is.
Custom logic
Of course as the project is open source, you may modify the way the project works. You may simply create as well a Python script that prints only the data that you need in the terminal, the order of the items that match the query and so on. For example, create the following file custom.py with the following content:
# Our Code World custom implementation
# Read article at:
# https://ourcodeworld.com/articles/read/981/how-to-implement-an-image-search-engine-using-keras-tensorflow-with-python-3-in-ubuntu-18-04
import os
import numpy as np
from PIL import Image
from feature_extractor import FeatureExtractor
import glob
import pickle
import json

if __name__=="__main__":
    fe = FeatureExtractor()
    features = []
    img_paths = []

    # Append every generated PKL file into an array and the image version as well
    for feature_path in glob.glob("static/feature/*"):
        features.append(pickle.load(open(feature_path, 'rb')))
        img_paths.append('static/img/' + os.path.splitext(os.path.basename(feature_path))[0] + '.jpg')

    # Define the query image, in our case it will be a hamburguer
    img = Image.open("/home/ourcodeworld/Desktop/hamburguer_query.jpg")  # PIL image

    # Search for matches
    query = fe.extract(img)
    dists = np.linalg.norm(features - query, axis=1)  # Do search
    ids = np.argsort(dists)[:30] # Top 30 results
    scores = [(dists[id], img_paths[id]) for id in ids]

    # Store results in a dictionary
    results = []

    for item in scores:
        results.append({
            "filename" : item[1],
            "uncertainty": str(item[0])
        })

    # Create a JSON file with the results
    with open('data.json', 'w') as outputfile:
        json.dump(results, outputfile, ensure_ascii=False, indent=4)
And run it with:
python3 custom.pyThis will create a JSON file with an ordered list of the images that seems to match with your query, in our example we searched with a hamburguer and as you can see, the first items are images of hamburguers:
[
    {
        "filename": "static/img/hamburguer_4.jpg",
        "uncertainty": "0.95612574"
    },
    {
        "filename": "static/img/hamburguer_2.jpg",
        "uncertainty": "1.0821809"
    },
    {
        "filename": "static/img/hamburguer_3.jpg",
        "uncertainty": "1.099425"
    },
    {
        "filename": "static/img/hamburguer.jpg",
        "uncertainty": "1.1565413"
    },
    {
        "filename": "static/img/hot_dog2.jpg",
        "uncertainty": "1.1644002"
    },
    {
        "filename": "static/img/hot_dog_5.jpg",
        "uncertainty": "1.2176604"
    },
    {
        "filename": "static/img/portrait-if-a-spitz-pomeranian_t20_v3o29E-5ae9bbdca18d9e0037d95983.jpg",
        "uncertainty": "1.262754"
    },
    {
        "filename": "static/img/smiley_dog.jpg",
        "uncertainty": "1.3276863"
    },
    {
        "filename": "static/img/golden-retriever-puppy.jpg",
        "uncertainty": "1.3307321"
    },
    {
        "filename": "static/img/husky-winter-dogsled_h.jpg",
        "uncertainty": "1.3511014"
    }
]
This implementation is pretty useful as you can filter as well images with more than 1.0 of uncertainty. Understanding this custom example will help you to implement this logic with your own projects and create for example some kind of API.
Special thanks and resources
This article wouldn't be possible without valuable information and resources extracted from the following sources:
You may read them as well to complement all the learned stuff in this article.
Happy coding !

