
A diff tool is used to compare text differences between two text files. If you're a developer (if you're not, how did you end up here?), you've probably seen this kind of tool in famous IDEs like Netbeans and Sublime. In this article, we are going to show how to implement a very useful and easy to use diff tool implementation for the famous ACE editor in Javascript.
Requirements
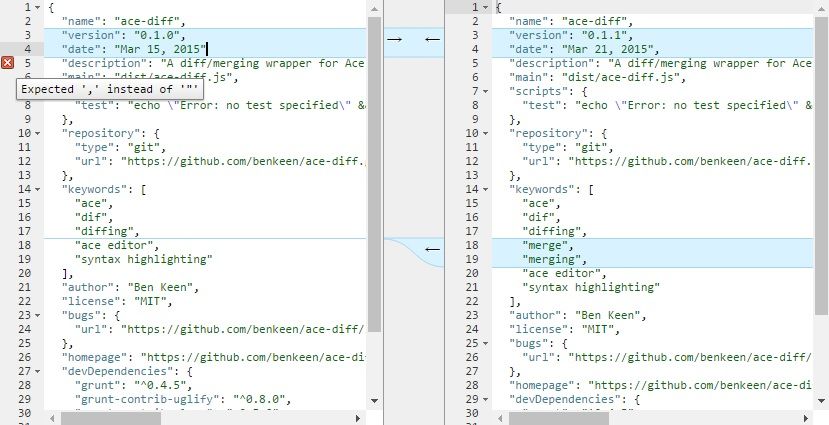
To implement a diff/merge control for ACE editor we'll depend on the Ace-diff plugin written by @benkeen. This plugin is a wrapper for Ace Editor that provides a 2 panel diffing and merging tool that visualizes differences in two documents and allow you to copy changes from one to another. It's built on top of the google-diff-match-patch library.
In order to implement this tool in your project, get a copy of the ace-diff.js or ace-diff.min.js file in the /dist folder of the project in Github. and the diff_match_patch.js file in the /libs folder of the project in Github. Then proceed to add a script tag in your document that includes the required plugins (after the ACE editor):
<!-- Add ace editor from the CDN or a local copy -->
<script src="https://cdnjs.cloudflare.com/ajax/libs/ace/1.2.5/ace.js" type="text/javascript" charset="utf-8"></script>
<!-- Add the diff plugin -->
<script src="ace-diff.js"></script>
<!-- Add the diff_match_patch plugin -->
<script src="diff_match_patch.js"></script>
Visit the official repository of ace-diff in Github here if you need more information.After this, you'll be able to instantiate the AceDiff class in your document. However, to visualizate the editor you're not ready yet! proceed to add some CSS to visualizate properly the editor.
Note: according to the place in your document that you want to locate the control, you'll need to change some properties. You can change the name of the classes in the way you want, but don't forget to change them too in the initialization with the classes property in Javascript.
Add the following CSS by linking a .css file to your document or within a style tag:
#flex-container {
    display: flex;
    display: -webkit-flex;
    flex-direction: row;
    position: absolute;
    bottom: 0;
    width: 100%;
    top: 0px !important;
    left: 0px;

    /* these 3 lines are to prevents an unsightly scrolling bounce affect on Safari */
    height: 100%;
    width: 100%;
    overflow: auto;
}
#flex-container>div {
    flex-grow: 1;
    -webkit-flex-grow: 1;
    position: relative;
}
#flex-container>div#acediff-gutter {
    flex: 0 0 60px;
    -webkit-flex: 0 0 60px;
    border-left: 1px solid #999999;
    border-right: 1px solid #999999;
    background-color: #efefef;
    overflow: hidden;
}
#acediff-gutter svg {
    background-color: #efefef;
}
.acediff-class {
    position: absolute !important;
    top: 0;
    bottom: 0;
    width: 100%;
}
.acediff-diff {
    background-color: #d8f2ff;
    border-top: 1px solid #a2d7f2;
    border-bottom: 1px solid #a2d7f2;
    position: absolute;
    z-index: 4;
}
.acediff-diff.targetOnly {
    height: 0px !important;
    border-top: 1px solid #a2d7f2;
    border-bottom: 0px;
    position: absolute;
}
.acediff-connector {
    fill: #d8f2ff;
    stroke: #a2d7f2;
}

.acediff-copy-left {
    float: right;
}
.acediff-copy-right,
.acediff-copy-left {
    position: relative;
}
.acediff-copy-right div {
    color: #000000;
    text-shadow: 1px 1px #ffffff;
    position: absolute;
    margin: 2px 3px;
    cursor: pointer;
}
.acediff-copy-right div:hover {
    color: #004ea0;
}
.acediff-copy-left div {
    color: #000000;
    text-shadow: 1px 1px #ffffff;
    position: absolute;
    right: 0px;
    margin: 2px 3px;
    cursor: pointer;
}
.acediff-copy-left div:hover {
    color: #c98100;
}
And you're ready to get started.
Implementation
The diff control needs to have the following markup:
<div id="flex-container">
    <div>
        <div class="acediff-class" id="editor-left"></div>
    </div>

    <div id="acediff-gutter"></div>

    <div>
        <div class="acediff-class" id="editor-right"></div>
    </div>
</div>
And you can initialize using the following JS:
<script>
    var aceDiffer = new AceDiff({
        left:{
            id:"editor-left"
        },
        right:{
            id:"editor-right"
        }
    });
</script>
Note that plugin provides all the following options that you can change to manipulate the tool as you wish:
{
    mode: null,
    theme: null,
    diffGranularity: 'broad',
    showDiffs: true,
    showConnectors: true,
    maxDiffs: 5000,
    left: {
        id: 'acediff-left-editor',
        content: null,
        mode: null,
        theme: null,
        editable: true,
        copyLinkEnabled: true
    },
    right: {
        id: 'acediff-right-editor',
        content: null,
        mode: null,
        theme: null,
        editable: true,
        copyLinkEnabled: true
    },
    classes: {
        gutterID: 'acediff-gutter',
        diff: 'acediff-diff',
        connector: 'acediff-connector',
        newCodeConnectorLink: 'acediff-new-code-connector-copy',
        newCodeConnectorLinkContent: '→',
        deletedCodeConnectorLink: 'acediff-deleted-code-connector-copy',
        deletedCodeConnectorLinkContent: '←',
        copyRightContainer: 'acediff-copy-right',
        copyLeftContainer: 'acediff-copy-left'
    }
}
Besides, you can still access the normal properties of the ACE editors by using the useful API:
aceInstance.getEditors(): this method returns an object withleftandrightproperties. Each contains a reference to the original Ace editor, in case you need to do anything with them.aceInstance.setOptions(): this lets you set many of the options previously mentioned dinamically. Note that certain things used during the construction of the editor, for example the classes cannot be overridden.aceInstance.getNumDiffs(): returns the number of diffs currently being displayed.aceInstance.diff(): updates the diff. This shouldn't ever be required because AceDiff automatically recognizes the key events like changes to the editor and window resizing.aceInstance.destroy(): destroys the AceDiff instance destroying both editors and cleans out the gutter.
As you can see working with AceDiff is really easy and functional. See the following tipic usage examples:
With start content
You can set up a diff control starting up with plain HTML i.e:
<div id="flex-container">
    <div>
        <div class="acediff-class" id="editor-left">{
propertyA: 12,
propertyB: 123,
propertyC: 321,
}</div>
    </div>

    <div id="acediff-gutter"></div>

    <div>
        <div class="acediff-class" id="editor-right">{
propertyA: 12,
propertyZ: 123,
propertyC: 321,
}</div>
    </div>
</div>

<script>
    var aceDiffer = new AceDiff({
        left:{
            id:"editor-left"
        },
        right:{
            id:"editor-right"
        }
    });
</script>
Dynamic content
If you're starting a diff control dinamically (using jQuery or Angular), then you probably need (or want) to add the content dinamically to the editors, to achieve this use the getEditors method of the aceDiffer instance to retrieve the ACE editor instance respectively and change it dinamically using the setValue method.
<div id="flex-container">
    <div>
        <div class="acediff-class" id="editor-left"></div>
    </div>

    <div id="acediff-gutter"></div>

    <div>
        <div class="acediff-class" id="editor-right"></div>
    </div>
</div>

<script>
    var aceDiffer = new AceDiff({
        // Add a mode
        mode:"ace/mode/javascript",
        left:{
            id:"editor-left"
        },
        right:{
            id:"editor-right"
        }
    });

    var editors = aceDiffer.getEditors();

    var leftString = "var a = {\n propertyA: 12,\n propertyB: 123, \n propertyC: 321, \n}";
    var rightString = "var a = {\n propertyA: 12,\n propertyZ: 123, \n propertyC: 321, \n}";

    // Set Value to the editors
    editors.left.setValue(leftString, 1);
    editors.right.setValue(rightString, 1);

    // Optional to prevent CTRL-Z and remove original content as the content was dinamically added
    editors.left.getSession().setUndoManager(new ace.UndoManager());
    editors.right.getSession().setUndoManager(new ace.UndoManager());
</script>
Happy coding !

