

Let's suppose that you need to digitize a page of a book or a printed document, you will use a scanner to create an image of the real page. However although you have the rights to edit the content of the scanned document, you can't edit it in your computer because it's an image, and you can't simply edit an image as if it were a digital document. Yeah, the user can use programs that creates PDF with selectable text and then they can do what they want, however as a developer, you can offer your user the possibility of extract the text from images using the Optical Character Recognition technology. To achieve our goal of converting images to text, we are going to use Tesseract written in C++ installing it in the system and then using the command line with the Node.js wrapper.
In this article you will learn how to extract the text from an image with the help of Tesseract using Javascript in Node.js.
1. Install Tesseract in your system
In order to use the optical character recognition API, as mentioned in the article, we are going to use Tesseract. Tesseract is an open source Optical Character Recognition (OCR) Engine, available under the Apache 2.0 license. It can be used directly using an API to extract typed, handwritten or printed text from images. It supports a wide variety of languages (that needs to be installed). Tesseract supports various output formats: plain-text, hocr(html) and pdf.
The installation process of Tesseract in your system will vary according to the Operative System that you use:
Windows
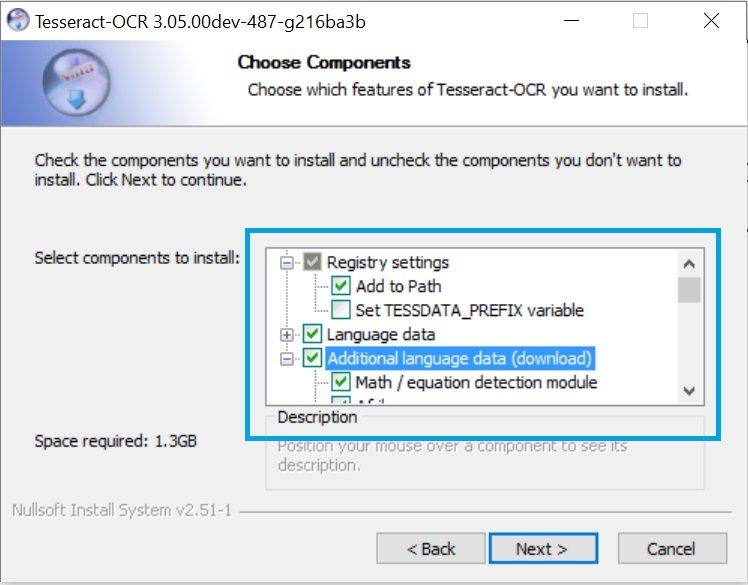
The installation of Tesseract in Windows is pretty simple, we recommend you to use the unnofficial installer mentioned in the wiki here (tesseract-ocr-setup-<version>.exe). You can get a list of all the available setups in the official website of tesseract here (download always the most recent version).
The installation process is very straightforward, just follow the wizard. However we recommend you to install directly all the languages that you need for tesseract in the setup (only the ones you need, otherwise the download process will take long) and register tesseract in the PATH:
Wait till the installation finishes and you're ready to go. You can test if it was correctly installed executing in a new command prompt window tesseract -v (that should output the installed version).
Ubuntu
Install Tesseract using the following command:
sudo apt-get install tesseract-ocrThen, install the languages that you need to recognize (e.g . -deu, -fra , -eng , -spa english required):
sudo apt-get install tesseract-ocr-engThen tesseract should be available on any terminal and therefore accesible by our PHP scripts later.
MacOS
If you're using Mac OS X, you can install tesseract using either MacPorts or Homebrew:
MacPorts
To install Tesseract run this command:
sudo port install tesseractTo install any language data, execute:
sudo port install tesseract-<langcode>A complete list of available langcodes can be found on MacPorts tesseract page.
Homebrew
To install Tesseract run this command:
brew install tesseractIn case you need more information or your operative system isn't listed, please refer to the Installation wiki of the Tesseract repository in Github here.
2. Install the Tesseract Node.js wrapper
To handle Tesseract with Node.js, we are going to use the most known Wrapper of Tesseract written by @desmondmorris. The node-tesseract module is a very simple wrapper for the Tesseract OCR package for node.js, it requires Tesseract 3.01 or higher.
To install the node-tesseract module in your Node.js project execute the following command:
npm install node-tesseractThen you'll be able to require the module using require('node-tesseract').
3. Processing image
The usage of the wrapper in Node.js is pretty easy, it consists of a simple method named process. This method expects as first parameter the absolute or relative filepath of the image to process, as second parameter an object with the configuration (optional to use the default settings) and as third parameter the callback triggered when the command ends.
Default initialization
To process an image, require the node-tesseract module and call the process function with the 2 required arguments (filename and callback):
var tesseract = require('node-tesseract');

tesseract.process('image.jpeg', (err, text) => {
    if(err){
        return console.log("An error occured: ", err);
    }

    console.log("Recognized text:");
    // the text variable contains the recognized text
    console.log(text);
});
Custom options
All the properties in the options object are the same arguments that you use with tesseract via command line e.g the command tesseract image.jpeg output_filename -l eng+deu -psm 6 has 4 arguments, however the first argument is set by your code and the second by the library, that means that the -l and -psm parameters need to be given in the options object:
var tesseract = require('node-tesseract');

var options = {
    // Use the english and german languages
    l: 'eng+deu',
    // Use the segmentation mode #6 that assumes a single uniform block of text.
    psm: 6
};

tesseract.process('image.jpeg', options , (err, text) => {
    if(err){
        return console.log("An error occured: ", err);
    }

    console.log("Recognized text:");
    console.log(text);
});
Known issues
When using different languages (and maybe huge files), you may catch the following exception at the execution of your script:
Error :An error occured:  { Error: stderr maxBuffer exceeded
    at Socket.<anonymous> (child_process.js:278:14)
    at emitOne (events.js:96:13)
    at Socket.emit (events.js:188:7)
    at readableAddChunk (_stream_readable.js:176:18)
    at Socket.Readable.push (_stream_readable.js:134:10)
    at Pipe.onread (net.js:548:20)</p>
This error "stderr maxBuffer exceeded" is caused because the child_process.exec used to handle tesseract with node.js kills the process because the allowed amount of data of the standart output isn't enough (200KB as default value). To prevent this error, you need to use and set the maxBuffer property in the process options. node-tesseract allow you to achieve this by providing an object in the env property:
var tesseract = require('node-tesseract');

var options = {
    // Use the english and german languages
    l: 'deu',
    // Use the segmentation mode #6 that assumes a single uniform block of text.
    psm: 6,
    // Increase the allowed amount of data in stdout to 16MB (A little exaggerated)
    env: {
        maxBuffer: 4096 * 4096
    }
};

tesseract.process('german.jpeg', options , (err, text) => {
    if(err){
        return console.log("An error occured: ", err);
    }

    console.log("Recognized text:");
    console.log(text);
});
Note: according to your needs, increase the maxBuffer value.
Finally, we recommend you to read the documentation of Tesseract usage with the command line to see more configuration options.
Happy coding !

