Less is a widely known CSS pre-processor, which means that it extends the CSS language, adding features that allow variables, mixins, functions and many other techniques that allow you to make CSS that is more maintainable, themeable and extendable. Thanks to the implementation of CSS Preprocessors in NetBeans you will be able to compile automatically LESS files on the fly in your project, so you won't need to run the commands by yourself everytime you make a little change.
In this article we'll show you how to configure NetBeans correctly to compile automatically LESS files into CSS.
Requirements
You will need Node.js installed on your computer and npm needs to be available from the path to be able to install less. In case you don't have less already installed and available from the path, you can install it globally using the following command in your terminal:
npm install -g lessIf you already have less installed, you can proceed with the configuration in NetBeans.
1. Access to the configuration
As first step, proceed to open the Properties Dialog of your project. This dialog allows you to change specifically settings related to your project and are stored in the nbproject folder of your project. In order to compile LESS files into CSS automatically, NetBeans integrates the so named File Watchers that allow you to execute some action when you make changes on some files. You need to configure the CSS Preprocessors options in your project, so open properties dialog by doing right click on your project:

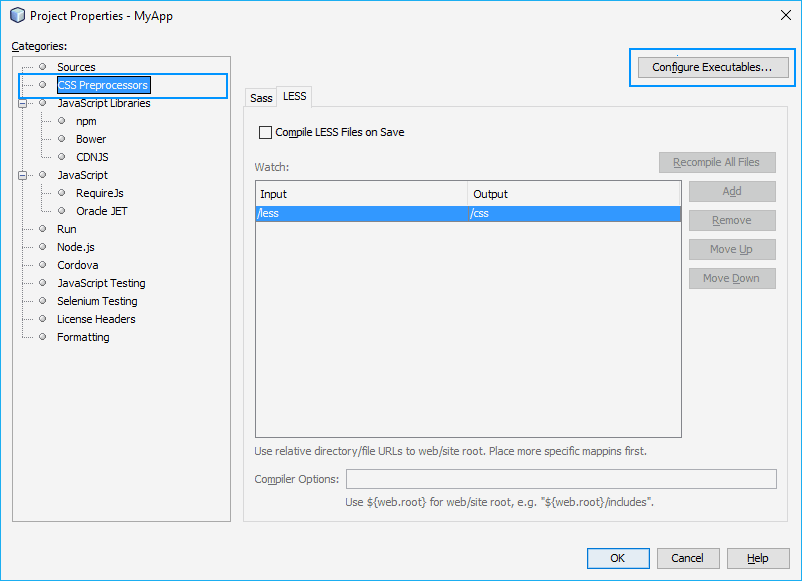
Once you click on properties, the Project Properties dialog will appear, here select the CSS Preprocessors tab and click on Configure Executables:

As next step, click on Configure Executables and proceed with the next step.
2. Configure LESS executable path
In order to run automatically the compile commands, Netbeans needs the absolute path to the the less compiler, as installed with Node.js, you can find the cmd file of less compiler path in %APPDATA%/npm/lessc.cmd. Provide this path in the LESS Path input:

Apply or save changes and follow the last step.
3. Configure LESS folders to compile and output path
As last step, you need to specify where are the LESS files that will be compiled and where should be the CSS files generated. In this case, our project structure is the following:

So we would register a single watcher that converts the files in /less to /css and don't forget to check "Compile LESS Files on Save" as this will be triggered everytime you make changes on the LESS files:

In the root folder of our projects there's the less folder where we'll store all LESS files. They will be automatically compiled into CSS files when you press CTRL + S or you save manually the file. Now you can modify the source files of your project and they'll be automatically build into CSS ready for production (note that you will need to minify those files as well for production).
Happy coding !


