
Looking for a way to render an entire XML document into a expandable TreeView of Winforms? You surely don't want to loop over every node and write a lot of "if's" according to the type and data that the node contains, don't you? Instead, we want to share with you an interesting approach of how to render automatically any XML file structure into a TreeView component of Winforms that will make your life easier.
In this article, we'll show you how to render an entire XML document into a TreeView of your Winforms application with C#.
1. Understanding rendering logic
In this example, we will have a treeView1 variable that represents a TreeView component added to the form by Drag & Drop from the toolbox. As first step, you need to create a variable that contains the XML string, this can be obtained either from a local or remote source, so it's basically up to you how to retrieve the data from the XML file that you want to render. As next, create a new structure of a XmlDocument with the string XML data that you have using the LoadXml method from the created instance.
As we assume that you may have already some data in the treeView, we will clear all nodes previous to the render process using the Nodes.Clear method of the TreeView. Now, as you know, on every XML file there's a document name that defines what's the file about, for example:
<?xml version="1.0" encoding="UTF-8"?>
<urlset xmlns="http://www.sitemaps.org/schemas/sitemap/0.9">
	<url>
		<loc>https://www.sitemaps.org/</loc>
		<lastmod>2016-11-21</lastmod>
	</url>
</urlset>
On the previous XML file, the document name is urlset, and so on with other xml files. In our logic, we will add this node as well and it will contain basically all the nodes of the file. This must be done manually, so add the node to the treeView with Node.Add and then, store this node into a variable that we will provide as argument for the helper method AddNode:
try
{
    // 1. Read XML File from a local path
    string xmlString = File.ReadAllText(@"C:\Users\sdkca\Desktop\myXMLFile.xml", Encoding.UTF8);

    // 2. Create a XML DOM Document and load the data into it.
    XmlDocument dom = new XmlDocument();
    dom.LoadXml(xmlString);

    // 3. Initialize the TreeView control. treeView1 can be created dinamically
    // and attached to the form or you can just drag and drop the widget from the toolbox
    // into the Form.

    // Clear any previous content of the widget
    treeView1.Nodes.Clear();
    // Create the root tree node, on any XML file the container (first root)
    // will be the DocumentElement name as any content must be wrapped in some node first.
    treeView1.Nodes.Add(new TreeNode(dom.DocumentElement.Name));

    // 4. Create an instance of the first node in the treeview (the one that contains the DocumentElement name)
    TreeNode tNode = new TreeNode();
    tNode = treeView1.Nodes[0];

    // 5. Populate the TreeView with the DOM nodes with the helper 'AddNode' function
    this.AddNode(dom.DocumentElement, tNode);
}
catch (XmlException xmlEx)
{
    MessageBox.Show(xmlEx.Message);
}
catch (Exception ex)
{
    MessageBox.Show(ex.Message);
}
The helper method AddNode is the following one:
/// <summary>
/// Renders a node of XML into a TreeNode. Recursive if inside the node there are more child nodes.
/// </summary>
/// <param name="inXmlNode"></param>
/// <param name="inTreeNode"></param>
private void AddNode(XmlNode inXmlNode, TreeNode inTreeNode)
{
    XmlNode xNode;
    TreeNode tNode;
    XmlNodeList nodeList;

    // Loop through the XML nodes until the leaf is reached.
    // Add the nodes to the TreeView during the looping process.
    // If the node has child nodes, the function will call itself.
    if (inXmlNode.HasChildNodes)
    {
        nodeList = inXmlNode.ChildNodes;

        for (int i = 0; i <= nodeList.Count - 1; i++)
        {
            xNode = inXmlNode.ChildNodes[i];
            inTreeNode.Nodes.Add(new TreeNode(xNode.Name));
            tNode = inTreeNode.Nodes[i];
            AddNode(xNode, tNode);
        }
    }
    else
    {
        // Here you need to pull the data from the XmlNode based on the
        // type of node, whether attribute values are required, and so forth.
        inTreeNode.Text = (inXmlNode.OuterXml).Trim();
    }
}
It basically converts every XML node into a TreeView node.
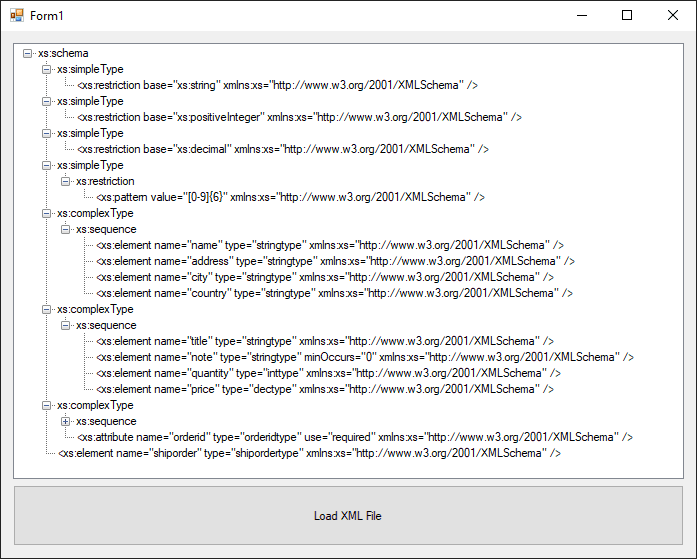
2. Full example
Now that we explained the logic, we can proceed with the implementation of a form. In this example, we will have 2 elements on the form, a TreeView namely treeView1 and a button namely button1 that we dragged from the toolbox and attached it manually to the form.
Then, in our code we will add an event listener to the button, so when the user clicks an open file dialog will show up and will allow him to select a XML file that will be rendered into the Tree View:
using System;
using System.IO;
using System.Text;
using System.Windows.Forms;
using System.Xml;

namespace Sandbox
{
    public partial class Form1 : Form
    {
        public Form1()
        {
            InitializeComponent();
        }

        /// <summary>
        /// When the user clicks on the Load XML button, an open File Dialog will
        /// appear, allowing you to pick an XML file to render in the treeview
        /// </summary>
        /// <param name="sender"></param>
        /// <param name="e"></param>
        private void Button1_Click(object sender, EventArgs e)
        {
            OpenFileDialog saveFileDialog1 = new OpenFileDialog();
            saveFileDialog1.Filter = "XML Files (*.xml)|*.xml";
            saveFileDialog1.FilterIndex = 2;
            saveFileDialog1.RestoreDirectory = true;

            if (saveFileDialog1.ShowDialog() == DialogResult.OK)
            {
                this.RenderXMLFile(saveFileDialog1.FileName);
            }
        }

        private void RenderXMLFile(string filepath)
        {
            try
            {
                // 1. Read XML File from a local path
                string xmlString = File.ReadAllText(filepath, Encoding.UTF8);

                // 2. Create a XML DOM Document and load the data into it.
                XmlDocument dom = new XmlDocument();
                dom.LoadXml(xmlString);

                // 3. Initialize the TreeView control. treeView1 can be created dinamically
                // and attached to the form or you can just drag and drop the widget from the toolbox
                // into the Form.

                // Clear any previous content of the widget
                treeView1.Nodes.Clear();
                // Create the root tree node, on any XML file the container (first root)
                // will be the DocumentElement name as any content must be wrapped in some node first.
                treeView1.Nodes.Add(new TreeNode(dom.DocumentElement.Name));

                // 4. Create an instance of the first node in the treeview (the one that contains the DocumentElement name)
                TreeNode tNode = new TreeNode();
                tNode = treeView1.Nodes[0];

                // 5. Populate the TreeView with the DOM nodes.
                this.AddNode(dom.DocumentElement, tNode);
            }
            catch (XmlException xmlEx)
            {
                MessageBox.Show(xmlEx.Message);
            }
            catch (Exception ex)
            {
                MessageBox.Show(ex.Message);
            }
        }

        /// <summary>
        /// Renders a node of XML into a TreeNode. Recursive if inside the node there are more child nodes.
        /// </summary>
        /// <param name="inXmlNode"></param>
        /// <param name="inTreeNode"></param>
        private void AddNode(XmlNode inXmlNode, TreeNode inTreeNode)
        {
            XmlNode xNode;
            TreeNode tNode;
            XmlNodeList nodeList;
            int i;

            // Loop through the XML nodes until the leaf is reached.
            // Add the nodes to the TreeView during the looping process.
            if (inXmlNode.HasChildNodes)
            {
                nodeList = inXmlNode.ChildNodes;

                for (i = 0; i <= nodeList.Count - 1; i++)
                {
                    xNode = inXmlNode.ChildNodes[i];
                    inTreeNode.Nodes.Add(new TreeNode(xNode.Name));
                    tNode = inTreeNode.Nodes[i];
                    this.AddNode(xNode, tNode);
                }
            }
            else
            {
                // Here you need to pull the data from the XmlNode based on the
                // type of node, whether attribute values are required, and so forth.
                inTreeNode.Text = (inXmlNode.OuterXml).Trim();
            }
        }
    }
}
As mentioned at the beginning of the article, this approach works with every structure of XML, just load a random file and it will be rendered in the Tree View. This approach is generic, but it can be easily customized, so you are free to modify to add conditionals to filter by data and other stuff.
Happy coding !

