
As a child, i always wanted to create keygens and other weird programs that already existed, however with my own design. One of those crazy ideas was the idea of creating a web browser that only should be used for bank transactions etc. Crazy right !? Well, till the date, although i didn't created my own browser engine, this can be made easily with web technologies thanks to Electron. The tabs feature can be made as well with an useful module that will help you with the implementation of the tabs without messing up with native code, just HTML, CSS and JavaScript.
In this article, we will show you how to implement browser like website navigation tabs.
1. Install electron-tabs
The electron-tabs module is a pretty simple utility that allows you to implement simple navigation tabs for Electron applications, in the same Chrome, Brave or any sane web browser does. You will be able to include new tabs using the webview of Electron. Please note that the webview tag's style uses display:flex; internally to ensure the child iframe element fills the full height and width of its webview container when used with traditional and flexbox layouts. Please do not overwrite the default display:flex; CSS property, unless specifying display:inline-flex; for inline layout.
You will be able to render either local files or remote websites easily. To install this module, run the following command on your terminal (as long as you are located in the project directory):
npm install --save electron-tabsAfter the installation of the module, you will be able to require it from the renderer process as we'll explain later. For more information about this module, please visit the official repository at Github here.
2. Implementation of the tabs
All the markup that you need to render tabs in your project is the following one:
<div class="etabs-tabgroup">
    <div class="etabs-tabs"></div>
    <div class="etabs-buttons"></div>
</div>
<div class="etabs-views"></div>
This however is rendered as plain HTML in the application, which means that you need to stylize it according to your needs. As it's inline html, it will take space in your DOM, so the logic that you are working with in your application needs to change. Your original index.html file should now be only a container with the tabs.
The following index.html file contains a pretty functional layout that will be enough for almost all projects that needs tabs in the app:
<!DOCTYPE html>
<html>
    <head>
        <meta charset="UTF-8">
        <title>Hello World!</title>
        <!--
            1. Include CSS that define the styles of the tabs.
            You can use the default styles of the module or include your own styles.
        -->
        <link rel="stylesheet" href="node_modules/electron-tabs/electron-tabs.css">
        <style>
            /* As the tab needs to be in the border of the view, remove margin of the body tag */
            body{
                margin: 0;
            }
        </style>
    </head>
    <body>
        <!-- 2. Include the basic markup of the tabs view -->
        <div class="etabs-tabgroup">
            <div class="etabs-tabs"></div>
            <div class="etabs-buttons"></div>
        </div>
        <div class="etabs-views"></div>

        <!--
            3. Include initialization code, you can include another js file
            Or write directly the JS code here.
        -->
        <script>
            // You can also require other files to run in this process
            require('./renderer.js')
        </script>
    </body>
</html>
As you can see the markup is pretty basic and contains only 4 div elements with some classes. The logic needs to be implemented however with JavaScript, this must be done within the Renderer process (either from a JS file loaded in the index file or with a script tag). In our example, we are including a file in the same directory as the index.html file, namely renderer.js that contains the following code:
// ./renderer.js
// 1. Require the module
const TabGroup = require("electron-tabs");
// 2. Define the instance of the tab group (container)
let tabGroup = new TabGroup({
// If you want a new button that appends a new tab, include:
newTab: {
title: 'New Tab',
// The file will need to be local, probably a local-ntp.html file
// like in the Google Chrome Browser.
//src: "./some-index-file.html",
//visible: true,
//webviewAttributes: {
// nodeintegration: true
//}
}
});
// 3. Add a tab from a website
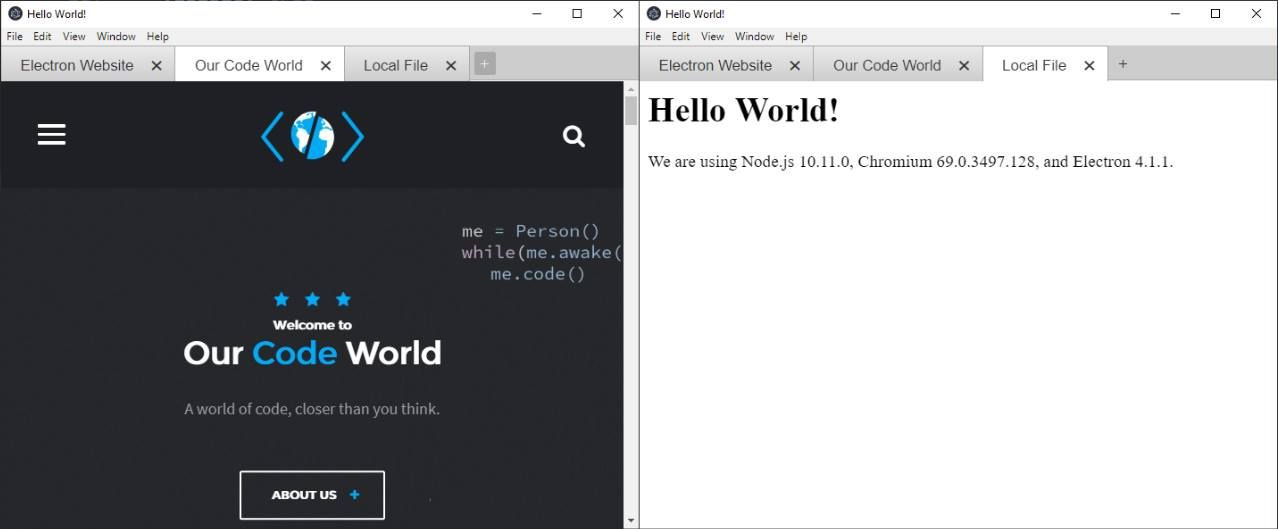
let tab1 = tabGroup.addTab({
title: "Our Code World",
src: "https://ourcodeworld.com",
visible: true
});
// 4. Add a new tab that contains a local HTML file
let tab2 = tabGroup.addTab({
title: "Local File",
src: "./local.html",
visible: true,
// If the page needs to access Node.js modules, be sure to
// enable the nodeintegration
webviewAttributes: {
nodeintegration: true
}
});In this example, we are including just 2 tabs. As first step you need to create an instance of the tab group that will store all the instances of the tabs. Our first tab loads a remote website, namely ourcodeworld.com so it doesn't need a lot of properties, only the src attribute that defines the URL of the website, this can be local though. For example our second tab loads a local file in your project and it uses the nodeintegration (you may run JavaScript with native features). Note that the newTab option during the initialization of the allows you to add a new button that loads another file, usually it should be an index page like the one in Google Chrome:
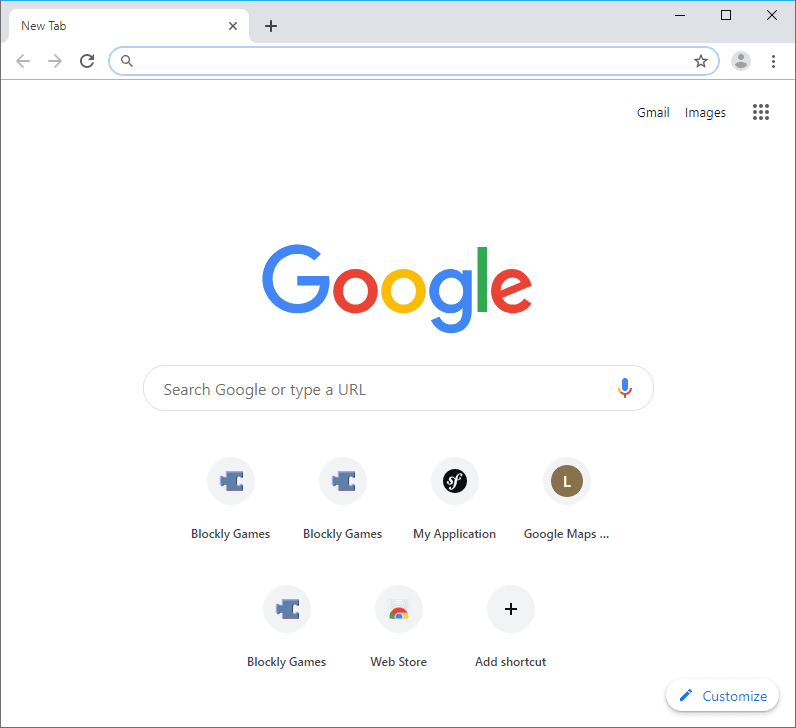
That allows the user either to browse to a new page or to a some local file. As you can see is pretty simple to create your own browser using the Electron Framework !
Happy coding !

