
The most common way of creating a windows installer for an Electron based application is through the windows-installer module, that doesn't require Administrator privileges and comes bundled with an automatic updater. However, if you need to create a traditional MSI the way Microsoft intended for software to be installed, this module is your friend. It creates a standalone MSI that installs your application to Program Files or any user-defined directory, much like the installers for Office, Node.js, or other popular apps. It allows up- and downgrades.
In this article, we'll explain you how to create the Windows version of an installer for your Electron Framework application easily using the Electron WiX MSI package.
1. Package (Build) your Electron Application
As first step, you need to have an electron project that is ready to be packed. You can create the release version of your Electron Application using the Electron Packager module. Electron Packager is a command line tool and Node.js library that bundles Electron-based application source code with a renamed Electron executable and supporting files into folders ready for distribution.
To generate this version of your application, install the Electron Packager module in your computer globally with:
npm install electron-packager -gYou can find a more detailed tutorial about how to package an electron application from scratch here. In our case, we will pack quickly our application with the following command:
electron-packager . --platform=win32 --arch=x64 OurCodeWorldThis will create the distributable version of your application, creating a whole directory with the content that it needs to run:

This will be directory that we will pack on the MSI file in this tutorial.
2. Install WiX Toolset
In order to create the installers, we will use native tools. This module relies on the WiX Toolset build tools that includes everything you need to create installations on your development and build machines. You can download the latest release from the Releases page of the project in the Github repository here. In this page you will find an option to download:
- wix311.exe is the installer for the WiX Toolset build tools.
- wix311exe.zip contains the wix311.exe installer inside a .zip file, useful if your IT department prevents direct downloading of .exe files.
- wix311-binaries.zip contains the files that make up the WiX Toolset and is useful if you don't want to install the toolset -- for example, if you're just checking WiX into source control.
- wix311-debug.zip contains a reference copy of the WiX source code and symbol (.pdb) files, both of which are useful when debugging problems with WiX.
Of our interest is the first option, the installer for the WiX toolset, an executable that looks like this:
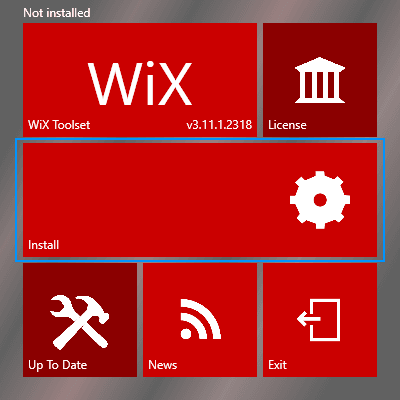
Click on install and wait until the setup finishes, when it's done you will find the files of the installation at C:\Program Files (x86)\WiX Toolset v3.11\. After installing WiX you will need to expose the binaries path of the WiX Toolset to the PATH environment variable of Windows. This can be easily done, searching for environment variables in the start menu of Windows:

Then click on Environment variables:

In the new window, search for the System variables are and look for the Path variable, select and edit it:

Once the binaries path of the WiX toolset has been exposed in the Path, you will be able to run the Candle and Light executables from the CLI (and the electron-wix-msi module as well).
3. Configure build script
After installing the WiX toolset, you will be able to use the Electron Wix module to create the installer. The logic to implement with this module is the following one, you will need to create a script that will generate the installer. You can do this actually inside the project, so install the module with NPM using the following command:
npm install electron-wix-msi --save-devFor more information about this package, please visit the official repository at Github. Once the module is installed on your project, you can proceed with the creation of the script that will build the MSI file with your project.
Create a script namely build_installer.js in the root directory of your electron project and add the following content inside:
// ./build_installer.js

// 1. Import Modules
const { MSICreator } = require('electron-wix-msi');
const path = require('path');

// 2. Define input and output directory.
// Important: the directories must be absolute, not relative e.g
// appDirectory: "C:\\Users\sdkca\Desktop\OurCodeWorld-win32-x64",
const APP_DIR = path.resolve(__dirname, './OurCodeWorld-win32-x64');
// outputDirectory: "C:\\Users\sdkca\Desktop\windows_installer",
const OUT_DIR = path.resolve(__dirname, './windows_installer');

// 3. Instantiate the MSICreator
const msiCreator = new MSICreator({
    appDirectory: APP_DIR,
    outputDirectory: OUT_DIR,

    // Configure metadata
    description: 'This is a demo application',
    exe: 'OurCodeWorld',
    name: 'Our Code World Desktop App',
    manufacturer: 'Our Code World Inc',
    version: '1.0.0',

    // Configure installer User Interface
    ui: {
        chooseDirectory: true
    },
});

// 4. Create a .wxs template file
msiCreator.create().then(function(){

    // Step 5: Compile the template to a .msi file
    msiCreator.compile();
});
In this script you will basically, to create your first installer without customization, change only the appDirectory and outputDirectory, where respectively you will need to provide the absolute path to the packed version of electron and the directory where the MSI file will be stored. The configuration object that the MSICreator class receives as first argument may contain the following properties:
-
appDirectory(string) - The source directory for the installer, usually the output of electron-packager. -
outputDirectory(string) - The output directory. Will contain the finishedmsias well as the intermediate files .wxsand.wixobj. -
exe(string) - The name of the exe. -
description(string) - The app's description. -
version(string) - The app's version. -
name(string) - The app's name. -
manufacturer(string) - Name of the manufacturer. -
appUserModelId(string, optional) - String to set asappUserModelIdon the shortcut. If none is passed, it'll be set tocom.squirrel.(Name).(exe), which should match the id given to your app by Squirrel. -
shortName(optional, string) - A short name for the app, used wherever spaces and special characters are not allowed. Will use the name if left undefined. -
shortcutFolderName(string, optional) - Name of the shortcut folder in the Windows Start Menu. Will use the manufacturer field if left undefined. -
shortcutName(string, optional) - Name of the shortcut in the Windows Start Menu. Will use the app's name field if left undefined. -
programFilesFolderName(string, optional) - Name of the folder your app will live in. Will use the app's name if left undefined. -
upgradeCode(string, optional) - A unique UUID used by your app to identify itself. This module will generate one for you, but it is important to reuse it to enable conflict-free upgrades. -
language(number, optional) - The Microsoft Windows Language Code identifier used by the installer. Will use 1033 (English, United-States) if left undefined. -
certificateFile(string, optional) - The path to an Authenticode Code Signing Certificate. -
certificatePassword(string, optional) - The password to decrypt the certificate given incertificateFile. -
signWithParams(string, optional) - Paramaters to pass tosigntool.exe. OverridescertificateFileandcertificatePassword. -
extensions(array, optional) - Specify WiX extensions to use e.g['WixUtilExtension', 'C:\My WiX Extensions\FooExtension.dll'] -
ui(UIOptions, optional) - Enables configuration of the UI. See below for more information. -
arch(string, optional) - Defines the architecure the MSI is build for. Values can be eitherx86orx64. Default's tox86if left undefined.
UI Configuration (Optional)
The ui property in the options passed to the installer instance allows more detailed configuration of the UI. It has the following optional properties:
enabled(boolean, optional) - Whether to show a typical user interface. Defaults totrue. If set tofalse, Windows will show a minimal "Windows is configuring NAME_OF_APP" interface.template(string, optional) - Substitute your own XML that will be inserted into the final.wxsfile before compiling the installer to customize the UI options.chooseDirectory(boolean, optional) - If set totrue, the end user will be able to choose the installation directory. Set tofalseby default. Without effect if a customtemplateis used.images(Optional) - Overwrites default installer images with custom files. I recommend JPG.background- (optional, string) 493 x 312 Background bitmap used on the welcome and completion dialogs. Will be used asWixUIDialogBmp.banner- (optional, string) 493 × 58 Top banner used on most dialogs that don't usebackground. Will be used asWixUIBannerBmp.exclamationIcon- (optional, string) 32 x 32 Exclamation icon on theWaitForCostingDlgdialog. Will be used asWixUIExclamationIco.infoIcon- (optional, string) 32 x 32 Information icon on the cancel and error dialogs. Will be used asWixUIInfoIco.newIcon- (optional, string) 16 x 16 "New folder" icon for the "browse" dialog. Will be used asWixUINewIco.upIcon- (optional, string) 16 x 16 "Up" icon for the "browse" dialog. Will be used asWixUIUpIco.
4. Creating installer
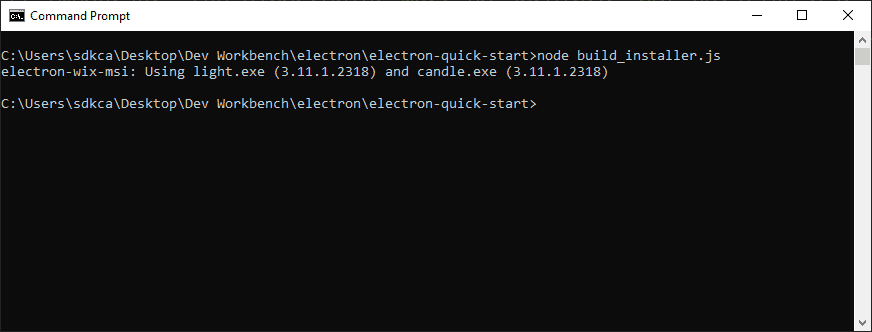
Finally, you only need to run the script that builts the MSI file. Run it with node easily with:
node build_installer.jsThis will start building the installer and it will take a while, as long as you have the candle and light executables available from the PATH directory of the Windows command prompt. It will output the following string on the window:
The installer, in this case OurCodeWorld will be generated in the windows_installer directory:

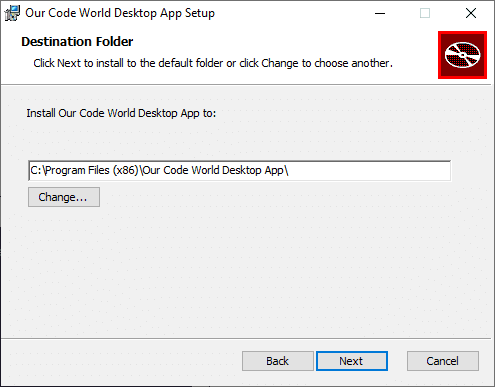
If you run it, you will have a basic setup that everyone knows:

In our case with the configuration will allow the user to change the installation directory:
And that's it, there you have a regular windows installer for your Electron Framework application. As an important tip, the packed version of Electron directory is about 142 MB, but packed with the MSI installer it has a size of 60MB.
Happy coding !

