
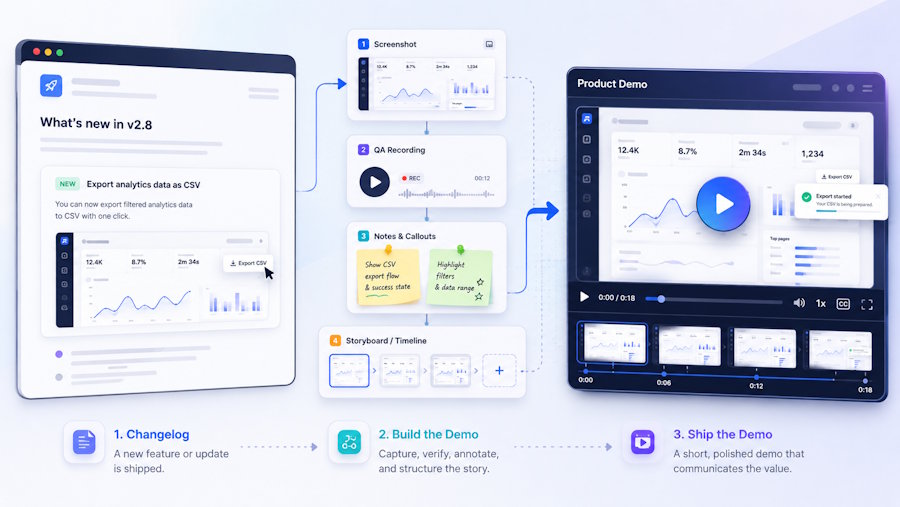
Imagine a small SaaS team has just shipped a CSV export option for an analytics dashboard.
The pull request is merged. The changelog says, “Users can now export weekly report data as a CSV file.” There is a screenshot from staging, a short test recording from QA, and maybe a few notes from the developer who built the feature.
That is already enough material for a short demo.
The mistake is trying to turn every release into a full product video. Most software updates do not need that. A new export option, a redesigned settings screen, a dashboard filter, or a better onboarding step usually needs something simpler: a short clip that shows what changed and how the user gets value from it.
This workflow is for that kind of release.
Start With One Feature
The first decision is what not to show.
A demo becomes harder when it tries to explain the whole product. For a small release, it is better to focus on one feature or one workflow.
For example:
- A new CSV export option in an analytics dashboard
- A redesigned billing settings page
- A faster import flow
- A new report filter
- A setup step that used to confuse users
- A small automation that removes a manual task
The demo should answer one question: what can the user do now that they could not do before, or what can they do faster?
If the answer needs five different screens, the scope is probably too large. Make a shorter demo first. A focused 20-second clip is often more useful than a long walkthrough that tries to cover everything.
Collect the Assets That Already Exist
Before opening a video editor, collect the material the team already has.
For a typical release, that might include:
- The changelog paragraph
- One clean screenshot of the updated screen
- A short recording from QA or manual testing
- A documentation screenshot
- A product image from the landing page
- The pull request description
- Notes from support tickets or user feedback
- A before-and-after description of the workflow
This step prevents a common problem: starting the demo from the wrong screen.
Developers often know the feature too well. They may start the recording at the implementation detail instead of the user problem. The changelog might say “Added CSV export support,” but the user problem is more specific: “I need to send weekly report data to another tool without copying it manually.”
That user problem should guide the demo.
Write a Short Demo Brief
A demo brief does not need to be formal. It only needs to make the intent clear.
Here is a useful template:
Feature:
New CSV export option for weekly analytics reports.
Audience:
Product managers who need to share report data with other tools.
Problem:
Users currently copy report data manually or take screenshots.
Before state:
The dashboard shows weekly analytics, but export is not available.
After state:
The user opens the report, clicks Export, and downloads a CSV file.
Format:
20-30 second product demo for changelog and help center.
Must show:
The report screen, the export button, and the downloaded file state.
Must avoid:
Showing unrelated dashboard sections or fake data that looks like production data.
This brief gives the team something to check against later.
If the generated or edited video does not match the brief, it is probably not the right demo, even if it looks good.
Generate a Few Rough Directions
Once the team has a brief and assets, the next step is not necessarily final production. It can be useful to test a few visual directions first.
For example, the same feature could be shown in different ways:
- Start with the old manual workflow, then show the export button
- Start with the report screen, then zoom into the changed area
- Start with a short problem statement, then show the new result
- Use a before-and-after format
- Use a short help center style walkthrough
A browser-based AI video generator can be useful at this stage, especially when the team wants to turn prompts, screenshots, product images, or media references into short demo concepts before recording the final version.
Generated clips should not be treated as final product footage without review. They can help with pacing, framing, and structure, but they may also invent details. A generated interface may not match production. Text may be wrong. Motion may make a workflow look easier than it really is.
That is fine for a draft. It is not fine for the final demo.
Choose Structure Before Style
When reviewing early directions, do not pick the version that looks the most polished. Pick the version that explains the feature best.
Ask:
- Does the viewer understand the user problem?
- Is the changed screen visible long enough?
- Does the demo show the actual result?
- Are there unnecessary clicks or pauses?
- Would this still make sense without narration?
- Is the video short enough for the place where it will be published?
A changelog demo can be quick. A help center demo may need to move slower. A landing page preview may need fewer details and more context. The same feature can have different versions depending on where the video will be used.
This is why it helps to test structure early. It is cheaper to reject a rough direction than to rebuild a finished video.
Turn the Best Direction Into a Real Demo
After choosing a direction, rebuild the final demo with accurate product material.
That may mean using:
- Real UI screenshots
- A clean screen recording
- Manual zooms and callouts
- Captions
- A short voiceover
- Edited product footage
- A static title card for context
The generated draft can still help. It may provide the order of scenes, the pacing, or the idea for how to introduce the feature. But the final product demo should match the actual product.
For technical users, small inaccuracies matter. A fake button, wrong label, or missing setup step can make the demo less trustworthy.
This is especially important for developer tools, SaaS dashboards, and B2B software. Users are not only watching for style. They are checking whether the workflow is real.
A Simple Storyboard
A lightweight storyboard can help before editing.
For the CSV export example, it might look like this:
Time | Scene | Purpose
0-3s | Weekly report screen | Establish the feature context
3-7s | User needs to export report data | Show the problem
7-12s | Export button is selected | Show the new action
12-18s | CSV file is downloaded | Show the result
18-24s | Caption: “Export weekly reports in one click” | Reinforce the outcome
This is enough for a short demo. It prevents the video from becoming a tour of the entire dashboard.
Final QA Checklist
Before publishing, run a quick review.
Check the following:
- Does the UI match the current product?
- Are labels, buttons, and screen states accurate?
- Does the demo hide any required step?
- Is any generated text wrong or misleading?
- Is the workflow shown at a realistic speed?
- Is the data safe to show publicly?
- Does the video fit its destination: docs, changelog, README, landing page, or support article?
- Does the final link or call to action make sense in context?
This review does not need to take long. It is mostly about avoiding avoidable mistakes.
If the clip shows a button, label, or workflow that users will not see in the product, replace that section before publishing.
Closing
Small software teams often skip demo videos because the process feels heavier than the release.
A lighter workflow works better: pick one feature, collect existing assets, write a short brief, test a few directions, then rebuild the final version with accurate product material.
The result does not have to be a polished launch video. It only needs to help users understand the change faster than a screenshot and a paragraph of text.

