

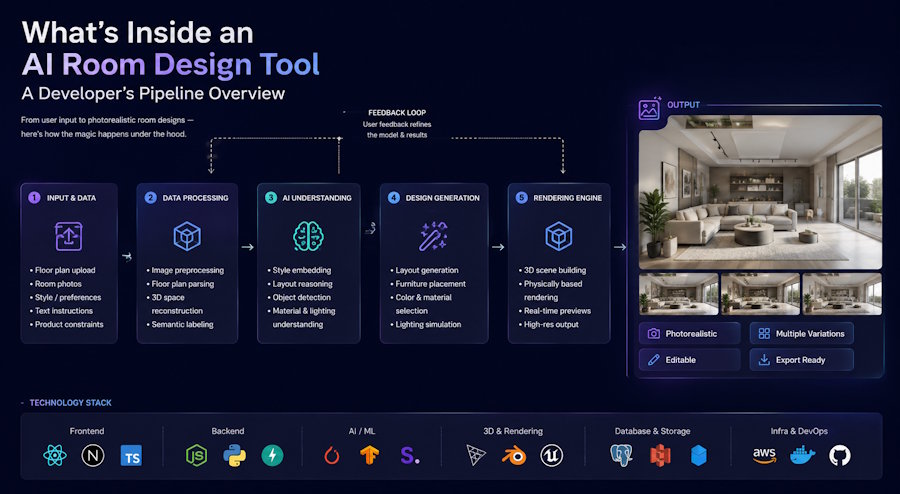
If you have used a consumer AI room design tool in the past year, you have probably had the moment where you photograph an empty living room, type “make it warm minimalist with a walnut coffee table,” and get back a rendering that respects your actual walls, floor, and windows. The output looks like magic. It is not. It is three or four well-understood techniques from the image generation stack, wired together in a specific order.
This article walks through what is actually happening under the hood. It is aimed at developers who are curious about the architecture — either because you are thinking about building something in the space, or because you want a clearer mental model of where consumer AI is now.
The Problem That Room Design Solves Poorly with Vanilla Diffusion
Give a plain Stable Diffusion 1.5 or SDXL model the prompt “modern living room with a walnut coffee table and green sofa” and it will generate a living room. It just won’t be your living room. The generated image will invent its own window placement, ceiling height, floor material, and wall proportions. That is fine for a Pinterest board. It is useless for a homeowner trying to decide if a specific sofa fits their specific room.
The core problem is that text-to-image diffusion is under-constrained. The model has to fill in every pixel from a text prompt and random noise. To make the output respect a specific room, we need to inject the structure of that room as an additional conditioning signal.
That is the problem the AI room design category solves. The stack that solves it looks roughly the same across all serious consumer players in the space.
The High-Level Pipeline
At the highest level, AI Room Design GPT and similar tools, which render variations of a specific room, typically look something like this:
User inputs:
- Photograph of the actual room
- Natural-language description of the desired change
Pipeline:
- Preprocess the photo → extract structural signals (depth, edges, segmentation)
- Parse the user prompt → build a structured text conditioning input
- Run diffusion (typically img2img) conditioned on:
- The original image (via VAE encoding)
- The structural signals (via ControlNet or equivalent)
- The text prompt (via CLIP text encoder or larger LLM front-end)
- Post-process the output → color correction, upscaling, artifact cleanup
- Return the rendered image
Each step has meaningful implementation choices. The main decisions are below.
Step 1: Extracting Structural Signals from the Room Photo
The single most important thing the tool has to do is preserve the geometry of the actual room. If the walls move, if the window shifts, if the ceiling height changes between the input photo and the generated output, the tool fails at its core promise.
The way this is done in practice is by running the input photograph through auxiliary networks that extract structural signals before diffusion begins. The three most common signals in this category:
- Depth map: a per-pixel estimate of how far each point is from the camera. Produced by a monocular depth estimator like MiDaS or DPT. Preserves the shape of the room.
- Line detection (MLSD): detects straight-line segments — the edges of walls, window frames, doors, floor lines. Critical for architectural fidelity.
- Semantic segmentation: labels each pixel by category (wall, floor, ceiling, window, existing furniture). Lets the model know what can be swapped out (the sofa) and what should usually stay put (walls, floors, windows).
Some tools use all three. Some use one or two. The choice affects both compute cost and output quality. A depth map alone often preserves geometry well enough but can lose fine architectural detail. Adding MLSD tightens up the wall lines but doubles the preprocessing latency.
Step 2: Injecting the Signals into the Diffusion Process
Once you have the structural signals, you need a way to force the diffusion model to respect them. The dominant technique here is ControlNet, introduced by Zhang et al. in early 2023.
ControlNet is architecturally elegant. It takes a pretrained diffusion UNet and adds a parallel “conditioning branch” that receives the auxiliary signal (depth, edges, segmentation, etc.) and injects it into the denoising process. The base UNet weights stay frozen; the ControlNet branch learns to bias generation toward the conditioning input.
In pseudocode, a room design pipeline running SDXL with depth and line ControlNets looks roughly like this:
depth_map = monocular_depth_estimator(input_room_photo)
line_map = mlsd_line_detector(input_room_photo)

controlnet_conditions = [
    {
        "model": "depth_controlnet",
        "input": depth_map,
        "weight": 0.85,
    },
    {
        "model": "mlsd_controlnet",
        "input": line_map,
        "weight": 0.60,
    },
]

output_image = sdxl_img2img(
    init_image=input_room_photo,
    strength=0.75,  # how much to change vs. preserve
    prompt=build_prompt(user_description),
    controlnets=controlnet_conditions,
    steps=30,
    guidance_scale=6.5,
)
The two knobs that most affect final quality are strength (how much of the original image is preserved through the denoising process) and the per-controlnet weight (how strictly the model must respect the structural signal).
Set strength too high and the output no longer looks like the input room. Set it too low and the requested change (new sofa, different wall color) barely materializes. A common starting range is roughly 0.6 to 0.8, adjusted per use case.
Step 3: Prompt Engineering the User Description
The user typing “warm minimalist with a walnut coffee table and a green sofa” is not a prompt the diffusion model handles well raw. Consumer tools quietly rewrite the user description into a more structured prompt that includes:
- Style descriptors expanded to their diffusion-friendly form (“warm minimalist” → “warm minimalist interior, natural wood, neutral palette, soft daylight, professional interior photography”)
- Negative prompts to suppress common failure modes (“cluttered, oversaturated, unrealistic lighting, cartoon, distorted geometry”)
- Anchor terms that reinforce the structural preservation (“same room, same walls, same floor, same windows”)
This is usually done by a lightweight LLM front-end, or by prompt templates keyed off the user’s style selection. The LLM approach is more flexible but adds a latency hop and a cost line item. The template approach is faster and cheaper but less able to handle unusual user requests.
Step 4: Post-Processing
Raw diffusion output is rarely ready to ship. Two post-processing steps are common in consumer tools:
- Upscaling: diffusion is often run at 1024×1024 or 1536×1024 to keep compute cost sane. The output is then upscaled to display resolution using a lightweight upscaler like Real-ESRGAN.
- Color and contrast normalization: the input photograph carries the color temperature of the actual room’s lighting. The diffusion output sometimes drifts warmer or cooler. A simple color-matching pass against the input photograph keeps the output feeling like a rendering of the same room.
What Makes This Hard in Production
The pipeline above is not conceptually difficult to build. What is difficult is making it reliable at consumer scale. A few of the specific challenges that anyone building in this space eventually runs into:
- Consistency across sessions: a user tries palette A on Sunday and palette B on Tuesday. The tool should return outputs that clearly show the two palettes in the same room, not two variations of two different rooms. Randomness in the diffusion process fights this. Seeded generation and stronger structural conditioning help.
- Handling odd rooms: irregular geometry (sloped ceilings, bay windows, exposed beams) breaks depth estimators and line detectors more often than well-lit rectangular rooms. Failure modes here are user-visible and hard to hide. Vertical-specific modes tend to help — for example, an AI Bathroom Design preset that biases MLSD weight upward to catch tile grids, mirror frames, and fixture edges will often ship better outputs than a single generic pipeline trying to handle every room type at the same conditioning weights.
- Latency: a full pipeline (depth + line + diffusion + upscale) can take seconds to tens of seconds per render, depending on hardware and steps. Users usually expect it to feel interactive. Reducing the number of denoising steps, quantizing the model, or moving to distilled variants (SDXL Turbo, LCM, or newer models like FLUX Schnell) all trade quality for speed.
- Content moderation: users generate rooms that shouldn’t be generated. A moderation layer at the prompt and output stages is not optional at consumer scale.
- Cost: hosted GPU inference is cheap enough per render to work at subscription pricing, but the cost curve gets meaningful at free-tier scale. Any team building in this space benchmarks its own infra before pricing.
The Newer Stack: FLUX, IP-Adapter, and Beyond
The 2023–2024 stack described above (SDXL + ControlNet) is still the workhorse, but newer options are increasingly viable. Two worth watching:
- FLUX (Black Forest Labs, 2024) offers stronger prompt adherence and better text rendering than SDXL, at a compute cost. ControlNet-like conditioning for FLUX is becoming more usable, though the ecosystem is less standardized than SDXL.
- IP-Adapter (Tencent, 2023) lets you condition on a reference image in addition to a text prompt. For room design, this opens interesting workflows: “make my living room look like this reference image” becomes a single-prompt operation instead of a two-stage transfer.
Neither replaces the ControlNet-conditioned img2img workflow described above. They augment it. The pipeline shape stays the same; the specific model components inside each box get better.
If You’re Building One of These
For developers considering a room design tool as a project or a product, a few practical observations from what has already shipped.
First, the model layer is close to a commodity. Many tools have used SDXL, and newer stacks are testing FLUX-class models. What differentiates the tools in this category is the surrounding product: prompt handling, structural signal choice, quality of the upscaler, latency, moderation, and how well the interface hides the underlying complexity from a non-technical user.
Second, evaluation is harder than training. There is no ground truth for “is this a good living room rendering.” Consumer tools in this space rely heavily on user feedback signals (kept, downloaded, shared) and paid human evaluation. A/B testing pipeline changes against user retention is currently the most reliable quality signal.
Third, the winners in the consumer segment so far are the tools that made the model layer disappear behind a phone-camera-simple interface. That is the pattern for consumer AI in most categories, and room design is no exception. The approach these tools take — letting a non-technical homeowner upload a photo and type a sentence, with no CAD, no manual placement, no configuration — tends to be easier to adopt than approaches that expose more knobs. The knobs are for the developer building the tool, not for the user.
Closing Thoughts
The pipeline for a consumer AI room design tool is not exotic. It is a well-understood diffusion stack with the right structural conditioning bolted on. What separates the tools that feel like toys from the tools that feel useful is not the model. It is the discipline of the pipeline: the choice of which structural signals to extract, the tuning of the ControlNet weights, the quality of the prompt rewriting, the ruthlessness of the post-processing, and the invisible LLM-driven glue that turns a plain-English request into a well-formed diffusion prompt.
If you are building in this space, the model choice matters less than most articles suggest. The pipeline choices matter more.

