

If you've worked on any web project long enough, you've hit this problem: a user uploads a 600px-wide photo, and now it needs to work as a desktop banner. Or you're digging through old project assets and none of them look right on a Retina screen. Or you've got a pile of AI-generated images sitting at some awkward in-between resolution — not quite good enough for a product page or a video thumbnail.
You've basically got two options: resize it the normal way, or run it through an AI upscaler. Both make the image bigger. That's about where the similarity ends.
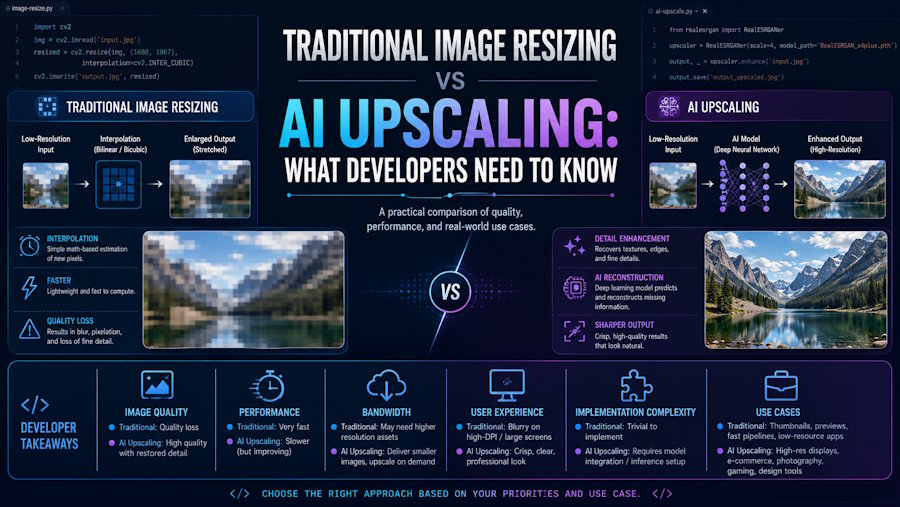
Traditional resizing is math — it takes the pixels you have and calculates new ones from them. Fast, cheap, predictable. AI upscaling actually looks at what's in the image first, then tries to reconstruct texture and edge detail based on that.
The real question isn't which approach is more advanced. It's whether your image just needs different dimensions, or whether it's already missing visual information it can't get back.
What traditional resizing actually does
Take a 600×400 image and scale it up to 1200×800. You've gone from 240,000 pixels to 960,000. Those extra 720,000 pixels don't exist anywhere in the original file — the software has to guess them based on the pixels already there. That guessing is interpolation.
Interpolation doesn't know or care whether it's looking at a face, a line of text, or a brick wall. It just applies a fixed rule to compute color values. The usual suspects:
- Nearest neighbor — copies the closest pixel, no math involved. Fast, but you get jagged edges. Fine for pixel art, bad for photos.
- Bilinear — averages nearby pixels with weighting. Smoother than nearest neighbor, but starts looking soft once you push the scale factor up.
- Bicubic — pulls from a wider neighborhood of pixels, usually sharper than bilinear. This is the default in most image tools for a reason.
- Lanczos — good for quality-focused scaling, but can introduce halos or ringing around high-contrast edges.
One thing that trips people up: displaying something bigger and generating a bigger file are not the same thing. CSS can stretch a 600px image to render at 1200px on the page, but the source file is still 600px. Tools like Sharp, ImageMagick, or Pillow will actually output a new 1200px file — but the new pixels still come from interpolation. No extra detail gets invented along the way.
Where AI upscaling does something different
AI upscaling isn't just looking at neighboring pixels — it's analyzing structure. The model tries to recognize faces, hair, fabric, product edges, architectural lines, illustration strokes, compression artifacts, and then predicts what those regions probably look like at higher resolution.
Put another way, traditional interpolation is asking:
What combination of surrounding colors should this new pixel be?
AI upscaling is asking something closer to:
Given everything in this image, what does this region plausibly look like at higher resolution?
That's why AI upscaling usually bundles in upscaling, denoising, sharpening, and some texture reconstruction all at once. It's also why it tends to outperform plain interpolation on portraits, old photos, product shots, and AI-generated images specifically.
But "sharper" isn't the same as "more accurate." When detail is genuinely gone from the source image, the model can only produce something that looks plausible — it's not recovering information that was never there. It might misread small text, reshape a logo, or add texture to jewelry, buildings, or product surfaces that wasn't in the original. For medical imaging, legal evidence, scientific images, ID documents, or precision technical drawings, anything an AI model generates in the gaps shouldn't be treated as ground truth.
The core differences
| Traditional resizing | AI upscaling | |
|---|---|---|
| How it works | Interpolates from existing pixels | Predicts and reconstructs detail from image structure |
| Speed | Fast | Noticeably slower |
| Cost | Low | Higher — usually needs GPU or a third-party service |
| Output consistency | Predictable | Varies by model and image |
| Batch processing | Easy | Needs to account for concurrency, queues, cost |
| Low-res source photos | Gets blurry at higher scale factors | Usually improves texture and edges |
| Text and logos | Stays accurate, just softer | Can get misread or redrawn |
| Faithfulness to original | Doesn't invent semantic detail | Can generate detail that wasn't in the source |
These aren't competing approaches. A lot of products end up using both, just at different stages of the pipeline.
When traditional resizing is the right call
Scaling down
Shrinking a 4000×3000 photo to 1200×900 doesn't need AI — the original already has more than enough detail. Thumbnails, responsive images, social media previews — plain resizing handles all of it.
Small upscales
If a 1000px-wide image just needs to become 1100 or 1200px, bicubic interpolation is already good enough. Running that through an AI model just adds latency and cost for no real gain.
Images with precise text or structure
Screenshots, charts, QR codes, logos, UI icons, technical docs — this stuff needs to stay exactly what it is. AI models can reinterpret small text or fine edges in ways you don't want. Traditional resizing is more reliable here precisely because it doesn't try to be clever.
High-volume, real-time processing
Platforms generating thumbnails at scale need something fast, cheap, and easy to cache. Traditional resizing plays nicely with CDNs in a way that AI processing pipelines generally don't.
Here's a quick example using Sharp to generate a responsive image while explicitly blocking accidental upscaling:
import sharp from 'sharp';

await sharp('input.jpg')
  .resize({
    width: 1200,
    withoutEnlargement: true,
  })
  .webp({ quality: 82 })
  .toFile('output.webp');
This is exactly the kind of thing you want for site delivery. It won't fix a source image that's already blurry, though — that's not what it's for.
When AI upscaling actually makes sense
AI upscaling earns its cost when the source is genuinely smaller than what you need. A 500px-wide image that needs to become a desktop banner, work on high-DPI screens, sit on a product detail page, serve as a video thumbnail, or get printed — that's the use case.
It's also worth reaching for when an image has multiple problems stacked together: low resolution, JPEG compression artifacts, noise, slight blur. A plain resize only changes dimensions. An AI model has a shot at addressing all of those at once, in the same pass.
If you're dealing with AI-generated images headed for a landing page, an ad, or social content, upscaling can slot in as a post-processing step after generation. Just don't skip the review afterward — check hands, faces, text, repeating patterns, product structure, and architectural lines before shipping anything out.
Old photos, discontinued product shots, assets from sites that no longer exist, anything where the source file is simply gone — these are also good candidates for AI upscaling, mostly because there's no alternative. You can't reshoot or re-export something that doesn't exist anymore.
Combining both in an actual product
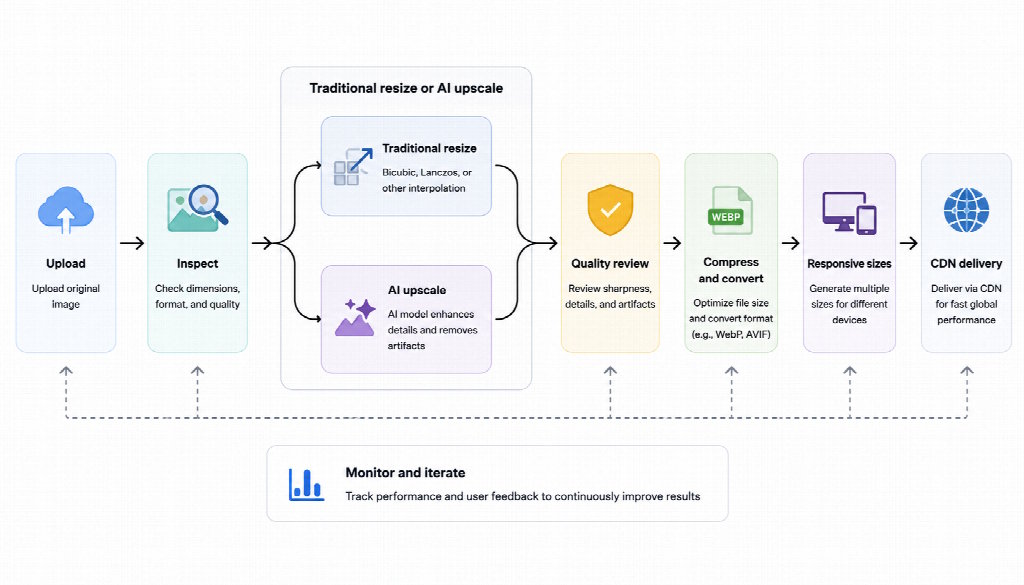
For most web products, the answer isn't picking one over the other — it's splitting image processing into stages:
User uploads image
→ Check dimensions, format, file size
→ Decide if AI upscaling is needed
→ Generate a high-resolution master
→ Compress and convert format
→ Generate responsive sizes
→ Push to CDN
→ Serve via srcset on the frontend
AI upscaling handles getting the master image to a higher quality baseline. Traditional tools handle everything downstream — compression, format conversion, thumbnails, multiple output sizes.
Foca Upscaler shows the distinction pretty well with its two processing modes. Foca Sharp takes the more conservative route, keeping the output close to the source while improving clarity. Foca Physics goes further by using the information already present in the image to infer and reconstruct missing detail. That can make a noticeable difference on faces, textures, architecture, and even blurred text when enough visual information remains in the source.
Once you have that master image, generating the final device-specific versions is back to familiar territory — Sharp, ImageMagick, or whatever CDN image service you're already using.
A few things worth planning for
Latency and cost. Traditional resizing is basically instant. AI upscaling can take several seconds and involves GPUs, API calls, queues, and concurrency limits. Build for that up front — upload progress, a processing state, retry on failure, a preview before the user commits to anything. Don't just leave a request hanging.
File size. Don't ship the raw output of an AI upscaler straight to the browser at full size. The master image still needs compression, conversion to WebP or AVIF, and resizing down to whatever the device actually needs — otherwise a sharper image just makes your page slower.
Privacy. Before sending images to a third-party service, know how long they're retained, whether they're used for training, where they're stored, and whether deletion is actually available. Sensitive images are better handled locally or with a private deployment.
Quality checks. At minimum, review AI output for faces, text, logos, product edges, straight architectural lines, and repeating patterns. A before/after comparison that the user confirms before downloading is more reliable than just handing over the final result and hoping it holds up.
Wrapping up
Traditional resizing and AI upscaling aren't solving the same problem.
Traditional resizing is fast, cheap, and predictable — the right tool for thumbnails, responsive images, minor size adjustments, and anything running at scale. AI upscaling is better suited to low-resolution photos, large scale factors, cleaning up compressed source images, and anything that needs real texture reconstruction.
For most web products, the practical answer is to generate a higher-quality master with AI first, then hand it off to traditional tools for compression, responsive sizing, and CDN delivery.
AI upscaling isn't a replacement for traditional image processing — it's one more step in the pipeline, aimed at a specific kind of problem the older tools were never built to solve.

