
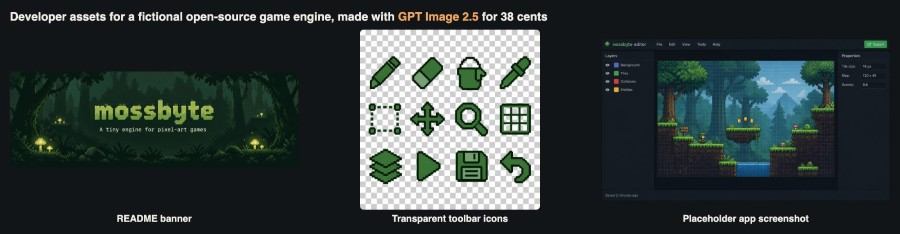
Developers need a surprising number of images that have nothing to do with the product's code: a banner for the README, an architecture diagram for the docs, icons for a toolbar, screenshots for the landing page before the UI is finished, a social preview card for the repository, and, for game developers, sprite sheets. Most of us either draw these badly ourselves or leave them out.
GPT Image 2.5, released in September 2026, comes in two variants, Flare and Sunburst, with six quality levels, transparent backgrounds, exact pixel sizes and mask editing. Those are exactly the controls that matter for developer assets, so we tested them on a concrete project. We made 28 requests, generated 30 images, measured latency and cost for each, checked every rendered string with OCR, and inspected transparency and sprite alignment programmatically. The total cost was 38 cents.
The test project
Our project is a fictional open-source 2D game engine called mossbyte. It does not exist; we invented it for this test. In our scenario it has a GitHub repository, a small level editor desktop app, and a companion mobile app for running test builds on a phone. Its visual identity is dark green #1B2A21 with a moss green accent #4C8C4A, and a small moss-covered robot as its mascot. The project needs a README banner, an architecture diagram, toolbar icons, an app icon, placeholder screenshots, a sprite sheet for the demo game, a repository social preview and some empty-state illustrations.
How we called the model
The API is asynchronous: you submit a task, receive a task ID, and poll until the task is completed. Both variants take identical parameters, so switching between them is a one-word change. This is the helper we used; the host and key are read from environment variables.
import os, time, requests

BASE = os.environ["IMAGE_API_BASE"]
H = {"Authorization": f"Bearer {os.environ['IMAGE_API_KEY']}"}

def generate(prompt, model="gpt-image-2.5-flare", **params):
    body = {"model": model, "prompt": prompt, "n": 1, **params}
    r = requests.post(f"{BASE}/images/generations", headers=H, json=body, timeout=60)
    if r.status_code != 200:
        raise ValueError(r.text)                  # rejected before any work was done
    tid = r.json()["data"][0]["task_id"]
    open("tasks.log", "a").write(tid + "\n")     # resume later instead of resubmitting
    while True:
        time.sleep(3)
        try:
            d = requests.get(f"{BASE}/tasks/{tid}", headers=H, timeout=30).json()["data"]
        except requests.RequestException:
            continue
        if d["status"] in ("completed", "failed"):
            return d

banner = generate(PROMPT, model="gpt-image-2.5-sunburst",
                  size="3:1", resolution="1k", quality="medium")
Every test below was designed in advance and run a fixed number of times. We did not regenerate anything to get a better result, so the failures you see are the failures we got.
Test 1: Flare or Sunburst for a README banner?
Flare is positioned as the fast default and Sunburst as the variant for precise, detailed edits. Both are billed at the same token rates. To see the difference on a typical asset, we generated the same README banner three times with each variant: the word "mossbyte" in a pixel-art font, the tagline "A tiny engine for pixel-art games" in monospace, and a dark pixel-art forest with glowing mushrooms, at 3:1 and medium quality.
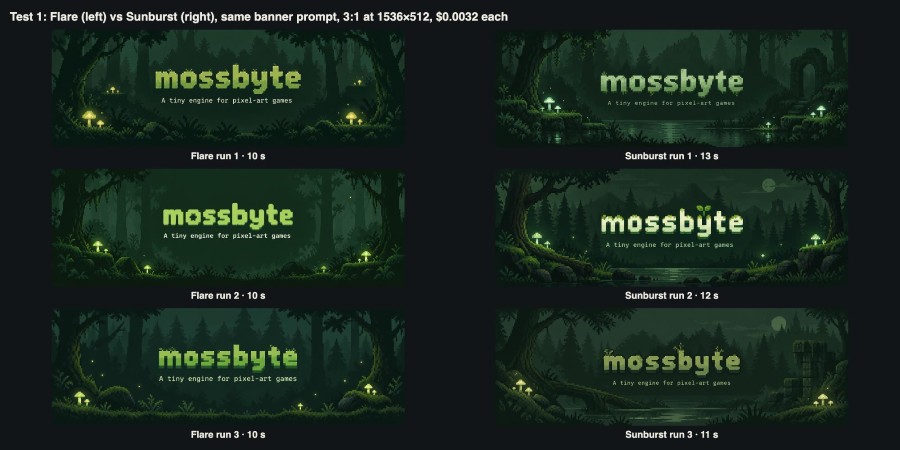
Flare on the left, Sunburst on the right. All six spelled both lines correctly.
All six banners were correct: the name and the tagline were spelled correctly and centred in every run. Each came back at 1536 × 512 and cost $0.0032. Flare finished in 10 seconds every time; Sunburst took 11 to 13 seconds. The visual difference was consistent: Flare drew exactly what we asked for, a forest with mushrooms, while Sunburst added extra scenery to all three of its banners, such as a lake with reflections, a ruined stone arch and a moon. Neither is wrong, but for a README banner, where the text is the point, Flare's simpler backgrounds kept the title more readable.
Test 2: quality levels on an architecture diagram
GPT Image 2.5 has six quality levels: low, medium, high, xhigh, max and auto. Diagrams are a good test, because they combine exact labels with structure. Our prompt described seven boxes with exact labels such as "Physics (AABB)" and "Renderer (WebGL2)", six arrows between specific boxes, and a title, "mossbyte v0.9 architecture". We generated it with Flare at each explicit level.
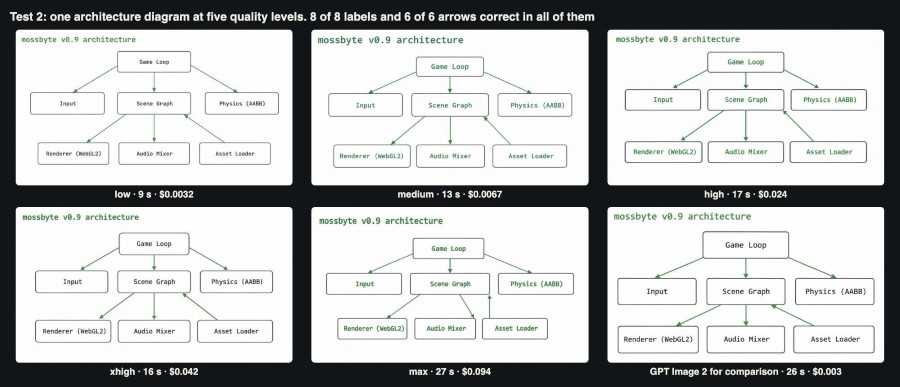
Five quality levels of the same diagram, plus GPT Image 2 for comparison.
The result surprised us. All five versions had all eight text items correct and all six arrows connecting the right boxes in the right direction, including low. The only blemish was in the max version, where the arrow from Asset Loader ends at the corner of the Scene Graph box instead of its edge, and the bottom row sits off-centre. The higher levels mostly changed the styling, with thicker outlines and larger type. They did not improve correctness. The price, however, rose steeply: $0.0032 at low, $0.0067 at medium, $0.024 at high, $0.042 at xhigh and $0.094 at max. The max diagram cost 29 times as much as the low one and was not more useful in a README.
For diagrams, the practical approach is to generate at low or medium, and only move up if something specific, such as a fine detail in an illustration, looks wrong. Do not use auto in a cost-sensitive loop: according to the documentation it reserves funds at the max rate and settles on actual use, which makes budgeting harder.
Test 3: latency compared with GPT Image 2
The main promise of Flare is speed. We ran the same diagram prompt through GPT Image 2 and through Sunburst at medium to compare server-side generation time.
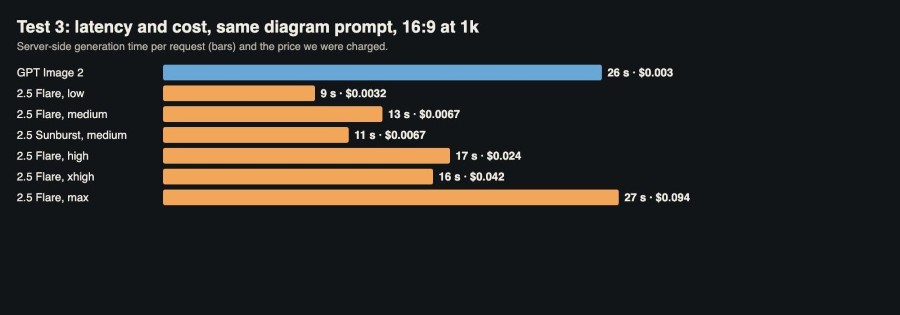
Generation time and price for the same diagram prompt at 16:9 and 1k.
GPT Image 2 took 26 seconds for the diagram and cost $0.003; it also rendered every label correctly, at 1672 × 941. Flare at medium took 13 seconds, half the time, for $0.0067. Sunburst at medium took 11 seconds. Across all 26 completed GPT Image 2.5 requests in this article, the server-side time ranged from 8 to 34 seconds, and only two requests took longer than 20 seconds: the max-quality diagram and the Sunburst sprite sheet. If your asset pipeline is interactive, for example a "generate icon" button in an internal tool, that difference is noticeable. If it runs in CI overnight, the cheaper option is fine.
Test 4: transparent icons
Icons, stickers and app icons need a transparent background. GPT Image 2.5 supports background: "transparent" with PNG or WebP output. We requested a 4 × 3 set of 12 toolbar icons for the level editor (pencil, eraser, paint bucket, eyedropper and so on) at 1:1, and a single app icon at an exact size of 1024 × 1024.
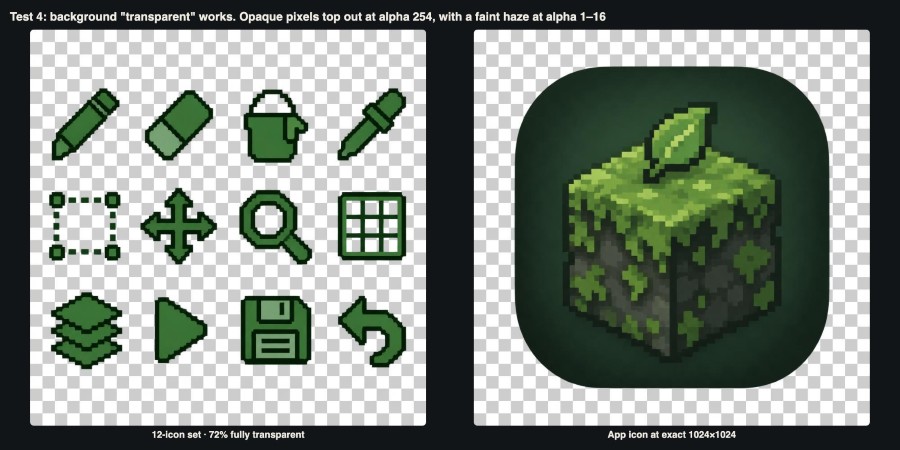
Both images shown over a checkerboard to make the transparency visible.
Both came back as RGBA PNGs with real transparency. All 12 icons were present, in the order we listed them, with a consistent line weight. The app icon was exactly 1024 × 1024, with transparent corners outside its rounded square. Each cost about $0.01 and took 10 to 12 seconds.
The alpha channel needed a closer look before using the files in code. In the icon set, 72 percent of pixels were fully transparent, as expected. But fully opaque pixels topped out at an alpha value of 254, not 255, and 6.4 percent of pixels had a faint haze with alpha between 1 and 16, invisible on a white page but present in the file. That matters if your code tests for alpha == 255, or computes bounding boxes from alpha > 0: the haze will make every bounding box nearly as large as the image. A short clean-up pass fixes both problems:
import numpy as np
from PIL import Image

def clean_alpha(path, out, low=16, high=240):
    im = np.array(Image.open(path).convert("RGBA"))
    a = im[:, :, 3]
    a[a <= low] = 0          # remove the faint haze
    a[a >= high] = 255       # make solid pixels fully opaque
    Image.fromarray(im).save(out)

def slice_grid(path, cols, rows, prefix):
    im = Image.open(path)
    w, h = im.width // cols, im.height // rows
    for r in range(rows):
        for c in range(cols):
            cell = im.crop((c * w, r * h, (c + 1) * w, (r + 1) * h))
            cell.crop(cell.getbbox()).save(f"{prefix}-{r}-{c}.png")   # trim to content
Test 5: placeholder app screenshots
Landing pages and docs often need screenshots before the UI is final. We asked for two: a dark desktop screenshot of the level editor with a menu bar, a layers panel, a properties panel, an "Export" button and a status bar, and a light mobile screenshot of the companion app with a list of four builds, each with a name, version, file size and date.
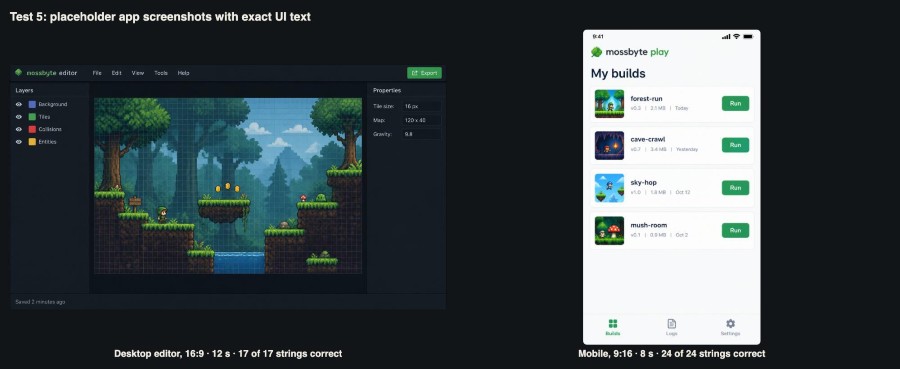
Desktop and mobile placeholder screenshots, with every requested string checked.
We compared every requested string with OCR output and checked uncertain ones by eye. The desktop screenshot had 17 of 17 strings correct, including "Map: 120 x 40" and "Saved 2 minutes ago". The mobile screenshot had 24 of 24 correct, including all four version numbers, file sizes and dates. Each took 8 to 12 seconds and cost $0.0066.
The model also added things we did not ask for, all of them plausible: a "9:41" clock and battery icons in the phone status bar, a leaf logo next to the app name, eye icons and colour swatches next to each layer, and a game level on the canvas complete with coins and a waterfall. For a placeholder that is helpful. For documentation that claims to show the real product, it is a problem, because readers will look for features that do not exist. Label generated screenshots as mock-ups until you replace them.
The GPT Image 2.5 API accepts both standard ratios and exact pixel sizes, so we used 16:9 and 9:16 here and received 1536 × 864 and 864 × 1536. Test 8 shows what happens with exact sizes.
Test 6: a sprite sheet for the demo game
Sprite sheets are the hardest asset in this list, because they must be both consistent and precise. A walk cycle only works if every frame has the same character at the same size, standing on the same baseline. We asked both variants for a 4 × 4 grid of 16 frames of the mossbyte robot: two rows of walk cycle, one row of jump frames and one row of idle frames, transparent background, at high quality.
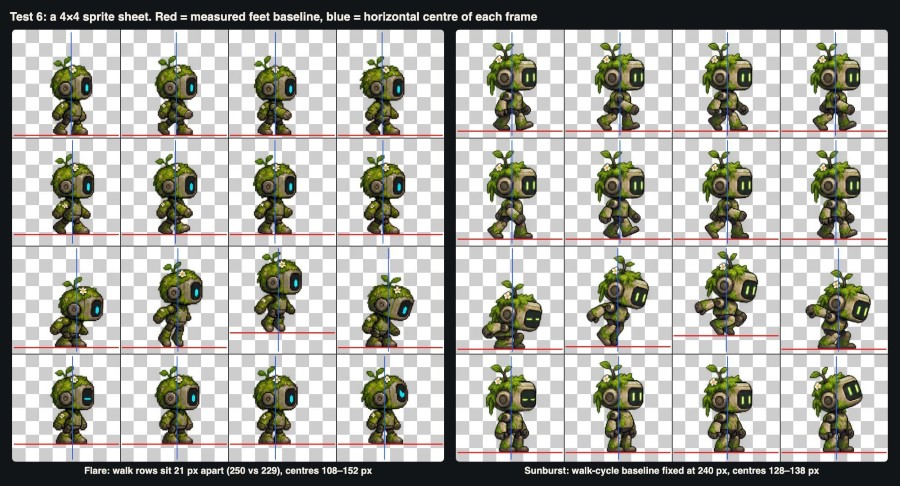
Flare (left) and Sunburst (right). Red lines show the measured feet baseline in each cell, blue lines the horizontal centre.
Both sheets looked right at first glance: 16 frames, a consistent character, transparent background, and no frame crossing a cell edge. To check the alignment, we split each sheet into 16 cells of 256 × 256 pixels and measured the bounding box of the opaque pixels in each cell.
The measurements separated the two variants clearly. In Flare's sheet, the four walk frames in the first row stood on a baseline at 250 pixels, but the four walk frames in the second row stood at 229 pixels, so the character would jump up by 21 pixels halfway through the walk cycle. The horizontal centres of the frames ranged from 108 to 152 pixels. In Sunburst's sheet, all eight walk frames stood on exactly the same baseline at 240 pixels, and the centres stayed between 128 and 138 pixels. The jump frames in both sheets were raised during take-off and flight, as they should be. Sunburst took 34 seconds against Flare's 20, at the same price of $0.038.
Neither sheet can go straight into a game engine without alignment, but Sunburst's needs much less. The practical recipe is to slice the sheet, trim each frame to its bounding box, and re-anchor every frame to a common baseline and centre in code, which takes a few lines with the slice_grid helper above. Also note that the two variants drew the same prompt as two different characters, one with a single cyan eye and one with two green eyes. Pick one design and use it as a reference image for later sheets.
Test 7: renaming one button with a mask
Mask editing is the feature that promises exact control: you send the image, a PNG mask whose transparent pixels mark the area to change, and a prompt. We used the desktop screenshot from Test 5 and asked both variants to change the "Export" button to "Publish build", with a mask covering only the button. For comparison, we also ran Flare with the same prompt and no mask.
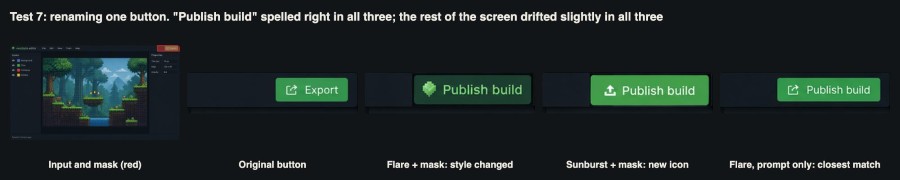
The mask, the original button, and the three edited versions.
All three edits spelled "Publish build" correctly, and each cost $0.0132 and took 12 to 16 seconds. The details varied. Flare with the mask changed the button's style: it became a dark green button with a leaf icon. Sunburst with the mask kept the bright green button but replaced the export icon with an upload arrow. Flare without a mask produced the closest match: the same colour, the same icon, only the new label.
We then measured how much of the screenshot outside the button had changed. The edits came back at 1360 × 768, not at the input's 1536 × 864, because we had not set a size, so we resized the original to match before comparing. Outside the masked area, 0.89 percent (Flare with mask), 1.09 percent (Sunburst with mask) and 0.69 percent (no mask) of pixels changed by a clearly visible amount, spread across the whole image as small redraws of text and texture. In this test, the mask controlled where the new content went, but it did not freeze the rest of the image.
If you need a guarantee, enforce it yourself: request the input size explicitly, then paste only the masked region of the result back onto the original.
def composite_back(original_path, edited_path, box, out_path):
    orig = Image.open(original_path).convert("RGBA")
    edit = Image.open(edited_path).convert("RGBA").resize(orig.size, Image.LANCZOS)
    orig.paste(edit.crop(box), box[:2])         # only the masked rectangle changes
    orig.save(out_path)

composite_back("editor.png", "editor_edit.png", (1330, 2, 1533, 59), "editor_v2.png")
With that step, every pixel outside the button is identical to the original by construction, which is what you want when the screenshot appears next to other, unedited ones.
Test 8: exact pixel sizes and output formats
A GitHub social preview image is 1280 × 640 pixels, and many platforms expect 1200 × 630 for link previews. GPT Image 2.5 accepts exact pixel sizes as long as each side is a multiple of 16, the longest side is at most 3840 pixels, the ratio is no wider than 3:1, and the total is between 655,360 and 8,294,400 pixels. We sent the same social card prompt at both sizes, and at 1280 × 640 in three output formats.
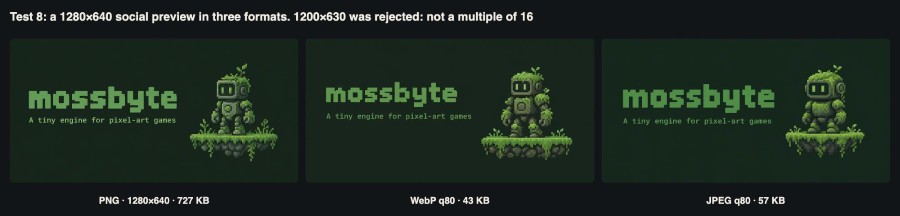
The same 1280 × 640 social card in PNG, WebP at quality 80 and JPEG at quality 80.
The 1200 × 630 request was rejected immediately with HTTP 400 and the message "pixel dimensions must be multiples of 16: 1200x630". It was not charged. 630 is not a multiple of 16, so the fix is to request 1200 × 640 or 1280 × 640 and crop. All three 1280 × 640 requests came back at exactly 1280 × 640, in 8 to 10 seconds, at $0.0047 each.
The output format made a large difference to file size: the PNG was 727 KB, the WebP at output_compression: 80 was 43 KB, and the JPEG at 80 was 57 KB, with no visible difference at normal size. Note that the three files are three separate generations, so the robot is drawn slightly differently in each. Requesting WebP directly saves a conversion step, but if you need a lossless master, request PNG once and convert it yourself. A pre-flight check saves a round trip:
def valid_pixel_size(w, h):
    return (w % 16 == 0 and h % 16 == 0 and max(w, h) <= 3840
            and max(w, h) / min(w, h) <= 3
            and 655_360 <= w * h <= 8_294_400)

assert valid_pixel_size(1280, 640)
assert not valid_pixel_size(1200, 630)     # 630 is not a multiple of 16
assert not valid_pixel_size(512, 512)      # too few pixels: use 1024 x 1024 and downscale
The last line is a practical trap: a 512 × 512 icon is below the minimum pixel count, so for small assets request a larger size and downscale.
Test 9: four empty-state illustrations in one request
Empty states ("You have no projects yet") are a good use for a batch, because you want several options to choose from. GPT Image 2.5 accepts n from 1 to 4. We generated four illustrations of the robot holding an empty folder in one request at low quality, and one with n=1 for comparison.
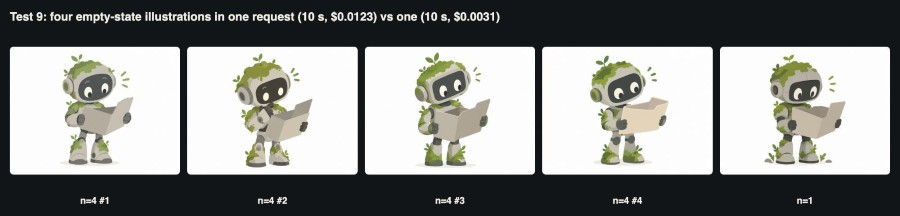
Four images from one request with n=4, and one from n=1.
The batch request took the same 10 seconds of server time as the single image and cost $0.0123, exactly four times the single image's $0.0031, so batching saves time but not money. The four illustrations shared a consistent style and character design while varying the pose and the folder, which is what you want when choosing between options. At low quality, the clean flat style was already good enough for a web app's empty state.
The walkthrough video
The video below summarises the nine tests with the images and measurements.
Walkthrough: developer assets with GPT Image 2.5 (about 3 minutes).
What it cost
| Test | Requests | Images | Time per request | Cost |
|---|---|---|---|---|
| 1. README banner, Flare vs Sunburst | 6 | 6 | 10–13 s | $0.019 |
| 2. Diagram at five quality levels | 5 | 5 | 9–27 s | $0.170 |
| 3. Diagram on GPT Image 2 and Sunburst | 2 | 2 | 11–26 s | $0.010 |
| 4. Transparent icons | 2 | 2 | 10–12 s | $0.020 |
| 5. Placeholder screenshots | 2 | 2 | 8–12 s | $0.013 |
| 6. Sprite sheets, high quality | 2 | 2 | 20–34 s | $0.077 |
| 7. Button edits | 3 | 3 | 12–16 s | $0.040 |
| 8. Sizes and formats | 4 | 3 | 8–10 s | $0.014 |
| 9. Empty states, n=4 and n=1 | 2 | 5 | 10 s | $0.015 |
| Total | 28 | 30 | $0.38 |
The max-quality diagram alone ($0.094) cost a quarter of the whole test. Leaving it out, together with the xhigh diagram, the remaining 28 images cost 24 cents. At medium quality and 1k, a typical asset such as a screenshot, diagram or banner cost between a third of a cent and seven tenths of a cent.
A developer's checklist
- Start with Flare at low or medium. Every diagram and screenshot was fully correct at those levels; higher levels changed styling and price, not accuracy.
- Use Sunburst for assets that need precise alignment. Its walk-cycle frames shared one baseline; Flare's were 21 pixels apart.
- Avoid quality auto in loops. Funds are reserved at the max rate, which cost 29 times the low rate in our diagram test.
- Clean the alpha channel. Opaque pixels peak at 254 and a faint haze sits around the artwork; threshold it before computing bounding boxes.
- Validate pixel sizes before sending. Multiples of 16 and at least 655,360 pixels; 1200 × 630 and 512 × 512 do not qualify.
- Set the size on edits. Without it, our 1536 × 864 screenshot came back at 1360 × 768.
- Composite masked edits back onto the original. Masks placed the change correctly, but up to 1.1 percent of the rest of the image was redrawn.
- Label generated screenshots as mock-ups. The model added plausible but invented UI details.
The bottom line
For developer assets, GPT Image 2.5 got the part that usually fails right: every one of the more than 100 requested strings across banners, diagrams, screenshots and edits was spelled correctly, and transparent PNGs and exact pixel sizes worked as documented. What still needs code around it is precision: aligning sprite frames, cleaning alpha channels, validating sizes and pasting masked edits back. Those are small, deterministic steps that fit naturally into a build script. For 38 cents, the fictional mossbyte project got a banner, a diagram, a full icon set, screenshots, a sprite sheet and a social card. If you want to try the same workflow, or compare it with other image and video models under one API key, you can find them on APIMart.