
Although not many applications need such structure of tabs in the same way a browser does, knowing how to do it can be useful. Using such a component can be pretty useful if you want to create your own embedded browser in your application or you work with some kind of design app that uses multiples canvas and the user can modify them. In this article we'll show you how to implement a Browser-Style tabs in your WinForms application in C# using the EasyTabs component.
1. Install EasyTabs
To implement such tabs on your WinForms application with C#, you will need to use the EasyTabs library. EasyTabs is an awesome library that allows you to use a .NET component with a set of tabs in their titlebar space, similar to Chrome, Firefox, Trillian or other web browsers. Its source code is hosted on Github as well an useful example to understand deeply how the library works. To install this package on your project in Visual Studio, go to the solution explorer and do right click on your project. From the dropdown list select the Manage NuGet Packages option:

In the Manager, go to the browse tab and search for the EasyTabs package:

Select the first package namely EasyTabs by Luke Stratman and install it in your project. Once the installation finishes you will be able to use the EasyTabs namespace on your code.
2. Create a Simple Test Form
The tabs follow the principle, that every created tab will be an instance of a native Form, so the one that we will create namely Form1 will be the content of every created Tab. You can change this behaviour with conditionals on the next step during the creation of the AppContainer, however to make your app work quickly and understand how the library works, we recommend you to test it with a single and simple Form.
In this example, our Form1 is really simple and has many native components, but they don't do nothing:

The special however, is inside the code. Your form needs to have the getter for the ParentTabs property that returns the ParentForm, so be sure to add the property in the source code of your form:
using System;
using System.Collections.Generic;
using System.ComponentModel;
using System.Data;
using System.Drawing;
using System.Linq;
using System.Text;
using System.Threading.Tasks;
using System.Windows.Forms;

// 1. Use Easy Tabs
using EasyTabs;

namespace Sandbox
{
    public partial class Form1 : Form
    {
        // 2. Important: Declare ParentTabs
        protected TitleBarTabs ParentTabs
        {
            get
            {
                return (ParentForm as TitleBarTabs);
            }
        }

        public Form1()
        {
            InitializeComponent();
        }

        private void Form1_Load(object sender, EventArgs e)
        {

        }
    }
}
Now this Form can be shown on a tab of the container.
3. Create an AppContainer Form
As next, you will need to create a new Form on your application that extends the TitleBarTabs UI. This form doesn't exist theoretically and can't be viewed alone, it just work as a wrapper for the tab(s) that will be appended later in the Entry Point of your application. Its code content will be very simple and requires a simple thing, a method that allows the user to create a new Tab with another Form instance, in our example every created tab by the user will be an instance of the Form1 created in the previous step, this in order to test your application, you can change the content of the Form1 as mentioned later.
Important
The CS file needs obviously be a Form instance, not a simple C# class, otherwise the InitializeComponent method available on every Form won't be available and your code wont compile. This can be determined during the creation of the form using the assistant in the Solution Explorer area.
using System;
// Use EasyTabs
using EasyTabs;

namespace YOUR_APPLICATION_NAMESPACE
{
    public partial class AppContainer : TitleBarTabs
    {
        public AppContainer()
        {
            InitializeComponent();

            AeroPeekEnabled = true;
            TabRenderer = new ChromeTabRenderer(this);
        }

        // Handle the method CreateTab that allows the user to create a new Tab
        // on your app when clicking
        public override TitleBarTab CreateTab()
        {
            return new TitleBarTab(this)
            {
                // The content will be an instance of another Form
                // In our example, we will create a new instance of the Form1
                Content = new Form1
                {
                    Text = "New Tab"
                }
            };
        }

        // The rest of the events in your app here if you need to .....
    }
}
Note that if you try to see the AppContainer Form in the Visual Studio designer, you will see this:
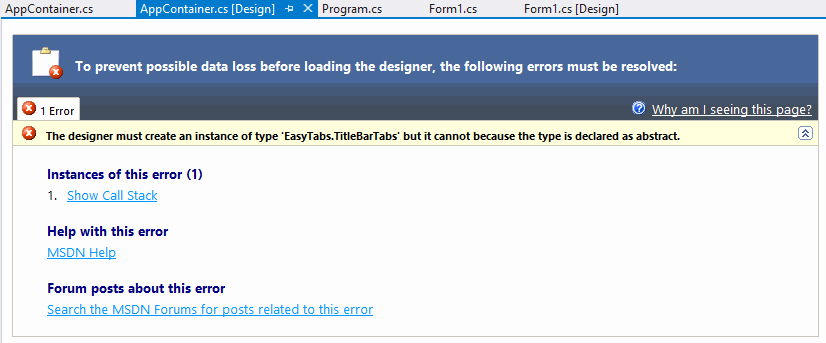
You will get this error, because as explained, the designer is trying to draw something that is abstract (our form is abstract once extends the TitleBarTabs instead of Form), therefore an exception will be thrown only if you try to see the Form in the designer, otherwise is totally valid.
4. Set Entry point of your application as the AppContainer
Proceed to change the code of your main Program.cs file namely the entry point for your application. Here you need to indicate that the app (an instance of AppContainer) should be started using the TitleBarTabsApplicationContext instead of the default one. Here you will indicate what will be the content of the first tab that is created in your application, as this is as mentioned a simple tutorial, it will be as well an instance of the Form1 created in the step 2:
using System;
using System.Collections.Generic;
using System.Linq;
using System.Threading.Tasks;
using System.Windows.Forms;
using EasyTabs;

namespace YOUR_APPLICATION_NAMESPACE
{
    static class Program
    {
        /// <summary>
        /// The main entry point for the application.
        /// </summary>
        [STAThread]
        static void Main()
        {
            Application.EnableVisualStyles();
            Application.SetCompatibleTextRenderingDefault(false);

            AppContainer container = new AppContainer();

            // Add the initial Tab
            container.Tabs.Add(
                // Our First Tab created by default in the Application will have as content the Form1
                new TitleBarTab(container)
                {
                    Content = new Form1
                    {
                        Text = "New Tab"
                    }
                }
            );

            // Set initial tab the first one
            container.SelectedTabIndex = 0;

            // Create tabs and start application
            TitleBarTabsApplicationContext applicationContext = new TitleBarTabsApplicationContext();
            applicationContext.Start(container);
            Application.Run(applicationContext);
        }
    }
}
As last step start your application as usually and instead of the boring default form now you will be able to use Chrome-Style tabs:

Happy coding !

