

Nowadays, the Optical Character Recognition is the preferred way to digitize documents, instead of entering the metadata of the documents manually, because the OCR will identify the text in the documents which are fed into the document management system and allows you to do something with the plain text, without even reading it by yourself. For JavaScript, there's a popular solution based on the Tesseract OCR engine, we are talking about the Tesseract.js project. Tesseract.js is a pure Javascript port of the popular Tesseract OCR engine. This library supports over 60 languages, automatic text orientation and script detection, a simple interface for reading paragraph, word, and character bounding boxes. Tesseract.js can run either in a browser and on a server with NodeJS which makes it available on a lot of platforms.
In this article, we'll show how to use Tesseract.js in the browser to convert an image to text (extract text from an image).
1. Installing Tesseract.js
As mentioned, you can use Tesseract.js library from the browser using either a CDN or from a local copy (for more information about this library, please visit the official repository at Github here). Tesseract.js works in the following way, you will need 2 scripts, namely tesseract.js and its tesseract-worker.js. As expected, to achieve an acceptable performance in the browser, the script uses a web worker that is located in another file (tesseract-worker.js), which means that you only need to include tesseract.js and the worker needs to be in the same directory as the script will include the worker automatically for you.
A.1. The quick and easy way
Using the free CDN, you can only include the tesseract script in your document that will automatically include the worker in the background:
<!-- Using a free CDN -->
<script src='https://cdn.rawgit.com/naptha/tesseract.js/1.0.10/dist/tesseract.js'></script>
It will automatically as well load the trained data for the language that you need from the CDN as well (thing that you need to do by yourself if you want to host a local copy). After including this simple Script, you will be ready to use tesseract so follow the step 2.
A.2. From a local copy
If using a CDN is not an option for you, then you want to have a local copy of the script in your own server. The first you need to know is that you have to download primary 2 scripts the worker of Tesseract and the index script:
After having them in some folder, you will need as well some language trained data (at least the one you want to use ) that will be stored in some folder that will contain all the languages that you need to add to Tesseract, you need to provide the path to this folder during the initialization of Tesseract:
// After including the Tesseract script, initialize it in the browser
window.Tesseract = Tesseract.create({
    // Path to worker
    workerPath: '/worker.js',
    // Path of folder where the language trained data is located
    langPath: '/langs-folder/',
    // Path to index script of the tesseract core ! https://github.com/naptha/tesseract.js-core
    corePath: '/index.js',
});
The Tesseract scripts uses the simple pattern langPath + langCode + '.traineddata.gz' to download the correct trained data of the language that the script needs. You can obtain this data by using the language code ISO 639-2/T or ISO 639-2/B (3 char code) and downloading the file from the CDN, for example to download the english and spanish data (you can get the file from the tessdata repository here):
// Download the spanish trained data
https://cdn.rawgit.com/naptha/tessdata/gh-pages/3.02/spa.traineddata.gz
// Download the english trained data
https://cdn.rawgit.com/naptha/tessdata/gh-pages/3.02/eng.traineddata.gz
With the previous example and using only 2 languages, the structure of our folder looks like:
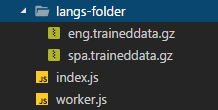
Remember that the script downloads the trained data that it needs (not all simultaneously unless you want it so). The file size aren't usually of a couple of KB but at least more than 800Kb (e.g english package weighs 9MB).
2. Recognizing text from image
After including the library properly, you will be able to convert an image to text using the Tesseract.recognize method that offers basically a Promise interface and works as follows. The method figures out what words are in image, where the words are in image, etc.
Note
image should be sufficiently high resolution. Often, the same image will get much better results if you upscale it before calling recognize.
imageis any ImageLike object. The main Tesseract.js functions take animageparameter, which should be something that is like an image. What's considered "image-like" differs depending on whether it is being run from the browser or through NodeJS.On a browser, an image can be:
- an
img,video, orcanvaselement - a CanvasRenderingContext2D (returned by
canvas.getContext('2d')) - a
Fileobject (from a file<input>or drag-drop event) - a
Blobobject - a
ImageDatainstance (an object containingwidth,heightanddataproperties) - a path or URL to an accessible image (the image must either be hosted locally or accessible by CORS)
In Node.js, an image can be
- a path to a local image
- a
Bufferinstance containing aPNGorJPEGimage - a
ImageDatainstance (an object containingwidth,heightanddataproperties)
- an
optionsis either absent (in which case it is interpreted as'eng'), a string specifing a language short code from the language list, or a flat json object that may:- include properties that override some subset of the default tesseract parameters
- include a
langproperty with a value from the list of lang parameters
The method returns a TesseractJob whose then, progress, catch and finally methods can be used to act on the result, so you can store it into a variable and call some methods according to your needs. The following example shows how to recognize english words from an image using local resources and a basic initialization (the code is ready to test, just change the path to the files in your project, the image and that's it):
<!DOCTYPE html>
<html lang="en">
    <head>
        <meta charset="UTF-8">
        <meta name="viewport" content="width=device-width, initial-scale=1.0">
        <meta http-equiv="X-UA-Compatible" content="ie=edge">
        <title>Tesseract Example</title>
    </head>

    <body>
        <button id="img-to-txt">
            Convert image to text
        </button>

        <script src="./tesseract.js"></script>
        <script>
            // 1. After including the Tesseract script, initialize it in the browser
            // Note: to prevent problems while tesseract loads scripts, provide the absolute path to the file from your domain
            window.Tesseract = Tesseract.create({
                // Path to worker
                workerPath: 'http://mydomain.com/worker.js',
                // Path of folder where the language trained data is located
                // note the "/" at the end, this string will be concatenated with the selected language
                langPath: 'http://mydomain.com/langs-folder/',
                // Path to index script of the tesseract core ! https://github.com/naptha/tesseract.js-core
                corePath: 'http://mydomain.com/index.js',
            });

            // 2. Write some logic to initialize the text recognition
            document.getElementById("img-to-txt").addEventListener("click", function(){
                let btn = this;

                // Disable button until the text recognition finishes
                btn.disable = true;

                // Convert an image to text. This task works asynchronously, so you may show
                // your user a loading dialog or something like that, or show the progress with Tesseract
                Tesseract.recognize("./text.png").then(function(result){
                    // The result object of a text recognition contains detailed data about all the text
                    // recognized in the image, words are grouped by arrays etc
                    console.log(result);

                    // Show recognized text in the browser !
                    alert(result.text);
                }).finally(function(){
                    // Enable button once the text recognition finishes (either if fails or not)
                    btn.disable = false;
                });
            }, false);
        </script>
    </body>
</html>
However not every text in the world is in english, so you may configure it to use pre-trained data from another language as long as you have the package. For example, with Spanish:
<!DOCTYPE html>
<html lang="en">
    <head>
        <meta charset="UTF-8">
        <meta name="viewport" content="width=device-width, initial-scale=1.0">
        <meta http-equiv="X-UA-Compatible" content="ie=edge">
        <title>Tesseract Example</title>
    </head>

    <body>
        <button id="img-to-txt">
            Convert image to text
        </button>

        <script src="./tesseract.js"></script>
        <script>
            // 1. After including the Tesseract script, initialize it in the browser
            // Note: to prevent problems while tesseract loads scripts, provide the absolute path to the file from your domain
            window.Tesseract = Tesseract.create({
                // Path to worker
                workerPath: 'http://mydomain.com/worker.js',
                // Path of folder where the language trained data is located
                // note the "/" at the end, this string will be concatenated with the selected language
                langPath: 'http://mydomain.com/langs-folder/',
                // Path to index script of the tesseract core ! https://github.com/naptha/tesseract.js-core
                corePath: 'http://mydomain.com/index.js',
            });

            // 2. Write some logic to initialize the text recognition
            document.getElementById("img-to-txt").addEventListener("click", function(){
                let btn = this;

                // Disable button until the text recognition finishes
                btn.disable = true;

                // Configure recognition
                let tesseractSettings = {
                    lang: 'spa'
                };

                // Convert an image to text. This task works asynchronously, so you may show
                // your user a loading dialog or something like that, or show the progress with Tesseract
                Tesseract.recognize("./texto.png", tesseractSettings).then(function(result){
                    // The result object of a text recognition contains detailed data about all the text
                    // recognized in the image, words are grouped by arrays etc
                    console.log(result);

                    // Show recognized text in the browser !
                    alert(result.text);
                }).finally(function(){
                    // Enable button once the text recognition finishes (either if fails or not)
                    btn.disable = false;
                });
            }, false);
        </script>
    </body>
</html>
In this article we covered the basic necessity of retrieving the text from an image. The library offers more utilities like displaying the progress of the recognition, figure out what kind of script is using the image e.g. 'Latin', 'Chinese'. So don't hesitate on visiting the official repository at Github here to discover more useful methods.
Happy coding !

