
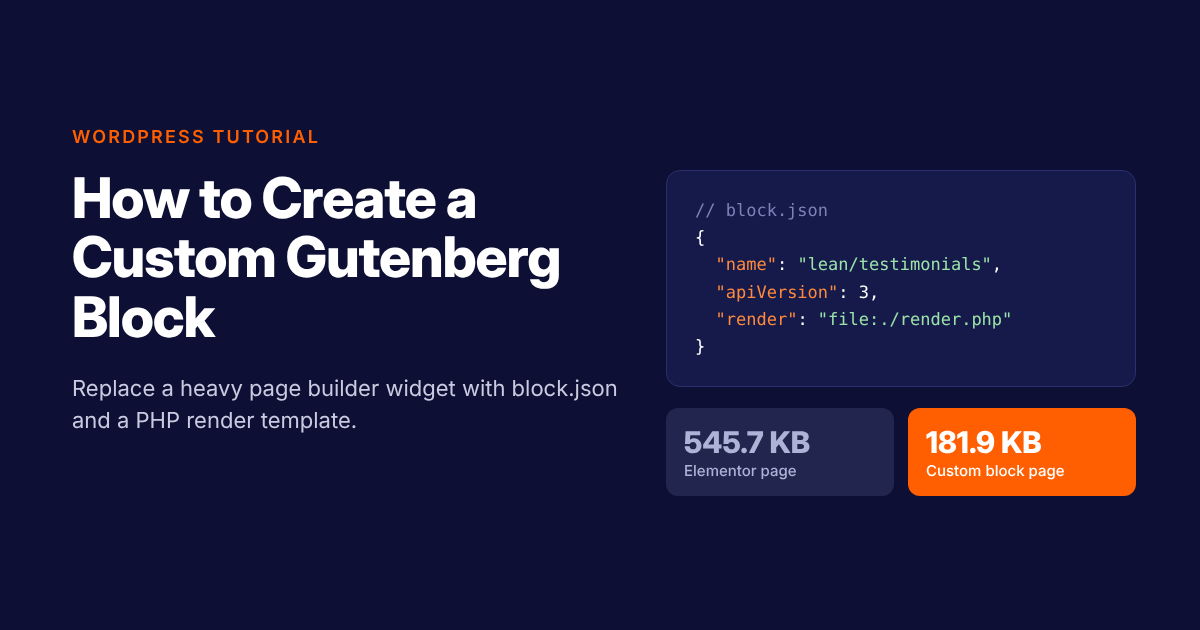
I've been building websites since 2005, and most WordPress rebuilds I take on now start the same way. A business owner says the site feels slow. I open the homepage, check the Network tab, and find a page builder loading its frontend framework, a slider library and a stack of widget stylesheets to show five customer quotes.
The quotes aren't the problem. The tool used to place them is.
In this tutorial, you'll build a small WordPress plugin that registers a custom Gutenberg block for testimonials. It pulls content from a custom post type, renders it in PHP, and loads one small stylesheet. No build step, no Node toolchain and no page builder. By the end, you'll have a pattern you can reuse to replace other widgets one at a time.
Why one page builder widget can slow down a whole page
Page builders have improved. Elementor, for example, now loads the Swiper library only when an element on the page uses it, which its team says cut 136KB from pages that don't (Elementor developers blog). That's good news for pages without a carousel. It also means the page with your testimonial carousel still pays for it.
CSS tells a similar story. When Elementor 3.24 rolled its CSS loading changes out to everyone, the release notes said sites that hadn't enabled "Improved CSS Loading" would see up to 668KB less CSS on every page (Elementor 3.24 developers update). The fact that this much could be trimmed shows how much was shipping before. Version 3.25 then added an experiment to strip wrapper div elements from widgets, because each button had been rendered inside three of them (Elementor 3.25 developers update).
Why does this matter for a business site? Google's widely cited 2016 study, The Need for Mobile Speed, found 53% of mobile visits were abandoned when a page took longer than 3 seconds to load (Google). The study is old, but the habit it describes hasn't gone away.
My view, after years of auditing these sites: page builders are fine for prototypes and landing pages you'll throw away. For a business site you'll run for five years, a handful of purpose-built blocks is lighter, easier to maintain and harder for an editor to break.
What you'll build
A dynamic block called Lean Testimonials. "Dynamic" means WordPress renders the block's HTML in PHP on each request, instead of saving fixed markup into the post. That suits testimonials: add a new one in the admin and every page using the block shows it, with no re-editing.

The finished block on the front end, using the Twenty Twenty-Five theme.
You'll need WordPress 6.1 or later, because the block uses the render property in block.json, added in that release (WordPress 6.1 Block API dev note). I tested the code below on WordPress 6.9. Test it on a staging site before you use it on a live one.
The plugin has six files:
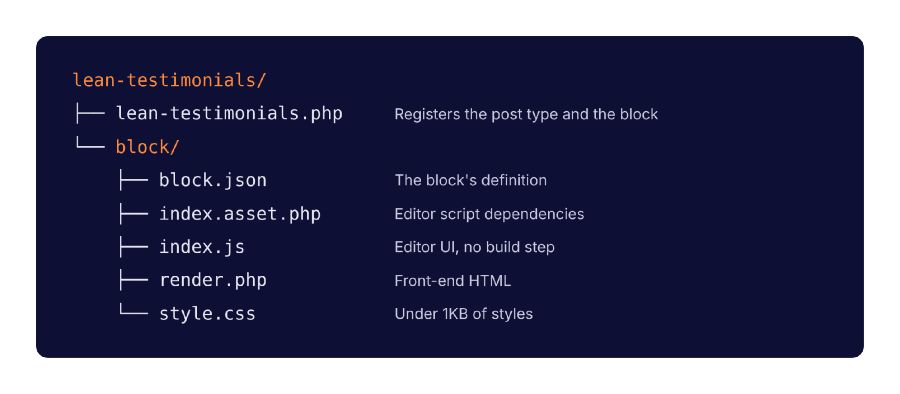
Step 1: Register the post type and the block
The main plugin file does two jobs on init. It registers a private testimonial post type, and it registers the block from its block.json folder.
<?php
/**
 * Plugin Name: Lean Testimonials
 * Description: A testimonials block that replaces a page builder widget.
 * Version:     1.0.0
 * Requires at least: 6.1
 * Requires PHP: 7.4
 * License:     GPL-2.0-or-later
 * Text Domain: lean-testimonials
 */

defined( 'ABSPATH' ) || exit;

add_action( 'init', function () {
    register_post_type( 'testimonial', array(
        'labels'       => array(
            'name'         => __( 'Testimonials', 'lean-testimonials' ),
            'singular_name'=> __( 'Testimonial', 'lean-testimonials' ),
        ),
        'public'       => false,
        'show_ui'      => true,
        'show_in_rest' => true,
        'menu_icon'    => 'dashicons-format-quote',
        'supports'     => array( 'title', 'excerpt' ),
    ) );

    register_block_type( __DIR__ . '/block' );
} );
Each testimonial uses the title for the person's name and company, and the excerpt for the quote. Setting public to false keeps testimonials out of search results and off their own URLs, while show_ui still gives editors an admin screen.
register_block_type() accepts the path to the folder holding block.json, so one line handles the whole block (register_block_type reference).
Step 2: Describe the block in block.json
block.json is the block's single source of truth. WordPress reads it on the server and passes the same definition to the editor.
{
  "$schema": "https://schemas.wp.org/trunk/block.json",
  "apiVersion": 3,
  "name": "lean/testimonials",
  "title": "Lean Testimonials",
  "category": "widgets",
  "icon": "format-quote",
  "description": "Shows testimonials without loading a page builder.",
  "textdomain": "lean-testimonials",
  "attributes": {
    "count": { "type": "number", "default": 3 }
  },
  "supports": {
    "html": false,
    "align": [ "wide", "full" ]
  },
  "editorScript": "file:./index.js",
  "style": "file:./style.css",
  "render": "file:./render.php"
}
The count attribute is the only setting: how many testimonials to show. The three file: paths point to the editor script, the stylesheet and the PHP template.
Step 3: Render the block in PHP
WordPress passes three variables into render.php: $attributes, $content and $block (WordPress 6.1 dev note). This block only needs the first.
<?php
/**
 * @var array    $attributes Block attributes.
 * @var string   $content    Block default content.
 * @var WP_Block $block      Block instance.
 */

$count = isset( $attributes['count'] ) ? absint( $attributes['count'] ) : 3;

$testimonials = get_posts( array(
    'post_type'      => 'testimonial',
    'posts_per_page' => $count,
) );

if ( ! $testimonials ) {
    return;
}
?>
<div <?php echo get_block_wrapper_attributes( array( 'class' => 'lt-grid' ) ); ?>>
    <?php foreach ( $testimonials as $testimonial ) : ?>
        <figure class="lt-card">
            <blockquote>
                <p><?php echo esc_html( $testimonial->post_excerpt ); ?></p>
            </blockquote>
            <figcaption><?php echo esc_html( get_the_title( $testimonial ) ); ?></figcaption>
        </figure>
    <?php endforeach; ?>
</div>
A few choices worth explaining:
- get_block_wrapper_attributes() adds the classes WordPress expects, including alignment, so the block behaves like core blocks.
- Every value is escaped on output. Testimonials come from editors, and you shouldn't trust any stored content blindly.
- The markup is a figure with a blockquote and figcaption. That's one wrapper per card, compared with the nested div layers a builder widget usually adds.
Step 4: Add the editor script without a build step
Most block tutorials start with npx @wordpress/create-block and a webpack build. That's the right call for complex blocks. For a block this small, plain JavaScript using the global wp object is enough, and it keeps the plugin easy for the next developer to read.
First, index.asset.php tells WordPress which editor packages the script depends on:
<?php
return array(
    'dependencies' => array( 'wp-blocks', 'wp-element', 'wp-block-editor', 'wp-components', 'wp-server-side-render', 'wp-i18n' ),
    'version'      => '1.0.0',
);
The build tools normally generate this file. Writing it by hand is fine, as long as the list matches the wp.* globals your script uses.
Then index.js:
( function ( blocks, element, blockEditor, components, serverSideRender, i18n ) {
    const el = element.createElement;
    const { useBlockProps, InspectorControls } = blockEditor;
    const { PanelBody, RangeControl } = components;
    const ServerSideRender = serverSideRender.ServerSideRender || serverSideRender;
    const { __ } = i18n;

    blocks.registerBlockType( 'lean/testimonials', {
        edit: function ( props ) {
            return el(
                'div',
                useBlockProps(),
                el(
                    InspectorControls,
                    null,
                    el(
                        PanelBody,
                        { title: __( 'Settings', 'lean-testimonials' ) },
                        el( RangeControl, {
                            label: __( 'Number of testimonials', 'lean-testimonials' ),
                            value: props.attributes.count,
                            onChange: function ( value ) {
                                props.setAttributes( { count: value } );
                            },
                            min: 1,
                            max: 12,
                        } )
                    )
                ),
                el( ServerSideRender, {
                    block: 'lean/testimonials',
                    attributes: props.attributes,
                } )
            );
        },
        save: function () {
            return null;
        },
    } );
} )(
    window.wp.blocks,
    window.wp.element,
    window.wp.blockEditor,
    window.wp.components,
    window.wp.serverSideRender,
    window.wp.i18n
);
The save function returns null, which tells the editor to store only the block's attributes and leave rendering to PHP (Creating dynamic blocks).
The editor preview uses ServerSideRender, which fetches the real output from the /wp/v2/block-renderer endpoint (ServerSideRender package docs). The WordPress team describes it as a fallback rather than a tool for building new features (Make WordPress Core). For a simple, content-driven block like this one, I think it's a fair trade: the editor and the front end show identical markup, and there's no JavaScript copy of the template to keep in sync.
Step 5: Style it
.lt-grid {
    display: grid;
    gap: 1.5rem;
    grid-template-columns: repeat( auto-fit, minmax( 260px, 1fr ) );
}

.lt-card {
    margin: 0;
    padding: 1.5rem;
    border: 1px solid #e2e4e7;
    border-radius: 8px;
}

.lt-card blockquote {
    margin: 0 0 1rem;
    font-style: italic;
}

.lt-card figcaption {
    font-size: 0.9rem;
    font-weight: 600;
}
That's under 1KB of CSS. In my test on a block theme, WordPress printed it inline in the page head, only on pages where the block appears, so it costs no extra request. Classic themes can opt into per-page block styles with the should_load_separate_core_block_assets filter.
Activate the plugin, add a few testimonials, then insert Lean Testimonials into a page. Use the sidebar to set how many to show.
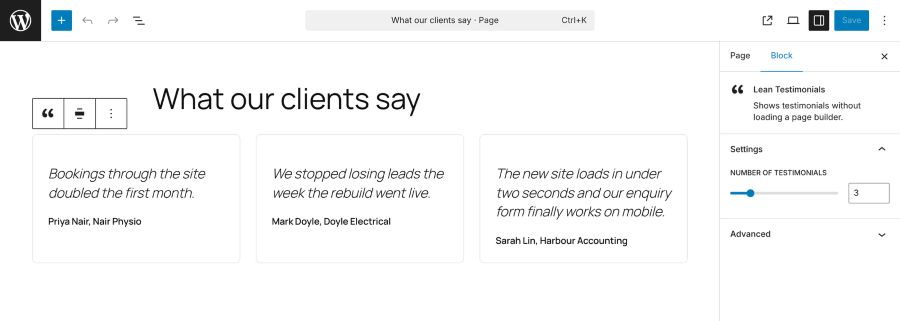
The block in the editor. The preview is rendered by the same PHP template as the front end.
Should you rebuild every widget?
No, and I'd be wary of anyone who says yes without looking at the site first. Converting one widget is an afternoon's work. A site with dozens of builder layouts across hundreds of pages is a migration project, with content to move, templates to rebuild and redirects to check. If that's where you are, it's usually faster and safer to hire a dedicated WordPress developer to plan the order of the migration and rebuild the widgets as blocks, so the site stays live and editable throughout.
If you're doing it yourself, work through the widgets in this order:
- Widgets on your highest-traffic templates, usually the homepage and service pages
- Widgets that pull in a JavaScript library, such as sliders, carousels and lightboxes
- Widgets repeated across many pages, where one block replaces many instances
- Everything else, as pages come up for edits
Measure the difference
Don't take my word for the gains. Measure them on your own site, because themes, hosting and caching all change the result.
- Duplicate the page that uses the builder widget, so you have a before and after on the same server.
- Replace the widget with Lean Testimonials on the copy.
- Open each page in Chrome DevTools, tick "Disable cache" in the Network tab, and reload.
- Note the transferred size, the number of requests and the JavaScript and CSS totals.
- Run both URLs through PageSpeed Insights for lab and field data.
Here's what that looked like when I ran it. I used a clean WordPress 6.9 install with the Twenty Twenty-Five theme. The before page had Elementor 4.5.0 with three Testimonial widgets in one container. The after page had Lean Testimonials showing the same three quotes. I loaded both logged out in Chrome at a 390px mobile viewport. Sizes are uncompressed, so real transfers will be smaller with gzip or Brotli.
| Metric | Elementor, 3 Testimonial widgets | Lean Testimonials block |
|---|---|---|
| Requests | 20 | 5 |
| JavaScript (KB) | 350.5 (11 files) | 65.7 (3 files) |
| CSS (KB) | 61.2 (6 files) | 0.4 (inlined) |
| Total page weight (KB) | 545.7 | 181.9 |
| DOM elements | 176 | 137 |
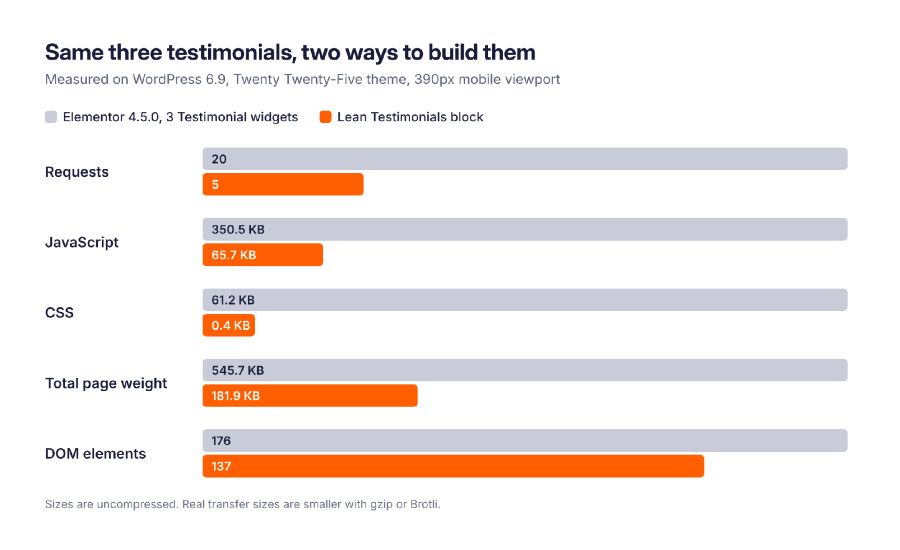
Most of the difference sits in the JavaScript row. The Elementor page loaded jQuery, jQuery Migrate, jQuery UI Core and Elementor's frontend scripts, plus background slideshow and background video modules the page doesn't use. The three scripts left on the block page all come from the theme. The block itself adds no front-end JavaScript.
Your numbers will differ with your theme, hosting and caching plugins. That's why it's worth running the test on your own site before you commit to a rebuild.
If you're replacing a carousel rather than static widgets, you'll also lose the slide animation. In my experience that's rarely missed. A static grid shows every quote at once, and nobody has to wait for slide four to read the best one.
Where to go from here
You now have a working dynamic block, registered from block.json, rendered in PHP and previewed in the editor without a build step. The same six files work as a template for most content widgets: team members, FAQs, logos, case study cards.
A few ways to extend it:
- Add a category attribute and a taxonomy, so different pages can show different testimonials.
- Add a star rating field with register_post_meta(), exposed to the REST API.
- Move to @wordpress/scripts once the editor UI grows past a single settings panel.
Start with the widget that costs you the most, measure it, and keep going one block at a time.
About the author: Fahad Raza has built websites since 2005 and worked in SEO for more than 18 years, including eight and a half years as Country SEO Specialist at IKEA Australia and New Zealand. He runs WordPress Developer Sydney, where he rebuilds slow, page-builder-heavy WordPress sites for established businesses.