
Imagine you've just shipped a feature, or sketched an idea over coffee, and you want a short moving clip to show it off. You don't have a video team, a camera, or an afternoon to spare. What you do have is a sentence describing the thing you pictured. These days, that sentence is already enough.
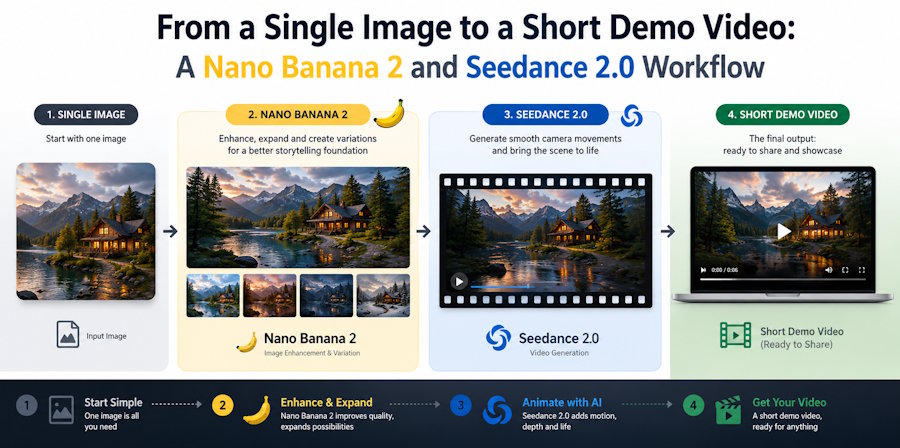
Making a big production for a small job is a common mistake developers make. Sometimes, all you need is a short clip, like 15 seconds. You don't need to go all out for a new screen, a mascot, or a concept shot. Even a hero frame for a landing page can be simple. All you really need is one good still image that you can set in motion. Luckily, there are two AI models that can help you with that: Nano Banana 2 and Seedance 2.0. Nano Banana 2 can create the frame you need, and then Seedance 2.0 can turn it into a video. Here's how you can use them from start to finish.
Start From One Image, Not a Whole Video
It's easy to get carried away and ask a video model to create a whole scene from just a few sentences. But don't do it. When you do, you're giving up control over the one thing that really matters - how the scene is framed. The framing is what makes or breaks the look of the clip, so it's better to keep a handle on it. By resisting the temptation to let the video model have free rein, you can ensure that your clip looks its best.
First, settle on a single still image that you're completely satisfied with. This means finalizing the subject, composition, lighting, and mood, so you'd be happy to share it as a standalone photo. Think of everything that comes after this step as just adding motion to a frame that you already love.
Generate the Still With Nano Banana 2
Nano Banana 2 is the community name for Google's Gemini 3.1 Flash Image model. You describe the frame in plain language and it draws it, no design tool required.
This tool is a great choice for the first step because it has some really useful features. For one, it can handle high-resolution images up to 4K, which is pretty impressive. It also supports a wide range of aspect ratios, from normal ones to more extreme ones like 8:1 and 1:8, which is perfect for creating banners and tall posters. Plus, you can use real-world references to ground your image by turning on the search function. If you already have a product shot or a logo, you can use it as a reference and let the model build around it. The key is to aim for a simple, well-composed frame with a clear subject - a busy image just won't animate as well as a clean one. By keeping it simple, you'll get a much better result in the end.
Write a One-Line Motion Brief
The camera or object being filmed should move in a smooth and intentional way to capture the desired footage.
When it comes to directing a scene, sometimes less is more. For instance, "Slow push-in, steam rising from the cup" or "Gentle parallax across the dashboard, cursor clicking export" can be all the direction you need. By naming the specific camera move and motion, you get a more usable result than a long paragraph describing the feeling of the scene. This approach is especially useful in Seedance 2.0, where a simple line of direction can go a long way. It's all about being concise and clear, allowing the team to focus on bringing the scene to life.
Hand the Image to Seedance 2.0
So you're using Seedance 2.0, which is a video model from ByteDance. What's really cool about this model is that it has an image-to-video mode, which is exactly what you need for this workflow. Here's how it works: you take the still image from the previous step and your one-line brief, and you pass them through the model. Then, it generates a short clip, usually between four to fifteen seconds long, and it can be up to 1080p in resolution. And if you want, it can even add a soundtrack to the clip.
Both models are connected to the same platform, reAPI, which is pretty convenient. One of the best things about this setup is that you don't have to upload files - you can just use public image links instead. This is what makes it so easy to switch between the two models: when you get an image from Nano Banana 2, it's already in a format that you can use directly in Seedance 2.0, without having to download it and then upload it again. You can just copy and paste the link, and you're good to go.
# image_url is the still image produced by Nano Banana 2 in the previous step

video = submit(
    "videos/generations",
    {
        "model": "doubao-seedance-2.0",  # Seedance 2.0
        "prompt": "slow push-in, steam rising from the cup",
        "image_urls": [image_url],       # pass image through directly
        "resolution": "1080p",
        "duration": 5,
    },
)
Choose Length and Resolution Before Style
Don't worry too much about how your video looks at first. Focus on getting the basics right, like how long it is and how clear it is. These two things, duration and resolution, are what will really affect how much time and money you spend on making your video. So, keep them simple while you're still figuring things out. This will save you a lot of hassle in the long run.
Five seconds at a modest resolution is plenty for testing a motion brief. Once the movement reads the way you want, bump the resolution for the final render. Reworking the look on a 1080p fifteen-second clip every time is how a quick demo turns into a slow, expensive one.
Chain Shots for Anything Longer
Normally, fifteen seconds is the maximum length for a single clip, which works well for most demo videos and social media clips. If you need a longer clip, it's better not to try to exceed this limit in a single request.
Imagine you're working with a series of clips, and you want them to flow smoothly into each other. Instead of starting each new clip from scratch, you can use the last frame of the previous one as the starting point for the next. This way, each new shot picks up exactly where the last one left off, creating a consistent look throughout. Seedance 2.0 makes this possible by handing off the final frame of one clip to the next, allowing you to string together multiple shots without any jarring transitions. By doing so, you can create a longer sequence that feels cohesive and polished, rather than a series of disconnected parts. This approach helps to maintain continuity and visual flow, making your final product more engaging and professional-looking.
A Quick QA Checklist
Before you ship the clip, run through this:
- One clear subject in the source frame, with room around it to move.
- A motion brief that names the camera move and the action, not just the vibe.
- The length of the shot is kept as brief as necessary.
- Once you've downloaded the final MP4 file, it's saved to your own storage space. Just a heads up, the output URLs will stop working after seven days.
- Anything factual double-checked by a human. These models produce the plausible, not the verified, so a real place or person or claim needs your eyes on it.
Closing
The key to this process is keeping things simple. You're not making a movie, just taking one concept and turning it into a powerful image using Nano Banana 2. Then, Seedance 2.0 brings it to life for a brief 15 seconds. Your personal style shines through in the frame, and the motion is practically effortless. But what really sets your work apart is the part that no automated tool can replicate - deciding what's worth showcasing in the first place, and that's what truly matters.

