

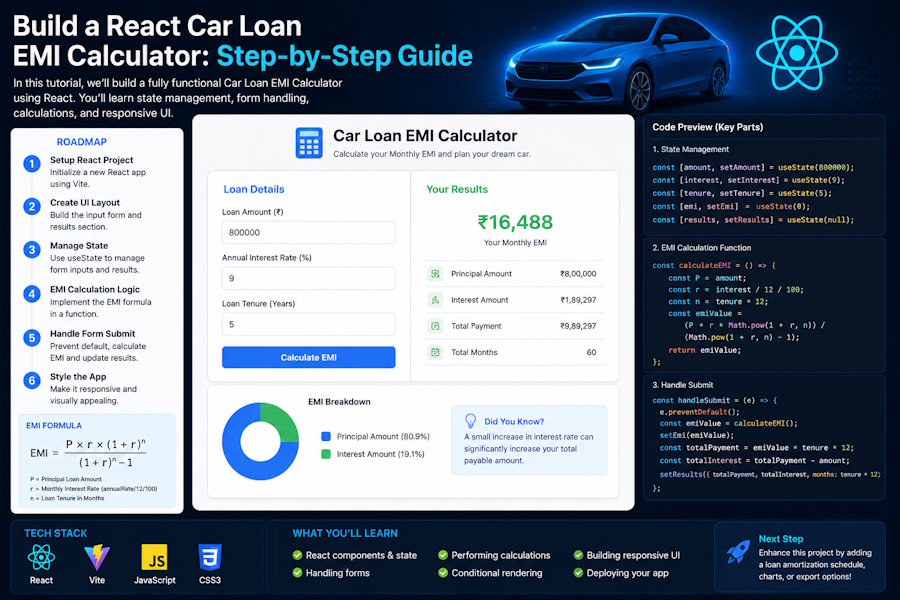
Buying a car is exciting, but the math behind it can get confusing fast. Before signing any paperwork, most buyers want clear answers to a few simple questions: How much will I pay every month? How much interest will I end up covering? How long will the loan actually last? A car loan EMI calculator answers all of this in seconds, and building one yourself is a great way to combine practical coding skills with real financial planning.
React is one of the most popular frameworks for building tools like this because it updates results instantly as users change their inputs, without any page reloads. That instant feedback is exactly what someone needs when comparing financing options for different vehicles whether they're eyeing a compact sedan or a family-friendly SUV like the Nissan Rogue. In this guide, we'll walk through everything needed to build a functional, user-friendly EMI calculator from scratch.
What Is a Car Loan EMI Calculator?
EMI stands for Equated Monthly Installment, the fixed amount a borrower pays every month until a loan is fully repaid. An EMI calculator takes a few basic inputs and instantly shows that monthly payment, making it easier to plan a budget before visiting a dealership.
Several factors influence the final EMI amount:
|
Factor |
Impact on EMI |
|
Loan Amount |
A higher amount increases the monthly payment |
|
Interest Rate |
Higher rates raise the total cost of the loan |
|
Loan Tenure |
A longer tenure lowers the EMI but increases total interest paid |
|
Down Payment |
A larger down payment reduces the loan amount and the EMI |
Anyone shopping for a new vehicle, including popular models like the Nissan Rogue, can use these variables to see how different choices affect affordability.
How Does a Car Loan EMI Formula Work?
At the core of every EMI calculator sits a fairly simple formula:
EMI = P × R × (1+R)^N / ((1+R)^N − 1)
Where:
- P = Loan principal amount
- R = Monthly interest rate
- N = Loan tenure in months
Lenders typically quote interest rates annually, so the calculator needs to convert that into a monthly rate first. Once that conversion happens, React handles the rest recalculating and displaying the updated EMI the moment a user changes any input field.
Features to Include in a React Car Loan EMI Calculator
A useful calculator needs more than just a single output number. Here are the core features worth including:
1. Loan Amount Input lets users enter the vehicle price or the amount they plan to finance.
2. Interest Rate Field allows users to test different rate scenarios based on what lenders are offering.
3. Loan Tenure Selection lets buyers choose a repayment period, such as 36, 48, or 60 months.
4. EMI Result Display shows the estimated monthly payment instantly, without requiring a page refresh.
5. Total Interest Calculation helps users see the full cost of borrowing, not just the monthly figure.
6. Amortization Schedule breaks down each payment into principal and interest, month by month.
Together, these features turn a basic calculator into a genuinely useful planning tool for anyone comparing loan offers for a car like the Nissan Rogue.
Setting Up a React Project for the EMI Calculator
Before writing any calculation logic, set up a clean project structure. Start by creating a new React application and installing any dependencies needed for styling or number formatting.
A simple, organized folder structure might look like this:
src/

 ├── components/

 │     ├── LoanForm.jsx

 │     ├── EMIResult.jsx

 │     └── AmortizationTable.jsx

 ├── App.jsx

 └── index.js
Separating the form, the results display, and the amortization table into their own components keeps the code easy to read and maintain as the project grows.
Building the EMI Calculator Component in React
The next step is creating input fields for the loan amount, interest rate, and loan duration. Each field needs to be tied to React's state so that any change immediately triggers a recalculation.
This is where the useState hook comes in. Every input field gets its own piece of state, and an onChange handler updates that state as the user types. Because React re-renders whenever the state changes, the calculator reflects new values instantly there's no lag between typing a number and seeing the updated result.
Adding EMI Calculation Logic
Once the inputs are wired up, write a function that applies the EMI formula. It takes the loan amount, monthly interest rate, and tenure as arguments, then returns the calculated monthly payment.
The typical flow: the user enters a loan amount, interest rate, and tenure; React runs the calculation function using those values; the result updates on screen instantly, without a separate "calculate" button.
Keeping this logic in a separate function, rather than mixing it into the component, makes it easier to test and reuse elsewhere in the app.
Creating an Amortization Schedule
An amortization schedule shows how each monthly payment splits between interest and principal, and how the remaining balance shrinks over time. It's one of the most valuable additions to any EMI calculator because it shows buyers exactly where their money goes each month.
A typical schedule table includes:
|
Month |
Payment |
Interest |
Principal |
Remaining Balance |
|
1 |
... |
... |
... |
... |
|
2 |
... |
... |
... |
... |
This feature matters because it helps buyers understand more than just the headline monthly number. It shows how much of the early payments goes toward interest versus principal, which makes it much easier to compare different loan terms side by side and make a more informed financing decision.
Improving User Experience and Design
A calculator that works correctly but feels clunky won't get much use. A few design choices go a long way: build a responsive layout that works as well on a phone as on a desktop, use clear labels for every input, format currency values so numbers are easy to scan, and add error handling so the tool doesn't break with unexpected input.
Practical examples include preventing negative loan amounts, showing a warning for unrealistic interest rates, and adding a reset button so users can start over without refreshing the page.
Testing Your React Car Loan Calculator
Before sharing the calculator publicly, test it across a few areas: calculation accuracy (double-check results against manual calculations or trusted references), user input testing (try a wide range of amounts, rates, and tenures for edge cases), mobile testing (confirm the layout works on smaller screens), and performance testing (make sure calculations update quickly even with rapid input changes).
Real-World Example: Planning a Car Purchase
Say a buyer is planning to finance an SUV and wants to compare a few scenarios before deciding. They can use the calculator to test different loan amounts, repayment periods, and interest rates side by side.
For example, someone researching a vehicle such as the Nissan Rogue can browse listings on a site like Autocram to get a sense of current pricing, then plug that number into the calculator, adjust the down payment, and try a few loan terms to see how the monthly EMI shifts. This hands-on comparison makes it easier to figure out what's actually affordable before stepping into a dealership, and it also helps buyers get a realistic sense of Nissan Rogue price ranges across different trims.
Frequently Asked Questions
Can React be used to build financial calculators?
Yes. React's component-based structure and state management make it well suited for interactive tools like EMI calculators, budget planners, and other finance-related apps that need to update results in real time.
What information is needed for a car loan EMI calculator?
At minimum, you need the loan amount, the interest rate, and the loan duration. These three inputs are enough to calculate a monthly payment using the standard EMI formula.
Is EMI calculation accurate?
An EMI calculator gives a close estimate based on the numbers entered, but the final payment amount can vary slightly depending on the lender's specific terms, fees, and rounding practices.
Can I add an amortization schedule to a React calculator?
Yes. By generating monthly payment data through a loop or recursive function, you can display a full month-by-month breakdown of principal, interest, and remaining balance.
How can I improve calculator performance?
Optimizing state updates, avoiding unnecessary re-renders, and breaking the interface into small, reusable components all help keep the calculator fast and responsive, even with frequent input changes.
Conclusion
Building a car loan EMI calculator in React is a practical project that blends programming with everyday financial planning. It gives users a fast, interactive way to understand what a car loan will actually cost them each month, long before they sit down at a dealership. Adding features like an amortization schedule and real-time calculations makes the tool even more valuable, since it shows exactly where each payment goes over time.
Whether someone is comparing financing options for a Nissan Rogue or any other vehicle, tools like this make it much easier to walk into a purchase with confidence and modern web technologies like React are what make building them approachable for developers at almost any skill level.

