

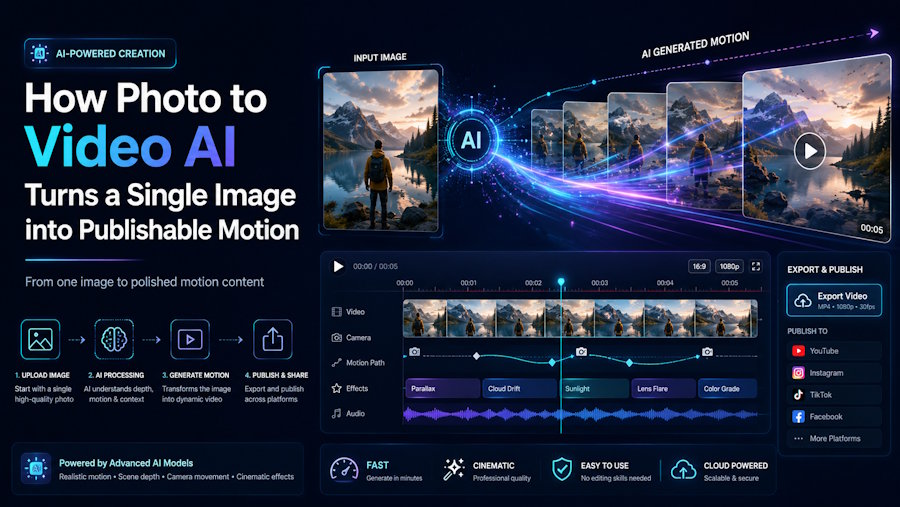
A strong photograph can capture attention, but motion often holds it longer. The challenge is that producing even a short video traditionally requires footage, editing software, and time. That workload is difficult to justify when you only need a product clip, animated portrait, or social media post.
Photo to Video AI offers a more direct workflow. You begin with one still image, describe how the scene should move, and let an AI video model generate the surrounding frames. The approach doesn’t replace every part of video production, but it creates a practical bridge between a static photo and a short, usable MP4.
Real-World Photo to Video AI Scenarios
The value of Photo to Video AI becomes clearer when you connect it to a specific publishing goal. Different users may start with the same kind of file, yet need very different movement, framing, and output settings.
The Small Product Seller
Imagine you sell watches, shoes, skincare products, or handmade accessories online. You already have clean product photography, but your listing pages and social feeds feel static. Organizing a new video shoot for every product variation would quickly consume your marketing budget.
Photo to Video AI lets you turn an existing product shot into a short showcase. A focused prompt such as “slow camera push-in, soft studio reflections moving across the bottle, product remains centered” gives the model a restrained direction. Gentle movement is usually more suitable than asking the product to spin, float, change shape, and move through several environments at once.
A square 1:1 output can fit a product page or carousel, while a 9:16 version works better for Reels and TikTok. Because each generation starts with one image, you can prepare separate clips for individual products instead of forcing an entire catalog into one video.
The Solo Social Media Creator
What if you create content alone and need several posts each week? Your photo library may contain strong portraits, landscapes, food shots, and illustrations, but learning a full animation suite can slow down your publishing schedule.
You can use Photo to Video AI to add a small head turn, drifting hair, moving clouds, changing light, or a controlled camera pan. For a portrait, a prompt such as “gentle blink, slight head movement, soft breeze, slow camera push-in” is more predictable than a complex action sequence.
The output format matters as much as the motion. Vertical 9:16 video suits short-form feeds, while 16:9 works for YouTube, presentations, and wider advertising placements. Choosing the destination before generation reduces the need to crop important parts of the image later.
The Family Photo Keeper
You may have an old portrait that carries emotional value but has no accompanying footage. The goal here isn’t dramatic animation. You want a subtle moment that keeps the person recognizable and respects the original image.
Start with the sharpest available scan and keep the main face prominent. A direction such as “subtle breathing, gentle blink, warm light shifting slowly, locked camera” asks for limited motion. Restrained prompts help reduce changes to facial structure, clothing, or background details.
Results can still vary because the model must invent frames that never existed. Group photographs, covered faces, heavy compression, and large requested movements are less predictable. Treat the generated clip as a creative interpretation rather than a recovered historical recording.
The Marketing Team Reusing Campaign Photography
A marketing team often owns polished campaign images but lacks matching video for every placement. Producing separate footage for landing pages, email campaigns, display ads, and vertical social posts can multiply costs.
Photo to Video AI can create several motion tests from the same approved photograph. One version might use a slow zoom for a landing-page hero, while another uses gentle environmental movement for a social advertisement. Keeping the source and prompt consistent also makes it easier to compare models.
This workflow is particularly useful during concept development. The team can evaluate motion direction before committing to a larger production, then use conventional editing software to add captions, music, brand graphics, or multiple clips.
Benefits Mapped to Each Scenario
Each example solves a different problem, but they share one advantage: existing visual assets gain another possible format.
- For product sellers: Photo to Video AI can extend the value of product photography without requiring a new shoot for every short clip. Controlled motion helps keep attention on the product rather than an elaborate scene.
- For solo creators: The workflow makes it possible to test several motion ideas without manually animating every frame. Model-specific aspect ratios also help you prepare content for different channels.
- For family-photo keepers: Gentle prompts provide a way to create an expressive interpretation while keeping movement intentionally limited. A clear source image and locked camera direction can support more stable results.
- For marketing teams: Multiple models and visible settings make structured experimentation easier. Teams can review the generation cost before each attempt and compare outputs under similar conditions.
A Practical Photo to Video AI Workflow
Begin with a sharp, well-lit image in JPG, PNG, or WEBP format. Keep the main person or object large enough to identify, and avoid a crowded background when possible. You should also confirm that you have permission to upload and use the photograph, especially when it contains a recognizable person or protected brand material.
When the image is ready, open Photo to Video AI and create an account. Anonymous generation isn’t supported, but a new account receives 60 credits without requiring a payment card. Registration-credit videos include an evaluation watermark, while paid plans provide watermark-free downloads and commercial-use rights under the site’s terms.
Upload one image for the generation. The photo already provides the subject, composition, palette, and lighting, so your prompt should concentrate on time and motion. Describe what the subject does, how the camera moves, and what changes in the atmosphere.
For example, “A red sports car on a neon street” mostly repeats visible information. A stronger motion prompt would be “car accelerates forward, neon reflections slide across the body, low tracking camera, light rain.” If the result changes the vehicle’s shape or logo, simplify the direction and test one adjustment at a time.
Next, choose a model according to the control you need. The available studio configuration includes Google Veo 3.1 Fast and Quality, Kling 2.6 and 3.0, ByteDance Seedance variants, Gemini Omni Video, HappyHorse, and LTX 2.3 models. Availability and controls differ by model, so you should read the settings shown for the active selection instead of assuming every model supports the same parameters.
Veo 3.1 Fast uses an eight-second output in the current workflow and offers Auto, 16:9, and 9:16 aspect-ratio controls. It is the default model for the image-to-video task, making it a straightforward starting point when you want a simple reference-image workflow.
Kling 3.0 provides more granular duration control from three to fifteen seconds. Its interface includes 16:9, 9:16, and 1:1 ratios, a sound toggle, and Standard, Professional, and 4K modes. When an image acts as the first frame, its ratio can determine the resulting composition.
Seedance 1.5 Pro exposes four-, eight-, and twelve-second durations. It supports 480p, 720p, and 1080p resolution, plus 1:1, 4:3, 3:4, 16:9, 9:16, and 21:9 ratios. You can also switch generated audio on or off and choose between a dynamic camera and a locked lens.
These are model-specific controls, not universal promises. Higher resolution, longer duration, audio, and premium modes may increase the credit cost. Photo to Video AI recalculates that cost before generation, allowing you to review the charge before starting the job.
For early experiments, use the shortest practical duration and a lower-cost setting. Look at the face, hands, product outline, label, background edges, and motion path. If one element drifts, revise only the relevant part of the prompt rather than rewriting everything.
Once the output is complete, download the MP4 and prepare it for its destination. Photo to Video AI is focused on generation rather than timeline editing, so captions, multi-clip assembly, music mixing, and detailed branding may still require a separate editor. Credits charged for a failed generation are returned automatically.
Turning One Good Photograph into More Useful Content
Photo to Video AI makes the most sense when you already have an image worth preserving. The photograph remains the visual anchor, while the prompt and selected model define how that frozen moment develops over time.
A clean source, a focused motion instruction, and a deliberate output format matter more than an overloaded prompt. Whether you are animating a product, portrait, campaign asset, or personal memory, start with restrained movement and evaluate the result carefully. The technology lowers the production barrier, but your judgment still turns generated motion into useful content.

