

The first AI video attempt often feels productive. You type a prompt, wait a few minutes, and get something that moves. The trouble begins on the second attempt. Was the new result better because the model changed, because the prompt changed, or because the generator simply returned a luckier variation?
That question matters when each render costs credits and the final deliverable needs more than novelty. A usable product shot must preserve the product. A character clip must not change the face halfway through. A scene with dialogue needs sound that belongs to the action. Without a repeatable AI video workflow, it is easy to spend most of the budget learning nothing.
The solution is not to find one model and use it for everything. It is to make each test answer a specific question. The AI video process below is the one I use when comparing models or preparing a short sequence for a real project.
Write the shot before choosing the model
AI video model names are a distraction at the beginning. Start with a shot brief that could be handed to a camera operator. It should describe what the viewer sees, what changes during the shot, and what must remain stable.
Here is a workable example:
A seven-second, 16:9 product shot of a matte-black hand grinder on a walnut counter. Morning light enters from the left. The camera makes a slow 20-degree orbit while three coffee beans roll into frame. No hands, labels, cuts, or background movement.
This brief is intentionally plain. It has one subject, one camera move, one secondary action, and a short list of constraints. Phrases such as “stunning,” “epic,” and “cinematic masterpiece” add enthusiasm, but they do not tell a model where the camera should go or which object must stay unchanged.
A clear brief also makes the AI video workflow measurable. You can check whether the grinder kept its shape, whether the light came from the correct side, and whether the camera movement was slow enough. “Does it look cool?” is much harder to compare.
Use a reference frame when appearance matters
Text-to-video is useful when you are exploring an idea and can tolerate visual surprises. It is less reliable when the starting composition already matters. If the clip features a product, mascot, room, or recurring character, create and approve a still frame first.
The still acts as a small creative contract. It fixes the subject’s proportions, the lens position, the palette, and much of the lighting before motion is introduced. Instead of asking the video model to invent both the design and the movement at once, you give it a visual starting point and ask it to solve a narrower problem.
For a browser-based process, you can create AI images from text prompts, choose the frame that best matches the brief, and use that image as the input for the video test. Keep the source image at the same aspect ratio as the intended clip. A vertical image forced into a landscape generation usually creates awkward cropping or unwanted background invention.
Do not over-finish the frame. Tiny text, intricate logos, and delicate repeating patterns are common failure points once motion begins. If a label must remain exact, it is often safer to add it later during editing.
Change one variable at a time
A fair AI video comparison is closer to a controlled test than a prompt contest. Use the same input image, shot brief, duration, aspect ratio, and approximate resolution. Then change only the model.
Save each output with a useful name rather than “final-7.mp4.” A filename such as grinder-orbit-modelA-test01.mp4 tells you what you are looking at weeks later. Record the settings beside it. A small spreadsheet with model, prompt version, duration, resolution, generation time, cost, and notes is enough.
Review the clips against a fixed scorecard:
- Subject fidelity: Did the object or character keep its defining features?
- Motion: Did the requested action happen at the right speed and in the right direction?
- Camera: Was the movement deliberate, or did the frame drift?
- Continuity: Did lighting, geometry, and background details remain stable?
- Usable seconds: How much of the clip could actually survive an edit?
The last measure is more valuable than general visual quality. A beautiful eight-second render with two clean seconds may be less useful than a quieter result that stays coherent for six.
Test cheaply, then spend on the keeper
High resolution does not rescue a weak shot. It only produces a more detailed version of the same bad composition or broken movement. Early AI video tests should use the lowest practical resolution and a short duration. At that stage, you are checking direction, not polishing pixels.
Once the composition works, make one targeted revision at a time. If the grinder changes shape, strengthen the instruction about preserving its geometry. If the beans move too aggressively, specify a short, gentle roll rather than rewriting the entire prompt. Keeping successful parts unchanged helps you understand which instruction fixed the problem.
Only raise the resolution after the shot has passed the basic review. This makes the AI video workflow cheaper and easier to diagnose. It also prevents a common mistake: keeping an expensive render simply because it was expensive.
Judge motion, image quality, and sound separately
One model may produce convincing physical movement but soften the product details. Another may preserve the frame beautifully while making the camera feel mechanical. A third may generate useful ambient sound but introduce visual instability. Compressing those differences into a single “best model” score hides the information you need.
Review the clip once with the sound off. Watch the edges of the subject, contact points, reflections, hands, and background lines. Then listen without paying much attention to the picture. Does the room tone fit the space? Does an impact sound occur when the impact is visible? Is dialogue understandable, and does it belong in the scene?
If sound will be replaced in the edit, do not let impressive generated audio outweigh weak visuals. If synchronized dialogue or environmental sound is central to the concept, evaluate it as a first-class AI video requirement from the start. The model should follow the job, not the other way around.
Keep related work in one place
AI video comparisons become messy when the reference image lives in one tool, three test clips live in three more, and the prompts are scattered across browser tabs. A consistent naming system helps, but so does reducing unnecessary handoffs.
Using Froging AI’s multi-model creative platform lets a creator move between image and video generation without rebuilding the project context for every test. The point of a shared workspace is not that every model behaves the same. It is that the surrounding process—inputs, prompt versions, previews, and downloaded outputs—can stay understandable while the model changes.
Even then, keep a local project folder. Save the approved reference frame, the exact prompt, selected outputs, and a short text file explaining why the final clip won. Cloud history is convenient; a clear project archive is dependable.
Build the edit from short, reliable shots
Trying to generate an entire advertisement or story in one AI video prompt gives the model too many decisions. Break the idea into shots with distinct purposes: an establishing view, a product detail, an action, and a closing frame. Five controlled clips are easier to repair than one ambitious sequence with a failure in the middle.
This approach also makes continuity work more practical. Reuse the same approved reference, character description, wardrobe, light direction, and camera vocabulary. When a shot fails, regenerate that shot rather than disturbing the rest of the sequence.
Leave titles, accurate product copy, subtitles, and final sound mixing for the editor. Generation is good at creating visual material. Editing is where timing, factual accuracy, and brand control become deliberate.
A useful test produces a decision
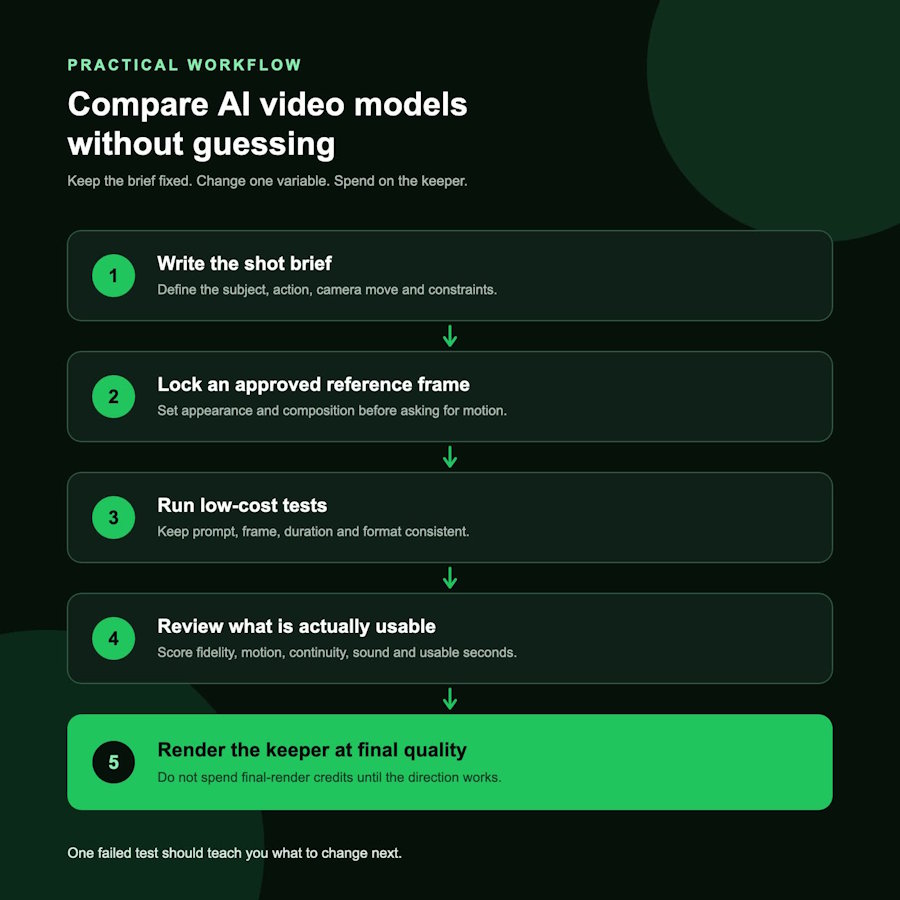
The goal of an AI video workflow is not to generate more clips. It is to reach a defensible decision with fewer wasted renders. Begin with a shot that can be evaluated. Lock the appearance with a reference frame when needed. Compare models under the same conditions, review separate qualities separately, and increase cost only after the direction works.
The winning AI video model may change from one shot to the next. That is not a flaw in the process; it is the reason to have a process. Once every test answers a clear question, model choice becomes less about hype and more about the footage you can actually use.

