

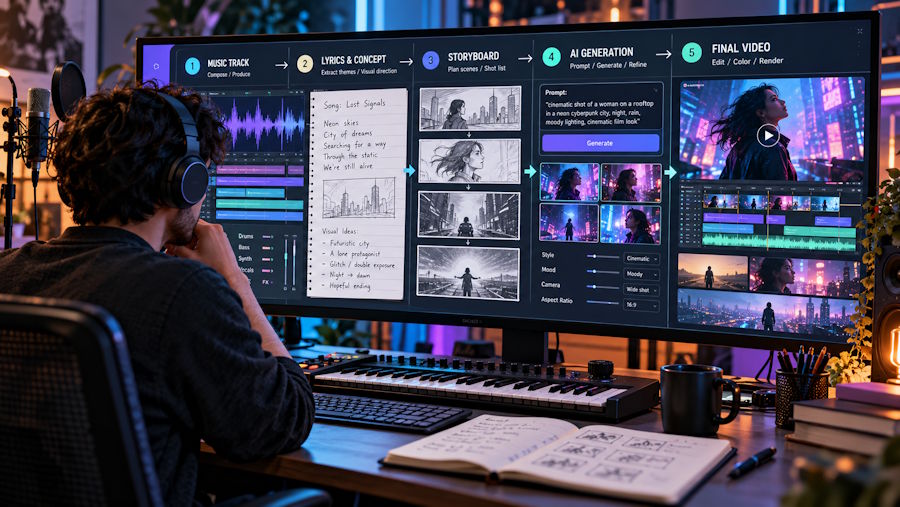
A music video can look impressive and still feel disconnected from its soundtrack. A cut arrives before the chorus, the main character changes between scenes, or captions obscure the face. Generating more footage rarely fixes these problems. A useful workflow starts with the song, translates its structure into visual decisions, and ends with a deliberate review of the exported file.
For independent musicians and creators, AI can reduce the work involved in producing those visuals. The creative brief still matters. Treat the video as a small production with clear inputs, a consistent visual language, and a checklist for delivery.
1. Define the output before choosing the visuals
Decide where the video will appear and what it needs to accomplish. A full release video gives a story time to develop. A short preview needs to communicate its mood almost immediately. A looping visualizer may work best with one composition and restrained movement.
Choose the aspect ratio early: 16:9 for a conventional widescreen video, 9:16 for a vertical feed, or 1:1 for a square composition. These formats need different framing. A wide shot with two people at opposite edges can lose its meaning when cropped vertically. Keep the important subject readable at the size viewers will actually see.
2. Prepare one reliable audio source
Use the final audio master you intend to publish. Replacing it later can shift vocal entries, transitions, and the ending. An MP3 or WAV export gives you a straightforward source to check before generation. Listen through it once for silence, clipping, accidental count-ins, and an abrupt tail.
Keep a simple project folder containing the audio, approved lyrics, visual references, and exports. Use descriptive filenames such as night-drive_master_v03.wav and night-drive_vertical_v02.mp4. This small habit helps prevent the wrong mix from reaching the final video.
Also confirm that your permission covers the intended use of the recording and composition. Being able to import a track does not establish the right to publish a video with it. Keep any relevant licenses alongside the project files.
3. Map the song into visual sections
Listen for changes in the arrangement rather than marking every beat. Note the intro, verse, chorus, bridge, and outro, then write one sentence describing the visual role of each section. A verse might introduce a location; the chorus might reveal a larger space or introduce more movement.
For example, a track about leaving home could begin in a quiet room, move through an empty street, and open into a bright landscape at the chorus. The locations support the emotional progression without requiring every lyric to become a literal picture.
Use timestamps as planning notes, not rigid instructions for a cut on every beat. Constant cutting can make a slow song feel restless. Let some shots continue across several musical phrases, and reserve stronger changes for moments that deserve emphasis.
4. Write a compact visual brief
A brief should specify the subject, setting, palette, lighting, and movement. Limit the number of ideas competing in each scene. A prompt asking for a close-up, a sweeping aerial shot, a costume change, and an explosion at once leaves too much to interpretation.
A more focused direction might read: “A lone cyclist in a yellow raincoat travels through a quiet coastal town at dawn. Muted blue surroundings, warm window lights, gentle forward movement, and a reflective mood. Keep the raincoat and bicycle consistent across scenes.”
Separate permanent details from details that may change. The character's clothing and the overall palette can remain fixed while locations and camera distance vary. This gives the video continuity without making every shot identical. Avoid relying on generated signs or small text to explain the story; those details are easy to distort.
5. Match the tool to the workflow
General video generators and music-focused tools solve different parts of the production. A general tool may suit a creator who wants to assemble individual shots manually. A music-focused workflow can be useful when the starting point is an existing song and the goal is a finished visual accompaniment.
SongScene is one example of an AI music video generator built around that starting point. Its published workflow lets users add music, choose a style and aspect ratio, and generate a video. For a creator evaluating it, a useful first test is whether the chosen visual direction fits the track and whether the exported composition works on the intended screen.
Compare tools using the same brief and audio excerpt where supported. Check the available duration, export resolution, watermark rules, and revision costs before committing to a full production. A polished demo is less informative than a test using your own material.
6. Review timing, continuity, and lyrics separately
Watch the result in three passes. First, listen while watching the overall rhythm: do scene changes support the arrangement, and does the ending resolve naturally? Second, inspect visual continuity: look for changes in faces, clothing, props, lighting, and the direction of movement.
Third, check every lyric caption against your approved text. Sung words can be difficult to transcribe, especially with layered vocals, unusual names, or heavy effects. Read captions at phone size and check whether they appear early enough to follow comfortably. Leave space around them for platform controls.
When something fails, identify the specific cause before regenerating. “The chorus needs a wider shot with more movement” is actionable. “Make everything more cinematic” is difficult to evaluate. Where the tool supports targeted revisions, fix the weak section while retaining material that already works.
7. Check the exported file before release
Review the actual downloaded file, not only the in-app preview. Confirm the aspect ratio, audio start, caption placement, and final frame. Watch it once on a phone with sound and once without sound. The first pass checks the musical experience; the second shows whether the imagery and text remain understandable.
Keep the approved export and its production notes together. For the next release, reuse the process: prepare the audio, map the song, define the visual language, and review the result. Consistency comes from making those decisions clearly, then using generation to put them on screen.

