
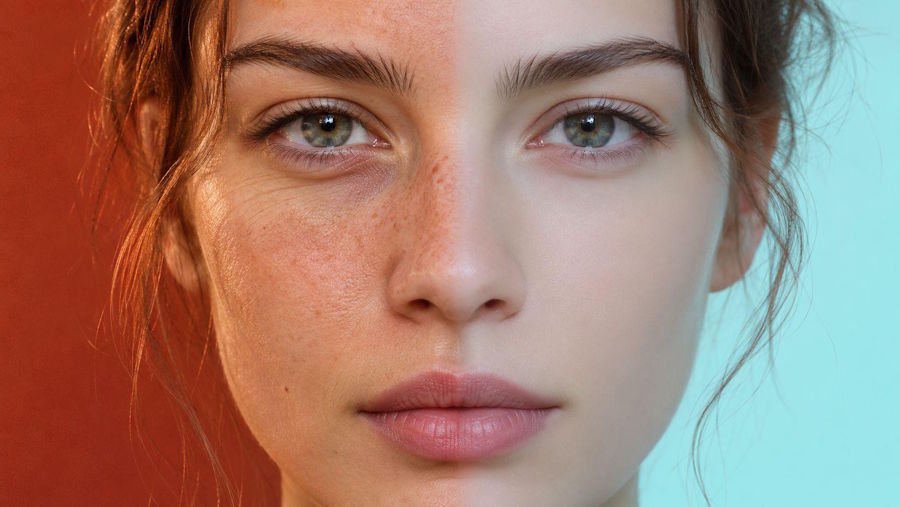
It looks better now. The blemish is removed. Yet the cheeks have the texture of candle wax. It passes the test at the thumbnail scale. At 100% scale, the flaw shows itself.
Start with examining what your photo editing dataset actually trains: do the processed targets preserve the pores, wrinkles, and tonal differences, or is "processed" synonymous with "smooth"? Before and after pairs can help determine that. Even a decent target cannot prevent the damage done through scaling, inference parameters, or face restoration layer afterwards.
The question to ask is what stage the texture was stripped off. Find out that first, before losing more nights in training.
Define what “plastic” means before changing anything
The plastic-like appearance of the skin may indicate various problems. Detail may be lost while the overall face contours remain sharp. Highlights may become overly wide and shiny. The freckles may be lost or artificial pores may emerge in places where there were no pores in the original image.
Different problems require different solutions. Note if the failed images have suffered from texture loss, invented textures, modified face shape, or incorrect lighting. If the model removes wrinkles when adjusting exposure, it has failed to follow the editing instructions.
A useful starting point is a collection of 24 held-out portraits with various ages, skin types, lighting conditions, and face sizes. Use it to find out the failures prior to creating a large testing set. Below are sample numbers and parameter ranges for debugging; not the benchmark. Be sure to include hard cases and portraits that are barely in need of any editing.
Compare identical crops in 100% and final sizes. Zooming everything to 400% may lead the reviewer to ignore the actual defects of images.
Check whether your targets already have the problem
The portrait may be professionally polished but remain inappropriate for your ideal candidate. There are varying degrees of acceptable smoothing in editorial beautification, regular headshots, and documentary portraits. Combining these into one guideline results in the desired outcome being undefined.
Audit 50 randomly selected training pairs initially. Compare the texture preservation, alteration of permanent features, and consistency of the desired modification. Increase the number of audits if problems cluster.
Include an acceptance guideline for reviewers to use: “Eliminate temporary flaws, but retain pores, freckles, wrinkles, and facial contour.” Include visual samples of appropriate and overused retouching. The term “natural skin” is too vague for reviewers.
Synthetic training pairings should also receive equal scrutiny. HQ-Edit, introduced at ICLR 2025, consists of about 200,000 edits produced via a process involving GPT-4V and DALL-E 3. It showcases the size of synthetic editing dataset, but its general editing performance is not enough to prove skin-texture fidelity for your project.
You can differentiate between your synthetic and photographic examples in your manifest to be able to test them independently rather than speculate about generated targets bringing specific finishes.
Inspect the images your training loader actually sees
A clean source folder becomes irrelevant when the information is removed from the training data during the preprocessing phase.
Assume that the face occupies 240 pixels in a 2048 pixel-wide picture. Scaling down the image to 512 pixels causes the face to occupy just 60 pixels. Cropping the image into a square of 60 pixels results in 3600 pixels as against 57600 – a reduction of sixteen times.
After each step of preprocessing, save a tiny dataset. Compare decoded original files, resized images, image augmentations, and the actual tensor converted into an image again. Make sure the inputs and targets are equally transformed spatially.
Call this utility function from the loader to save a single RGB input-target file pair beside each other. It is dependent on NumPy and Pillow packages. This function should be called twice for the same sample ID.
from pathlib import Path
import numpy as np
from PIL import Image

def save_pair(source, target, path, value_range=(0.0, 1.0)):
    # Expect RGB NumPy arrays with shape [3, H, W].
    source, target = np.asarray(source), np.asarray(target)
    if source.shape != target.shape:
        raise ValueError("Source and target shapes differ")
    lo, hi = value_range
    if hi <= lo:
        raise ValueError("Invalid value range")
    def to_image(tensor):
        if tensor.ndim != 3 or tensor.shape[0] != 3:
            raise ValueError("Expected an RGB array: [3, H, W]")
        values = np.clip((tensor.astype(np.float32) - lo) / (hi - lo), 0, 1)
        pixels = np.rint(values * 255).astype(np.uint8)
        return Image.fromarray(pixels.transpose(1, 2, 0))
    left, right = to_image(source), to_image(target)
    canvas = Image.new("RGB", (left.width * 2, left.height))
    canvas.paste(left, (0, 0))
    canvas.paste(right, (left.width, 0))
    path = Path(path)
    path.parent.mkdir(parents=True, exist_ok=True)
    canvas.save(path)
Pass unbatched arrays as save_pair(source, target, "debug/resize_001.png"). Make sure to convert PyTorch tensors to numpy by using .detach().float().cpu().numpy(). Set value_range=(-1.0, 1.0) for [-1, 1]-range arrays; per-channel normalization requires a separate inverse transform. Left image is the source, right – target. Equally sized doesn't mean correctly aligned. Examine fixed facial keypoints and stable areas on all stages of processing.
If independent cropping and flipping of both images in a pair is applied, then correspondence is broken. A face cheek in the input won't correspond to the same area on the target. Don't take it for granted that it will work because of the same seed used in both processes.
For latent pipelines, also check encode/decode cycle without any edits. If there is no texture even at this stage, then problem could be with the autoencoder itself, resolution or inputs. Up-sampling layer could create good details on the later stage, but that doesn't mean they were there initially.
Separate training damage from inference strength
Diffusers’ fine-tuning documentation for text-to-image model clearly indicates that the fine-tuning process is prone to overfitting and catastrophic forgetting.
Check base checkpoint vs. early, mid, and late checkpoints under the same inputs and inference parameters. If earlier checkpoints have texture and the latter checkpoints don’t, check training time, learning rate, and example ratio.
If doing LoRA fine-tuning, check impact of adapter separately. The official documentation mentions adapter scaling that can be set to zero for base weight usage in the supported mode. Use API of your pipeline; the controls may vary.
Here is isolation procedure:
| Comparison | Keep fixed | What the result suggests |
|---|---|---|
| Base versus tuned model | Input, prompt, seed, resolution | Whether fine-tuning introduced the defect |
| Early versus final checkpoint | Same inference configuration | Whether later training worsened preservation |
| LoRA scale 0, 0.5, 1.0 | Checkpoint and other controls | Whether the defect increases with adapter influence |
| Restoration off versus on | Same generated image | Whether post-processing causes the damage |
| Full frame versus face crop | Comparable edit and settings | Whether face resolution is a bottleneck |
If lower adapter influence improves skin but also removes the requested edit, the trade-off remains unresolved.
Test denoising without importing someone else’s settings
Strength in classic image-to-image diffusion pipelines limits how far generation can drift from the initial. Diffusers notes that greater strength increases noise; lesser strength usually makes the output resemble the initial more. It gives an example of 50 inferences and a strength of 0.8 resulting in 40 denoise iterations.
A possible strength for a suitable pipeline would be 0.2, 0.4, and 0.6, keeping other factors such as guidance, steps, and prompts constant. Evaluate both texture and edit quality. Output from a low-strength edit that retains all pores but doesn’t fix exposure issues is a poor edit.
Don’t transfer these values directly into instruction-guided editors, since some have separate image guidance and text guidance; others don’t use any strength parameter.
Another aspect of the current editing process workflow is instruction-based and iterative editing techniques. According to Black Forest Labs, FLUX.1 Kontext dev provides iterative editing and character retention. This makes sequential portrait testing possible, but character retention alone is not evidence of pore-level retention.
Conduct a test with a realistic workflow: exposure correction, changing the background, and adjusting the colors of the clothing. Observe the results for the face in each step of this process. If this is supported by your system, conduct another comparison between the workflow and a single edit of the original image.
Turn off the helpful extras
Output the unprocessed output of the model prior to face restoration, beautification filtering, sharpening, and final compression. Assess them independently at each step.
CodeFormer gives a perfect example of the importance of “enhancement” scrutiny. In its official implementation, the CodeFormer algorithm offers a fidelity weight between 0 and 1. Low numbers are said to prioritize visual quality, whereas high ones prioritize fidelity.
The restoration model can create an acceptable face while modifying parts that need to stay as is. The case of a natural output and a waxy face after restoration requires another round of training in the wrong phase.
Masks are another thing to inspect. The background substitution does not need to be performed on the whole face when the pipeline enables a precise local change. The mask areas need to be examined carefully to see whether the hair, ears, and jaw are correctly covered by a feathered mask.
Measure preservation without rewarding a failed edit
Whole image similarity can mask damage to faces because of how much the background may be filling up the image. Whole image similarity can also encourage a system to leave the photo untouched.
Assess each improvement separately. For the 24 debugging images, utilize a simple checklist form:
| Review dimension | Pass criterion |
|---|---|
| Edit completion | The requested correction is clearly achieved |
| Skin detail | Visible source texture remains where preservation is required |
| Identity and age cues | Features and permanent marks remain consistent with the brief |
| Protected regions | Areas outside the intended edit remain acceptably unchanged |
| Artifacts | No repeated pores, halos, patchy smoothing, or mask seams |
Reporting goes hand-in-hand with percentages. "Six of 24 portraits did not pass the texture test" tells us much more than just "75% passed." In this small sample, one portrait changes the percentage by roughly 4.2 points.
If gradient and high frequency are used, use them to flag images for verification. Noise and sharpening will boost these values without making skin realistic. Reference-based comparison of pixels also requires careful alignment.
Use a different person to assign scores to borderline cases without access to the name of the checkpoint. Otherwise, an affinity for smooth skin will quietly become the criterion of quality.
Make the next run answer one question
Select from the early steps that failed for the next test. If the images are already smooth, update the targets and acceptability criteria. If the problem is caused by the preprocessing step, modify the sampling or resolution. In case the failure occurs in the later stages, compare the smaller iterations.
Store the input, the target if available, the prompt, the seed, the checkpoint used, the adapter parameters, the intermediate output, and evaluate the results. A debugging process for the image editor will be easier to perform in the situation when all failed portraits correspond to a certain configuration.
Prior to confirming the fix, run problematic portraits and low-edit images again and ensure that the fix request is implemented correctly. The fix release candidate must finish the edit without destroying recognizable skin features.